Most pilots are never really taught how to land an airplane. The normal teaching method is little better than the pithy old saying, "The art of landing is throwing yourself at the earth and just barely missing." Hardly helpful. The way most pilots treat landings, it is an art. They get themselves over the runway, somehow, pull back the power and yoke, and somehow judge when their wheels are just over pavement. Magic.
— James Albright
Updated:
2024-02-15
I don’t think anything in aviation has to be reduced to art; it is a science. Let’s analyze the landing that way. I believe this will make your landings not only safer, but more pleasing to the paying customers in back. I think the individual techniques are simple but hard to explain. I like to attack this every few years because it really is fundamental. This update includes better graphics and a more streamlined explanation.
1
A note about perspective
First: a note about perspective. Most illustrations about glide path are exaggerated. To understand why, consider an airplane on final approach at 1 nautical mile on a 3-degree glide path using the correct perspective:
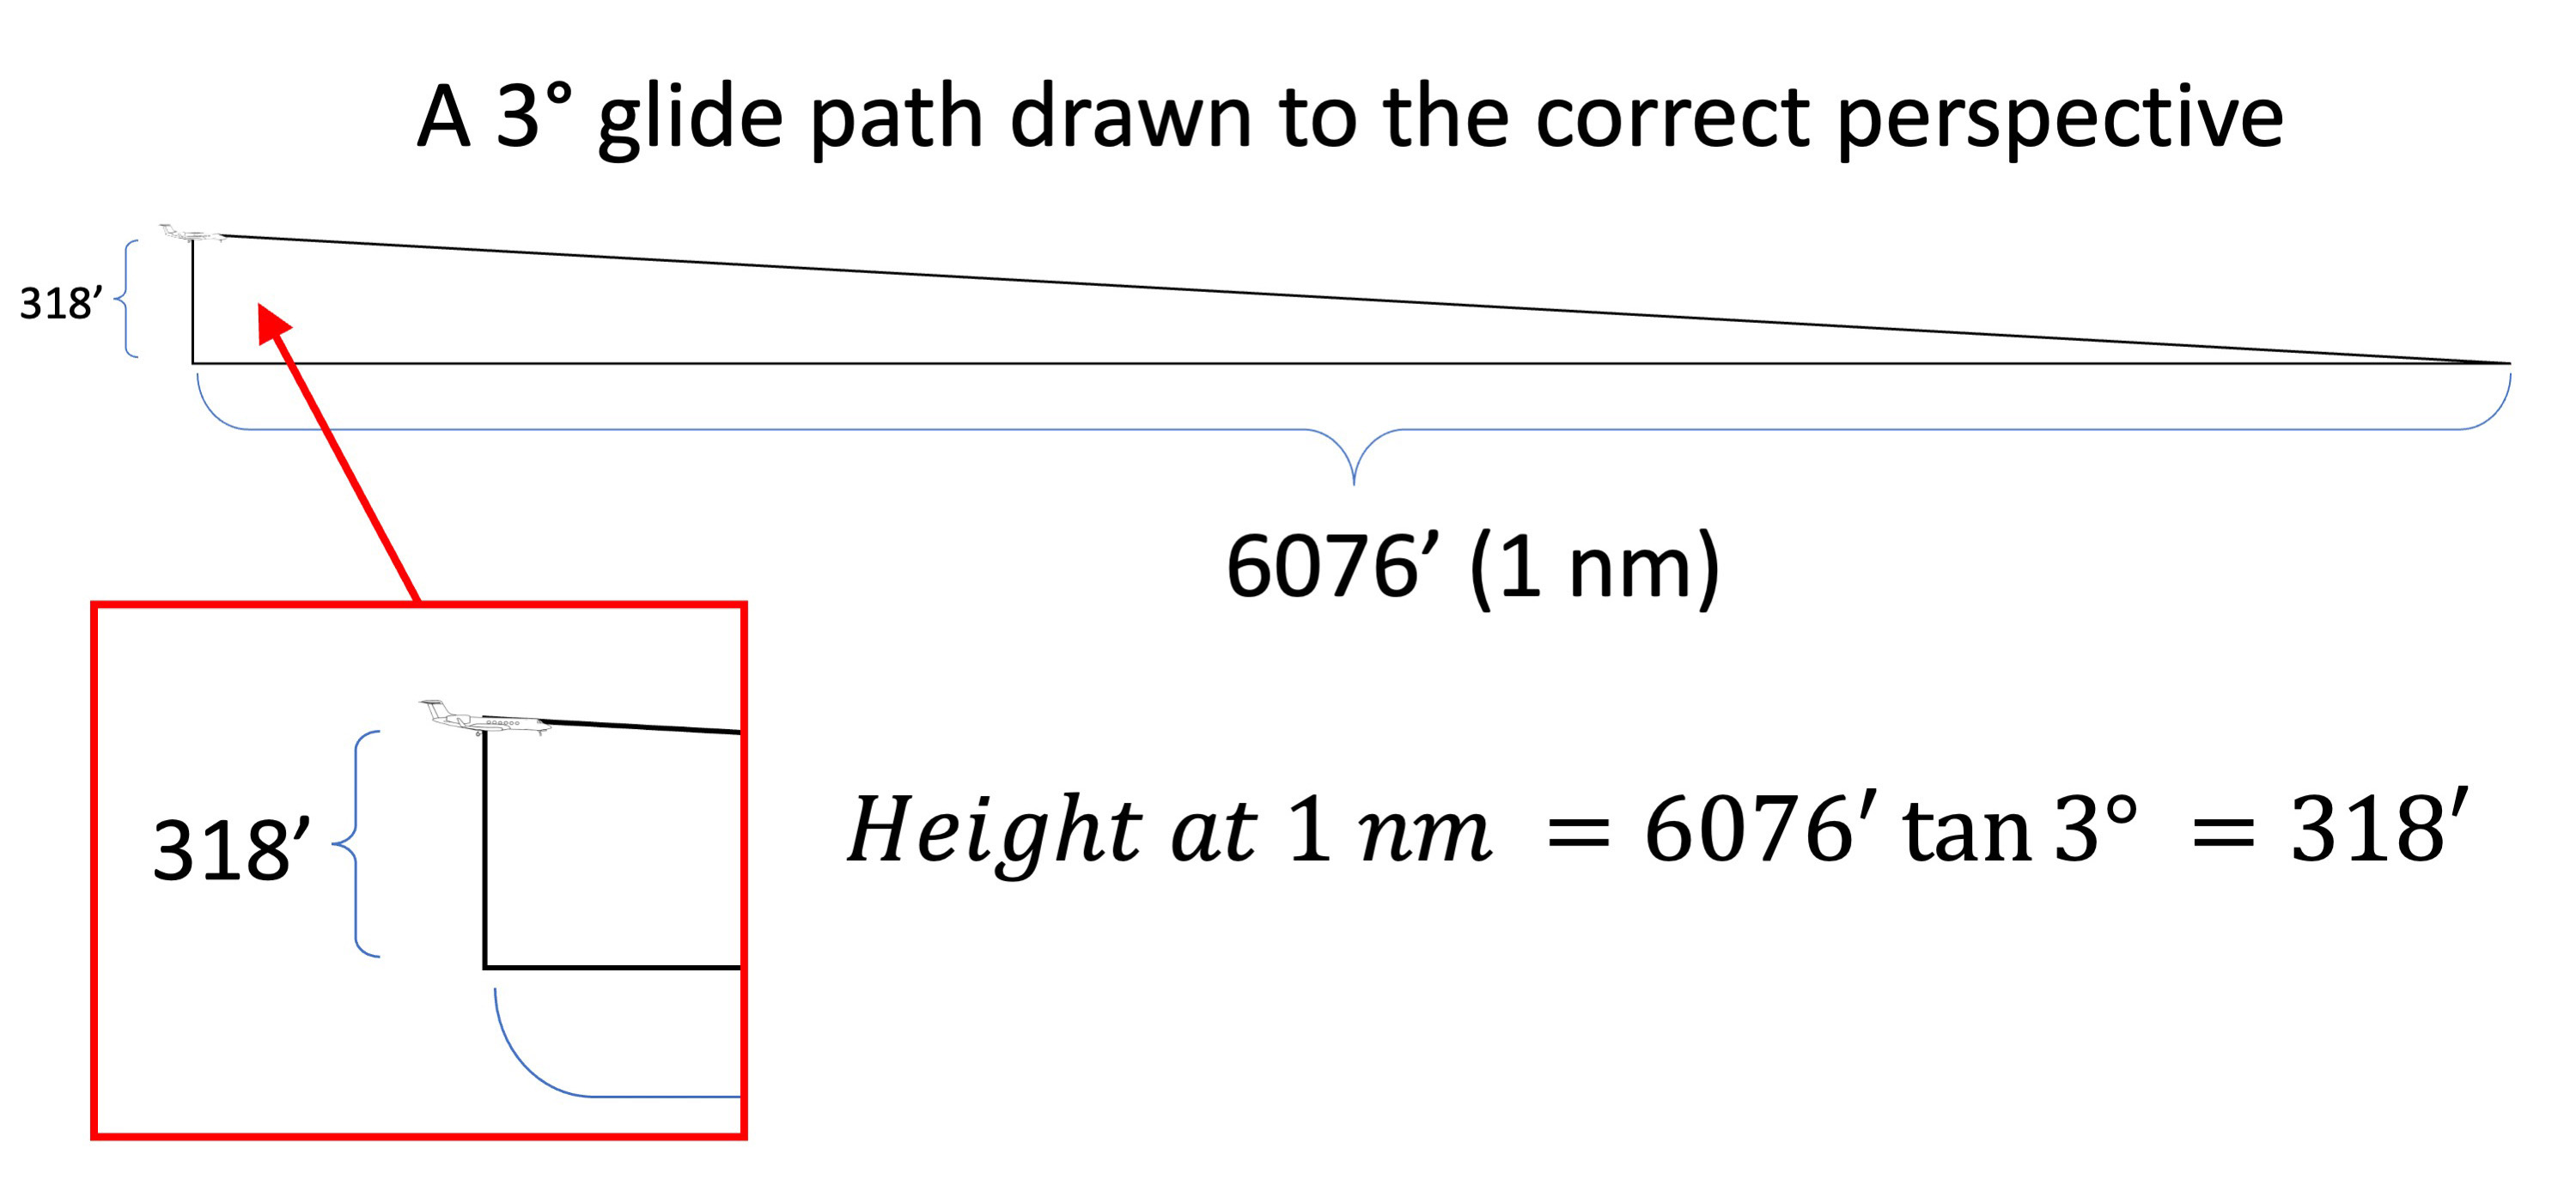
A view at 1 nm drawn to the correct perspective
Notice how small the airplane is and how shallow a 3° glide path really is. Most illustrators, me included, exaggerate the perspective because of limited space on the page. The important concept here is that a 3° glide path is very shallow.
2
The stable approach and the "slot"
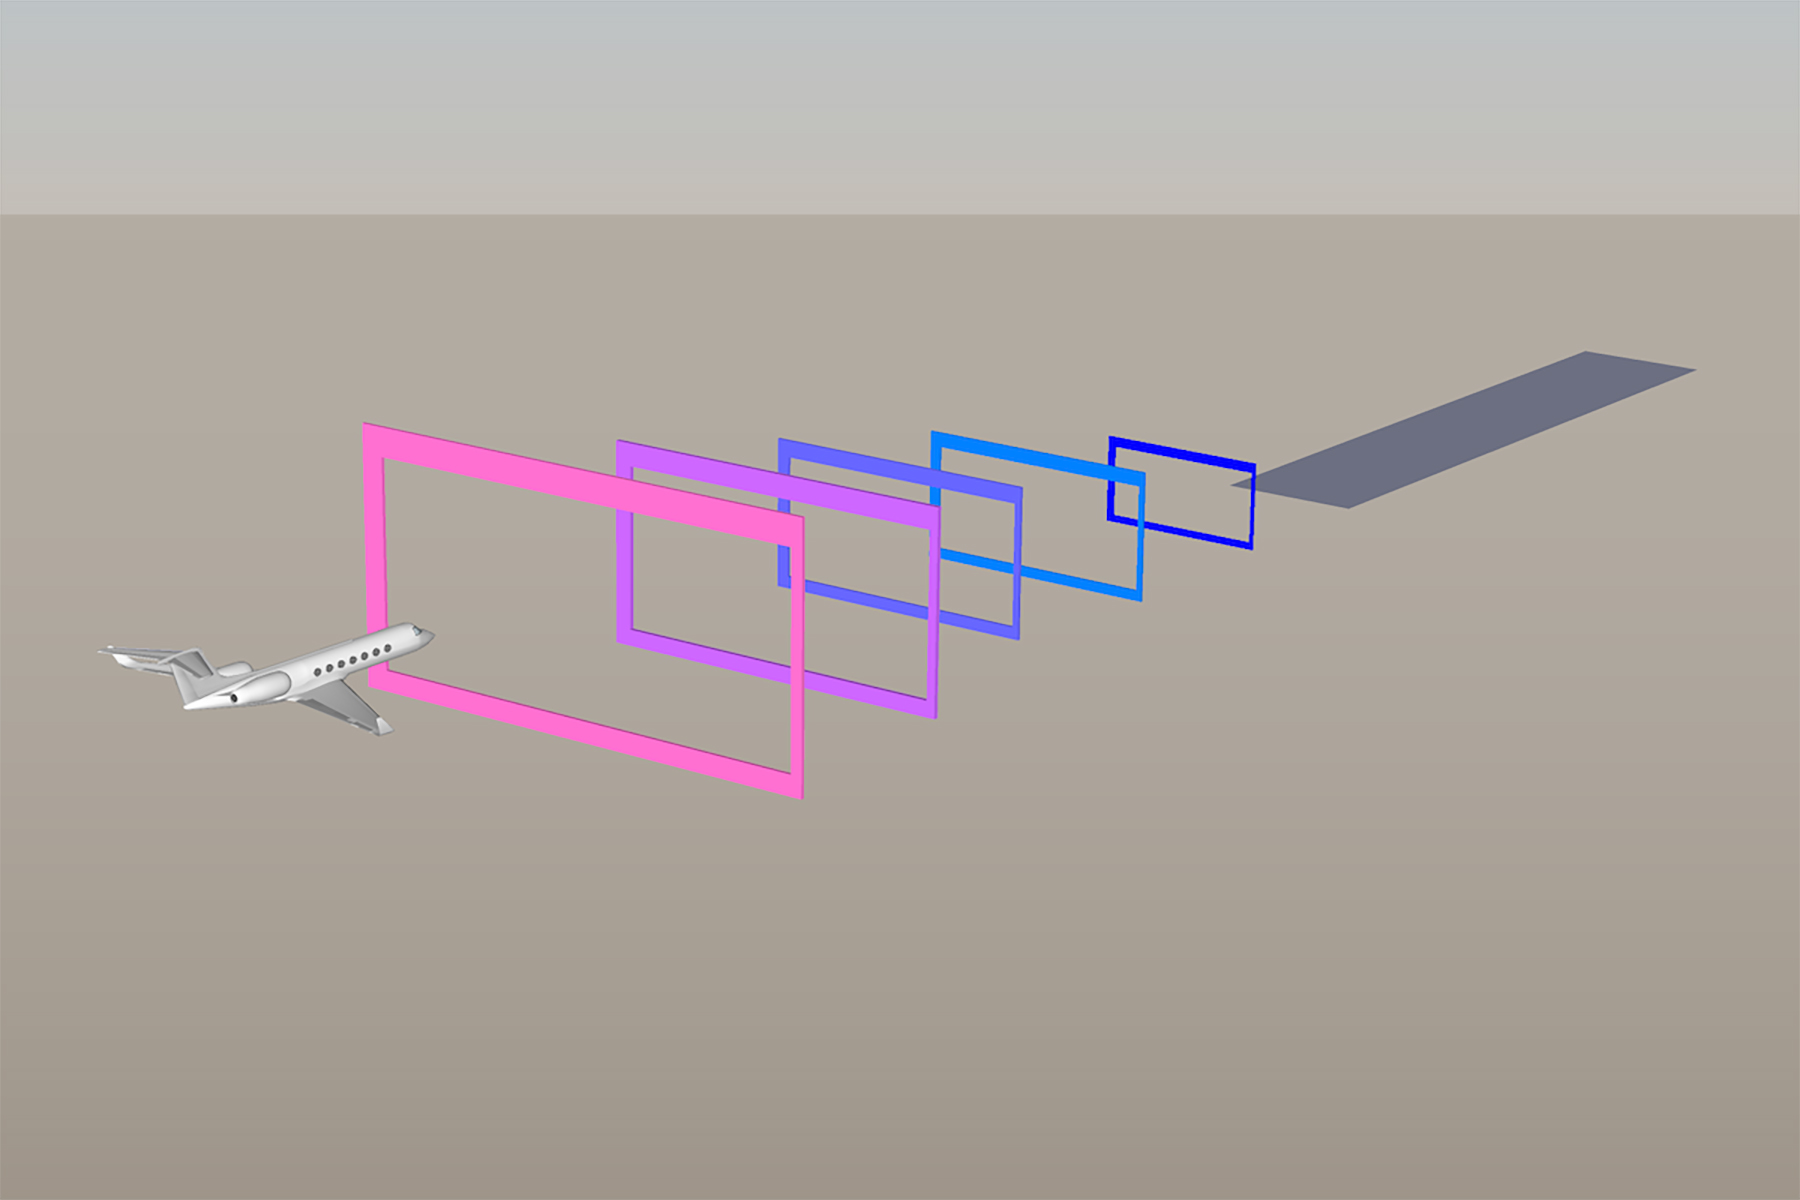
The landing slot
The airplane lands best if you consistently arrive at the correct threshold crossing height (usually 50 feet above the runway), 1,000 feet from the touchdown point, with a sink rate from a 3° glide path, and on speed neither accelerating nor decelerating. The sooner you get the airplane in that slot, the easier things will be. The landing flare will be the same every time. And that is a good thing.
3
The slot (vertical)
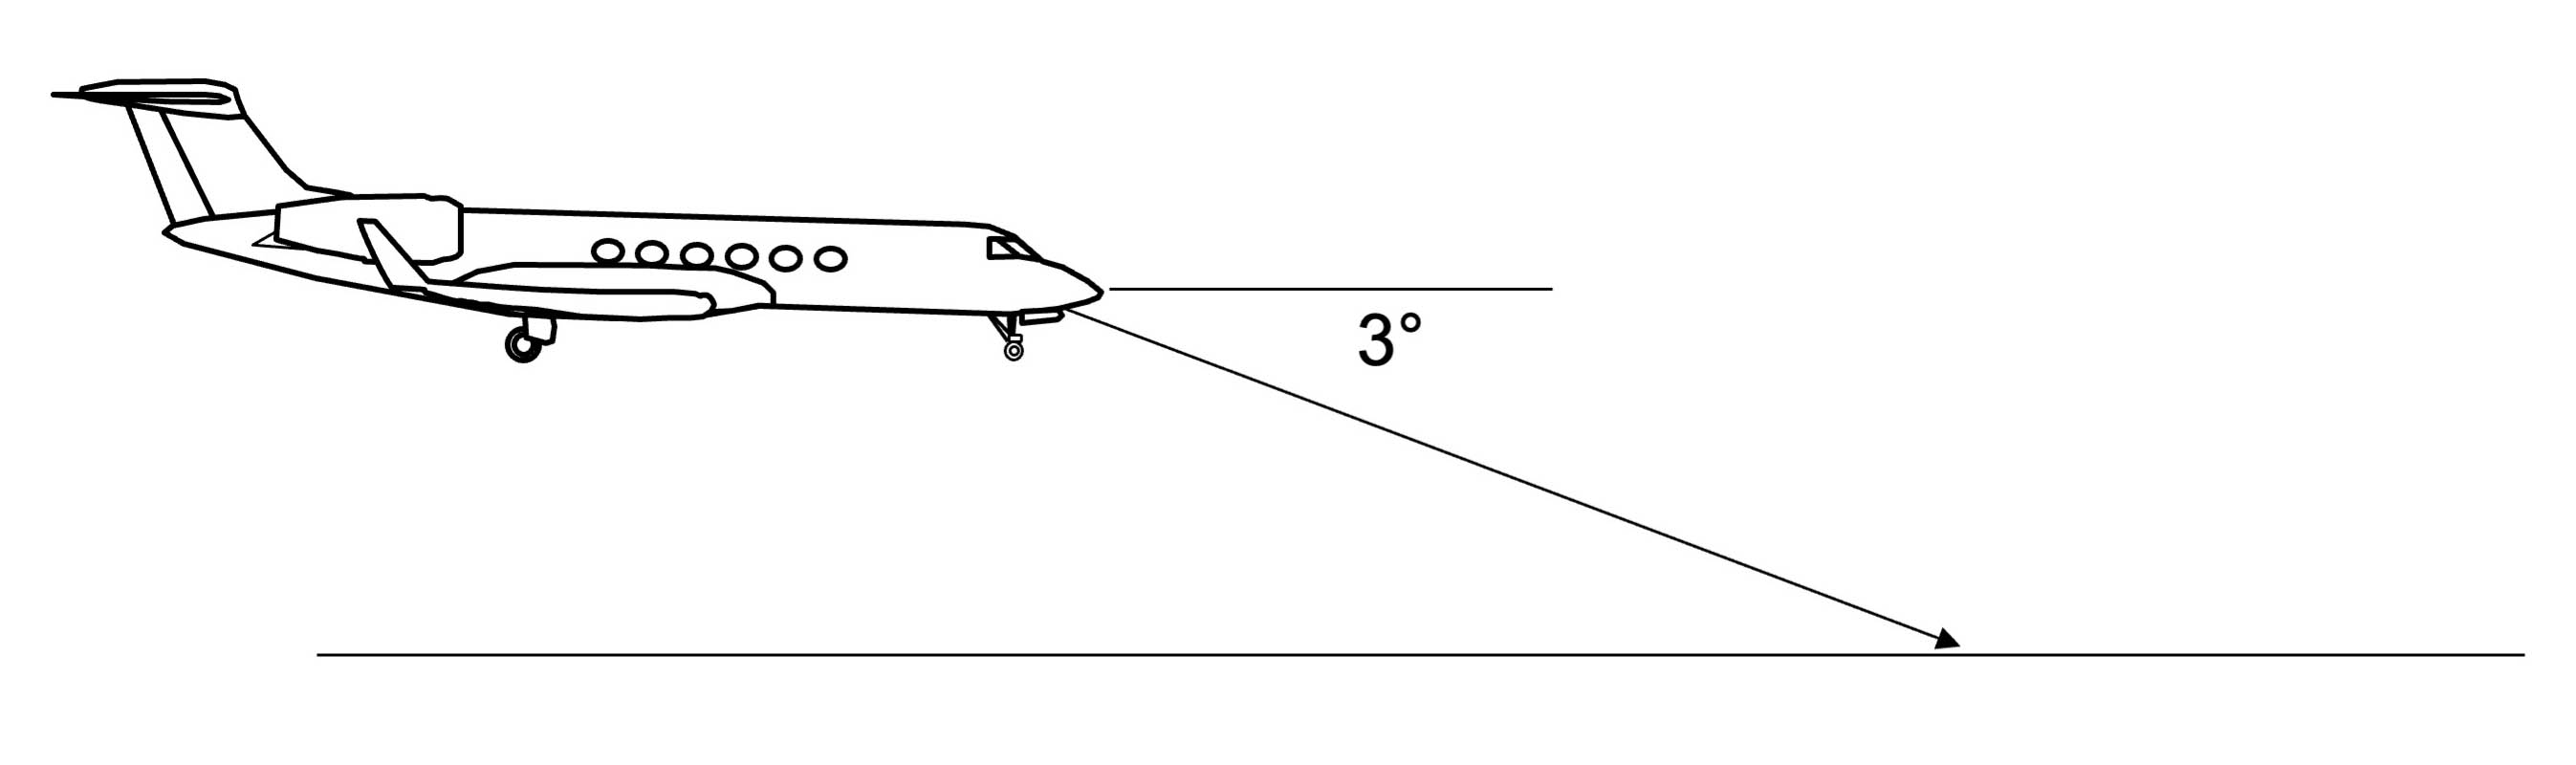
Your vertical slot is defined on most runways to be a 3° glide path until it is time to flare:
3° Glide Path
Vertically, the slot is defined by a three degree angle from the target touchdown point.
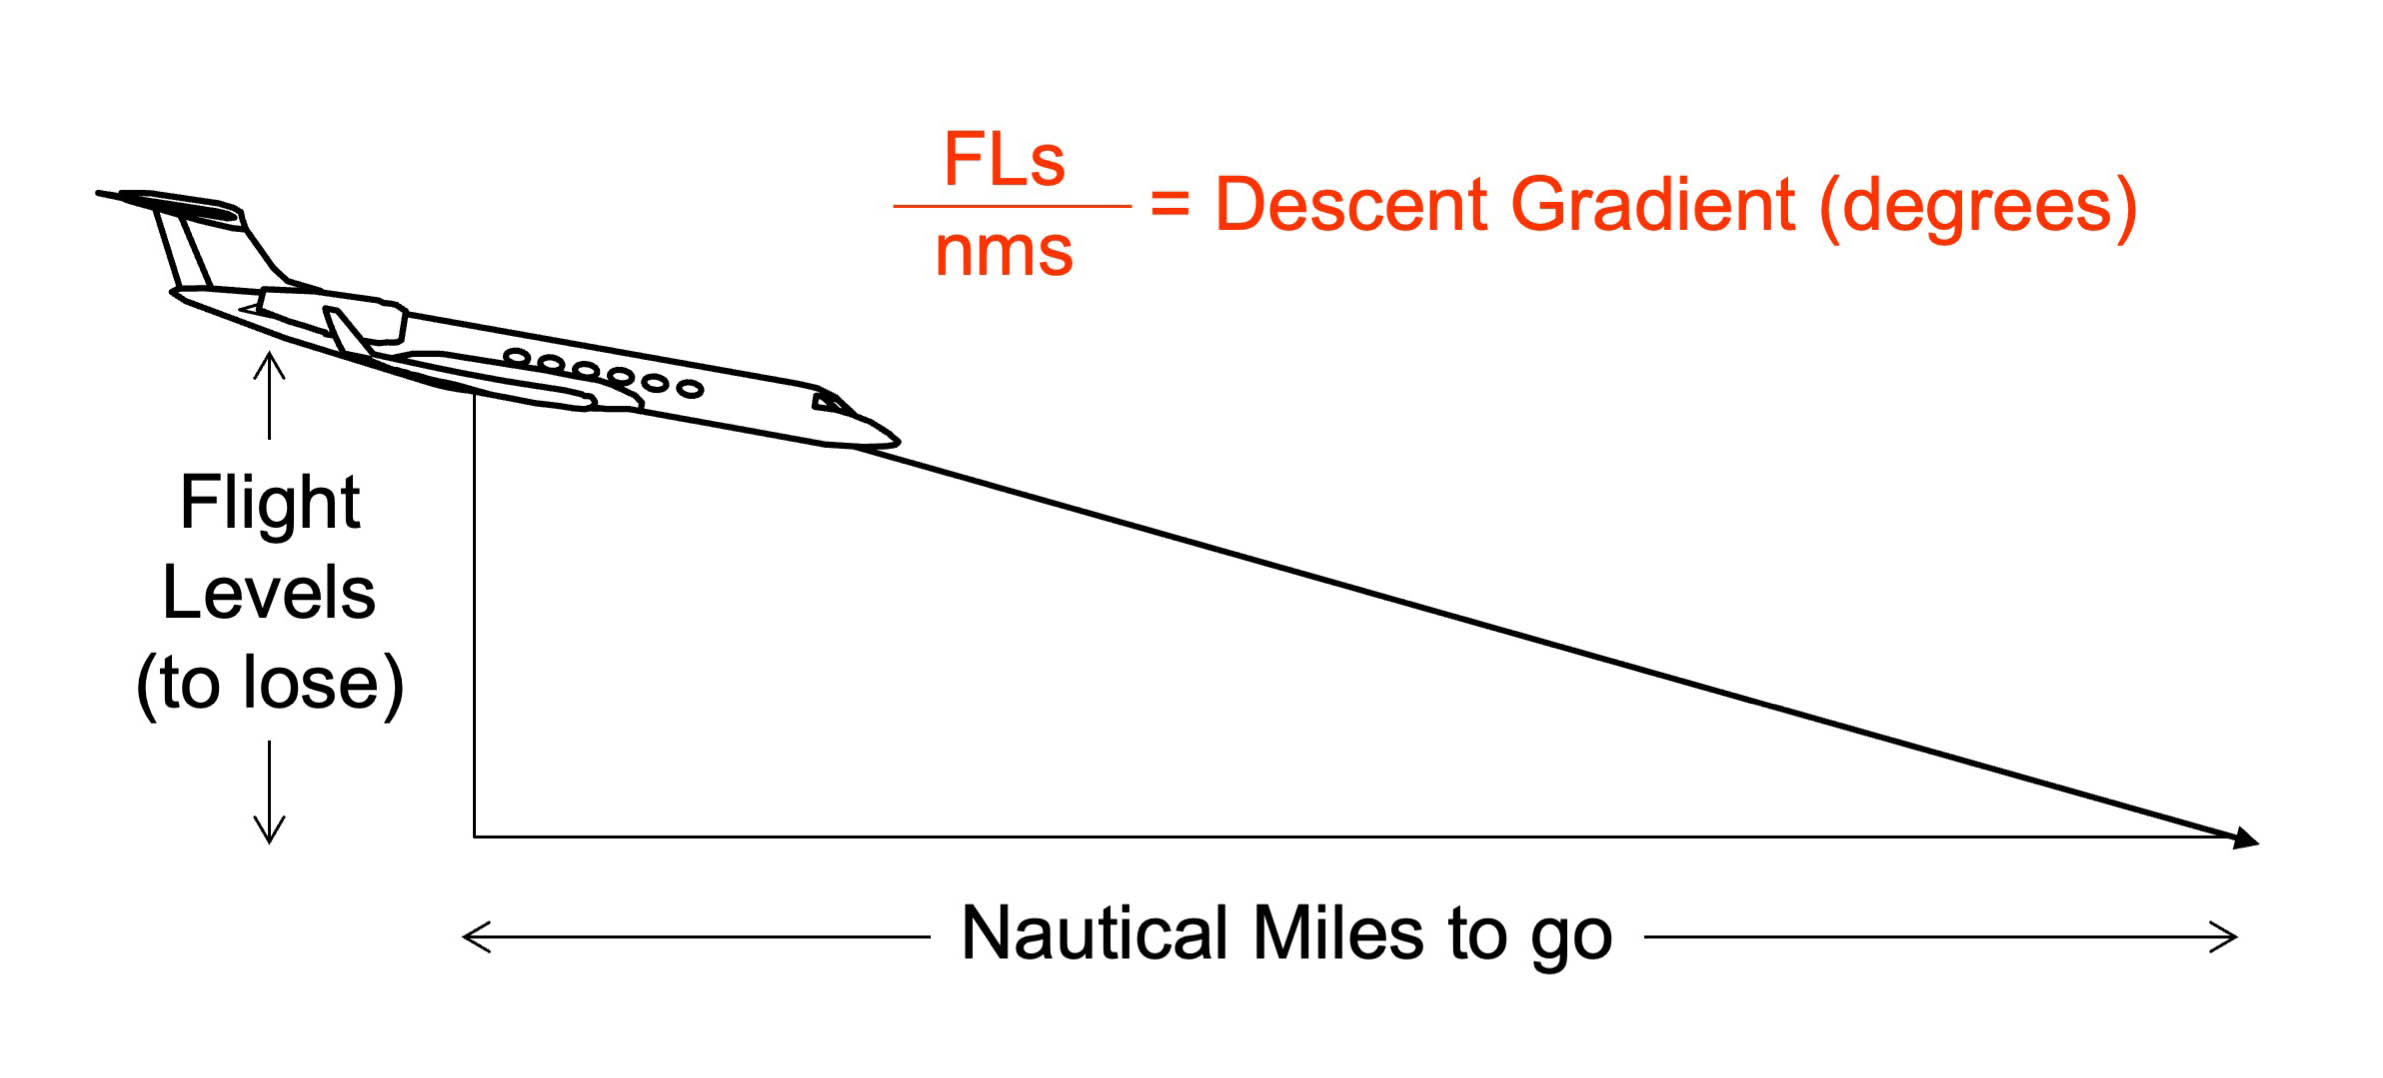
The angle equates to about 300 feet per nautical mile:
Height at One Mile = 6076 feet x tan(3°) = 318 feet
About 300 feet per nautical mile. Note there are times to be mathematically pure and times to be a pilot. Can you read 318 fpm on your altimeter? Probably not. But twenty miles out shooting for 6,000 feet when you should be at 6,360 feet might be significant. In general, however, 300 feet per nautical mile works.
So your objective is to place the airplane at 300'/1 mile, 600'/2 miles, 900'/3 miles, and so on. The sooner you are on that path, the better. While some aircraft have flight path angle indicators, most do not. You can come up with a vertical velocity equivalent.
In a G450 you might have an approach ground speed of 140 knots, which comes to:
At this speed you would travel a nautical mile in:
Your vertical velocity would be:
Like this kind of math? Check out: 60 to 1. Don't like it? Try to remember:

Descent rate on final approach is about half the ground speed times ten.
Vertical Cues
So in the G450, with a 140 knot V
You now know what you are looking for vertically. How do you judge your progress? You have several methods available to you:
ILS or LPV Glide Path — the best choices because the glide path information actually gets more precise as you continue the descent; the angle shown on your instruments are really angles and the closer to the glide slope transmitter you are the tighter the tolerances are. In the GV, for example, full scale deviation at one mile equates to about 150 feet. By the time you get to the end of the runway this same deviation narrows to 18 feet.
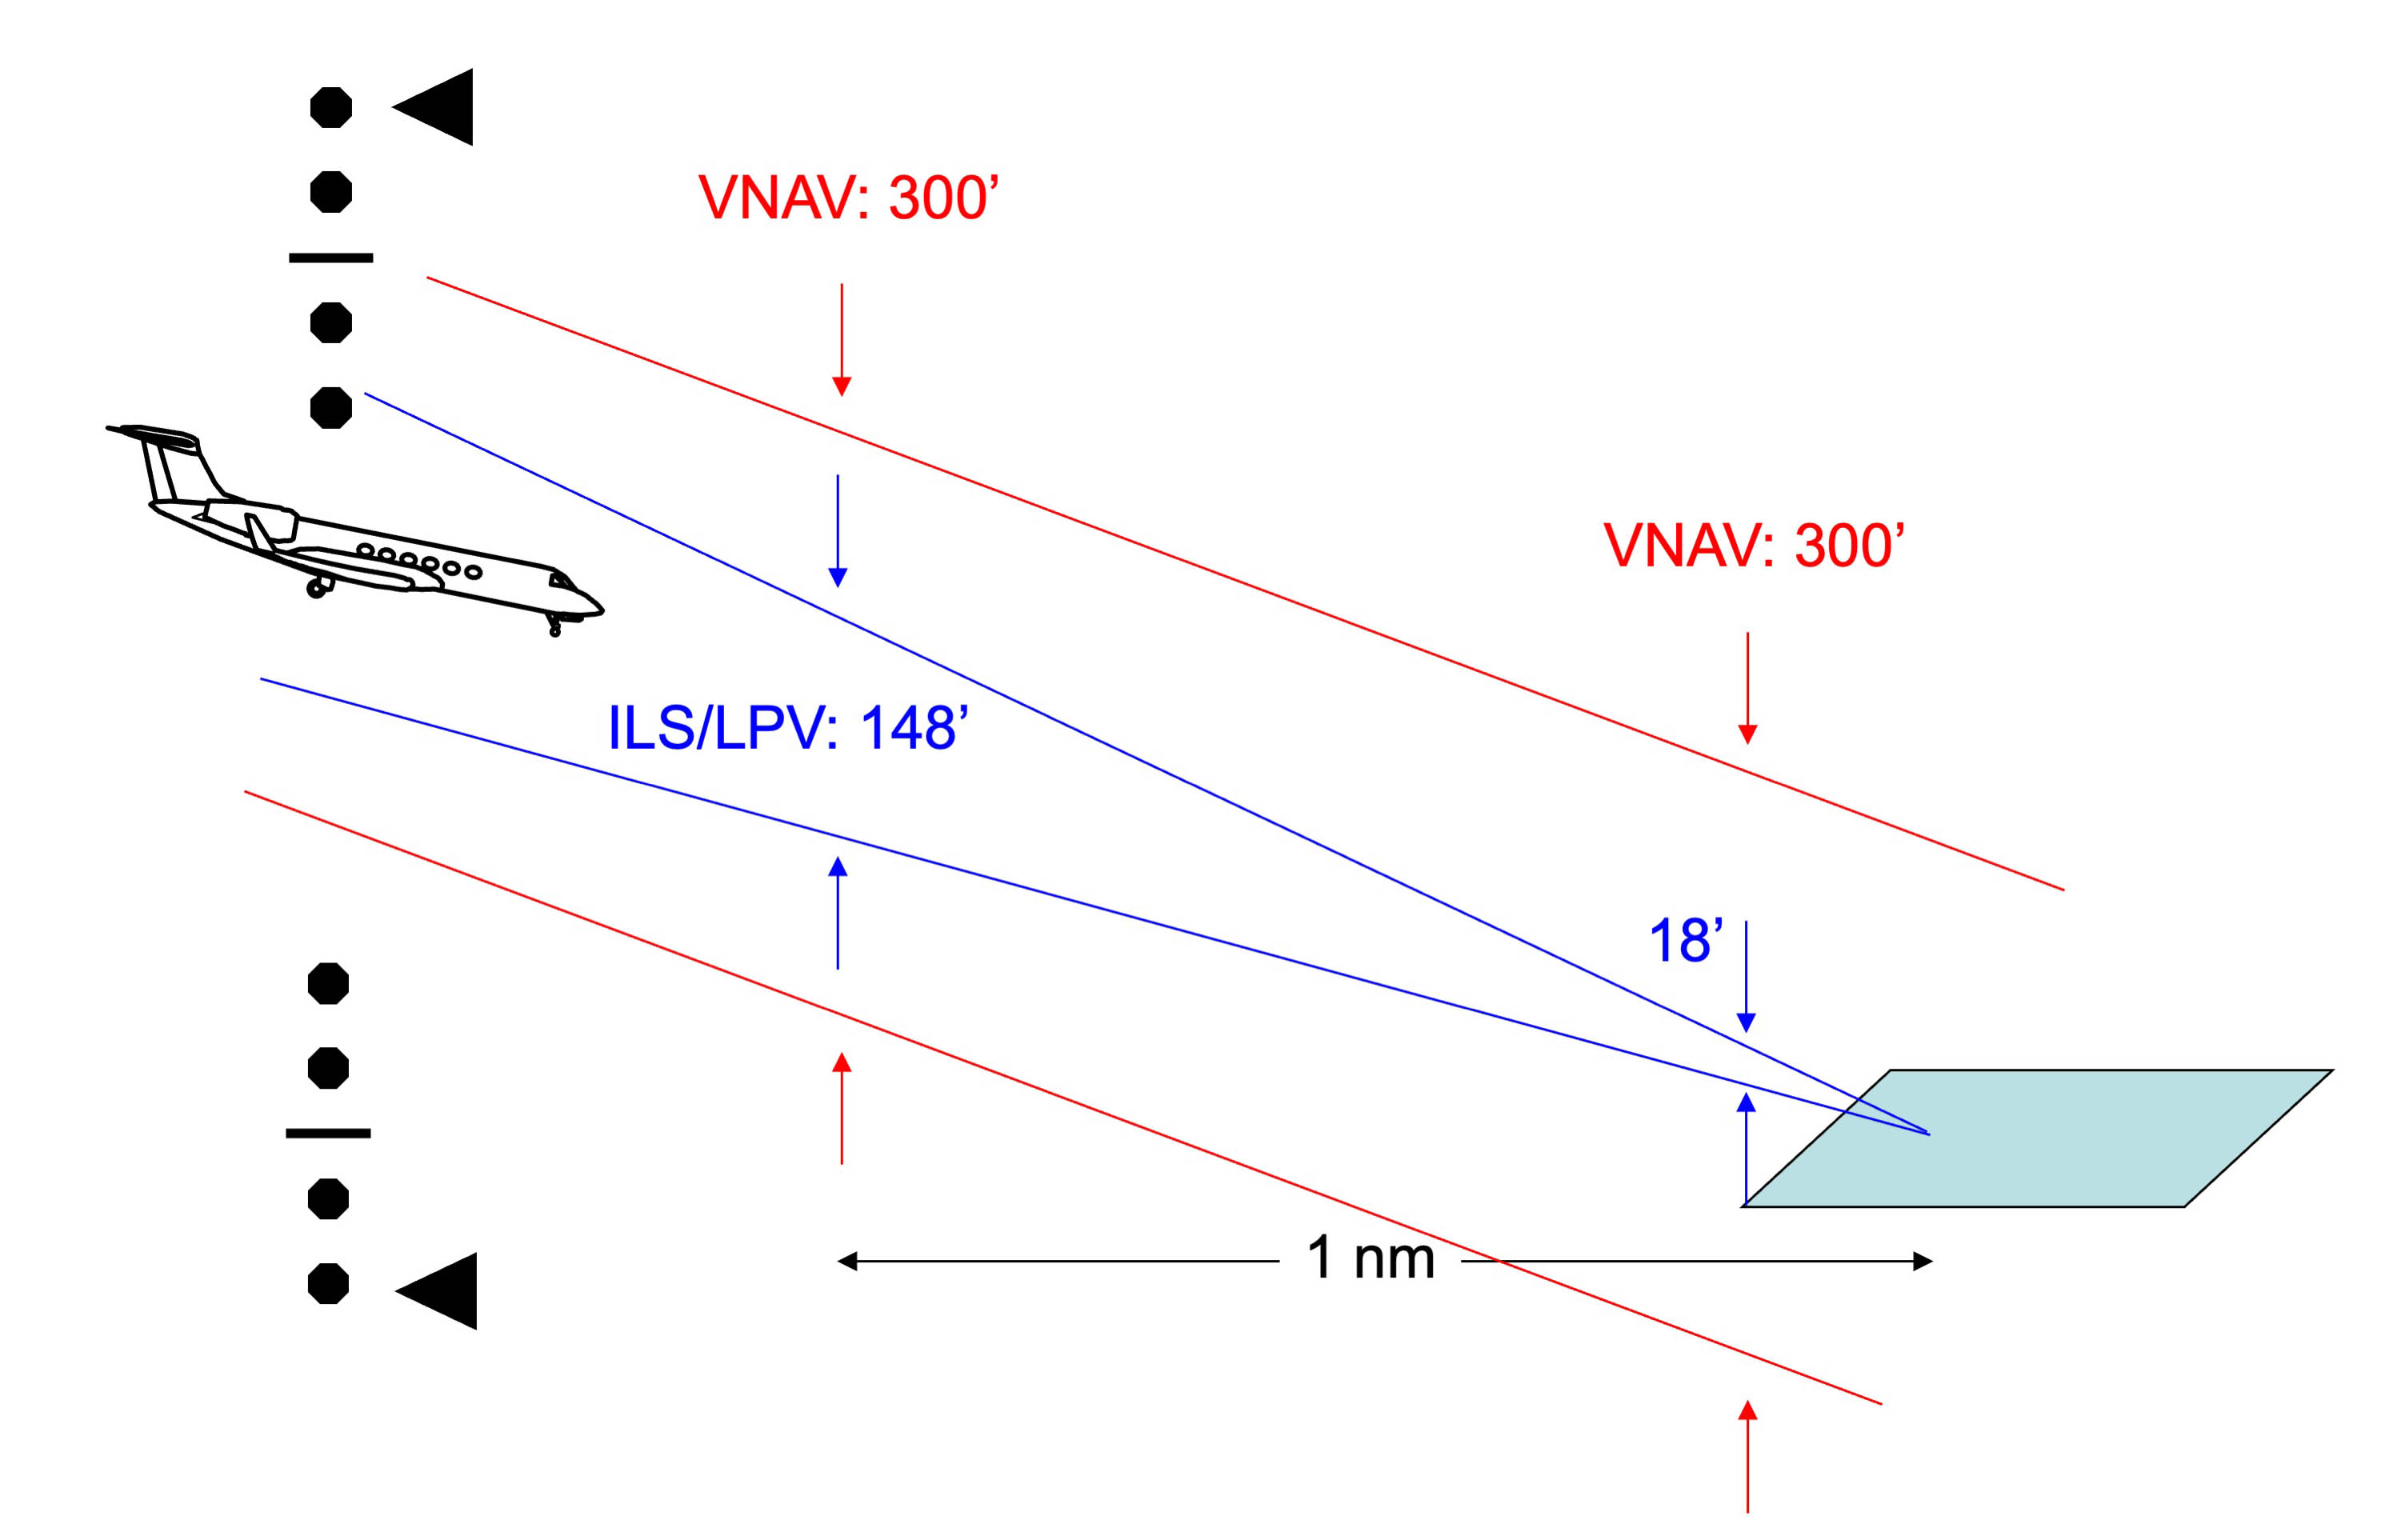
VNAV full scale deflection
VNAV (RNAV/GPS Approach) — If VNAV minimums are published and the VNAV glide path starts at the runway, this method is adequate but not as precise as an ILS, LPV, or HUD/EVS because of constant glide path deviation. In the GV, for example, full scale deflection represents 300 feet regardless of distance to the runway.
VNAV (Visual Approach) — A 300' per nautical mile target can be inserted into the FMS to provide a VNAV glide path, but this method is subject to the same constant full scale deflection problem noted earlier.
DME countdown
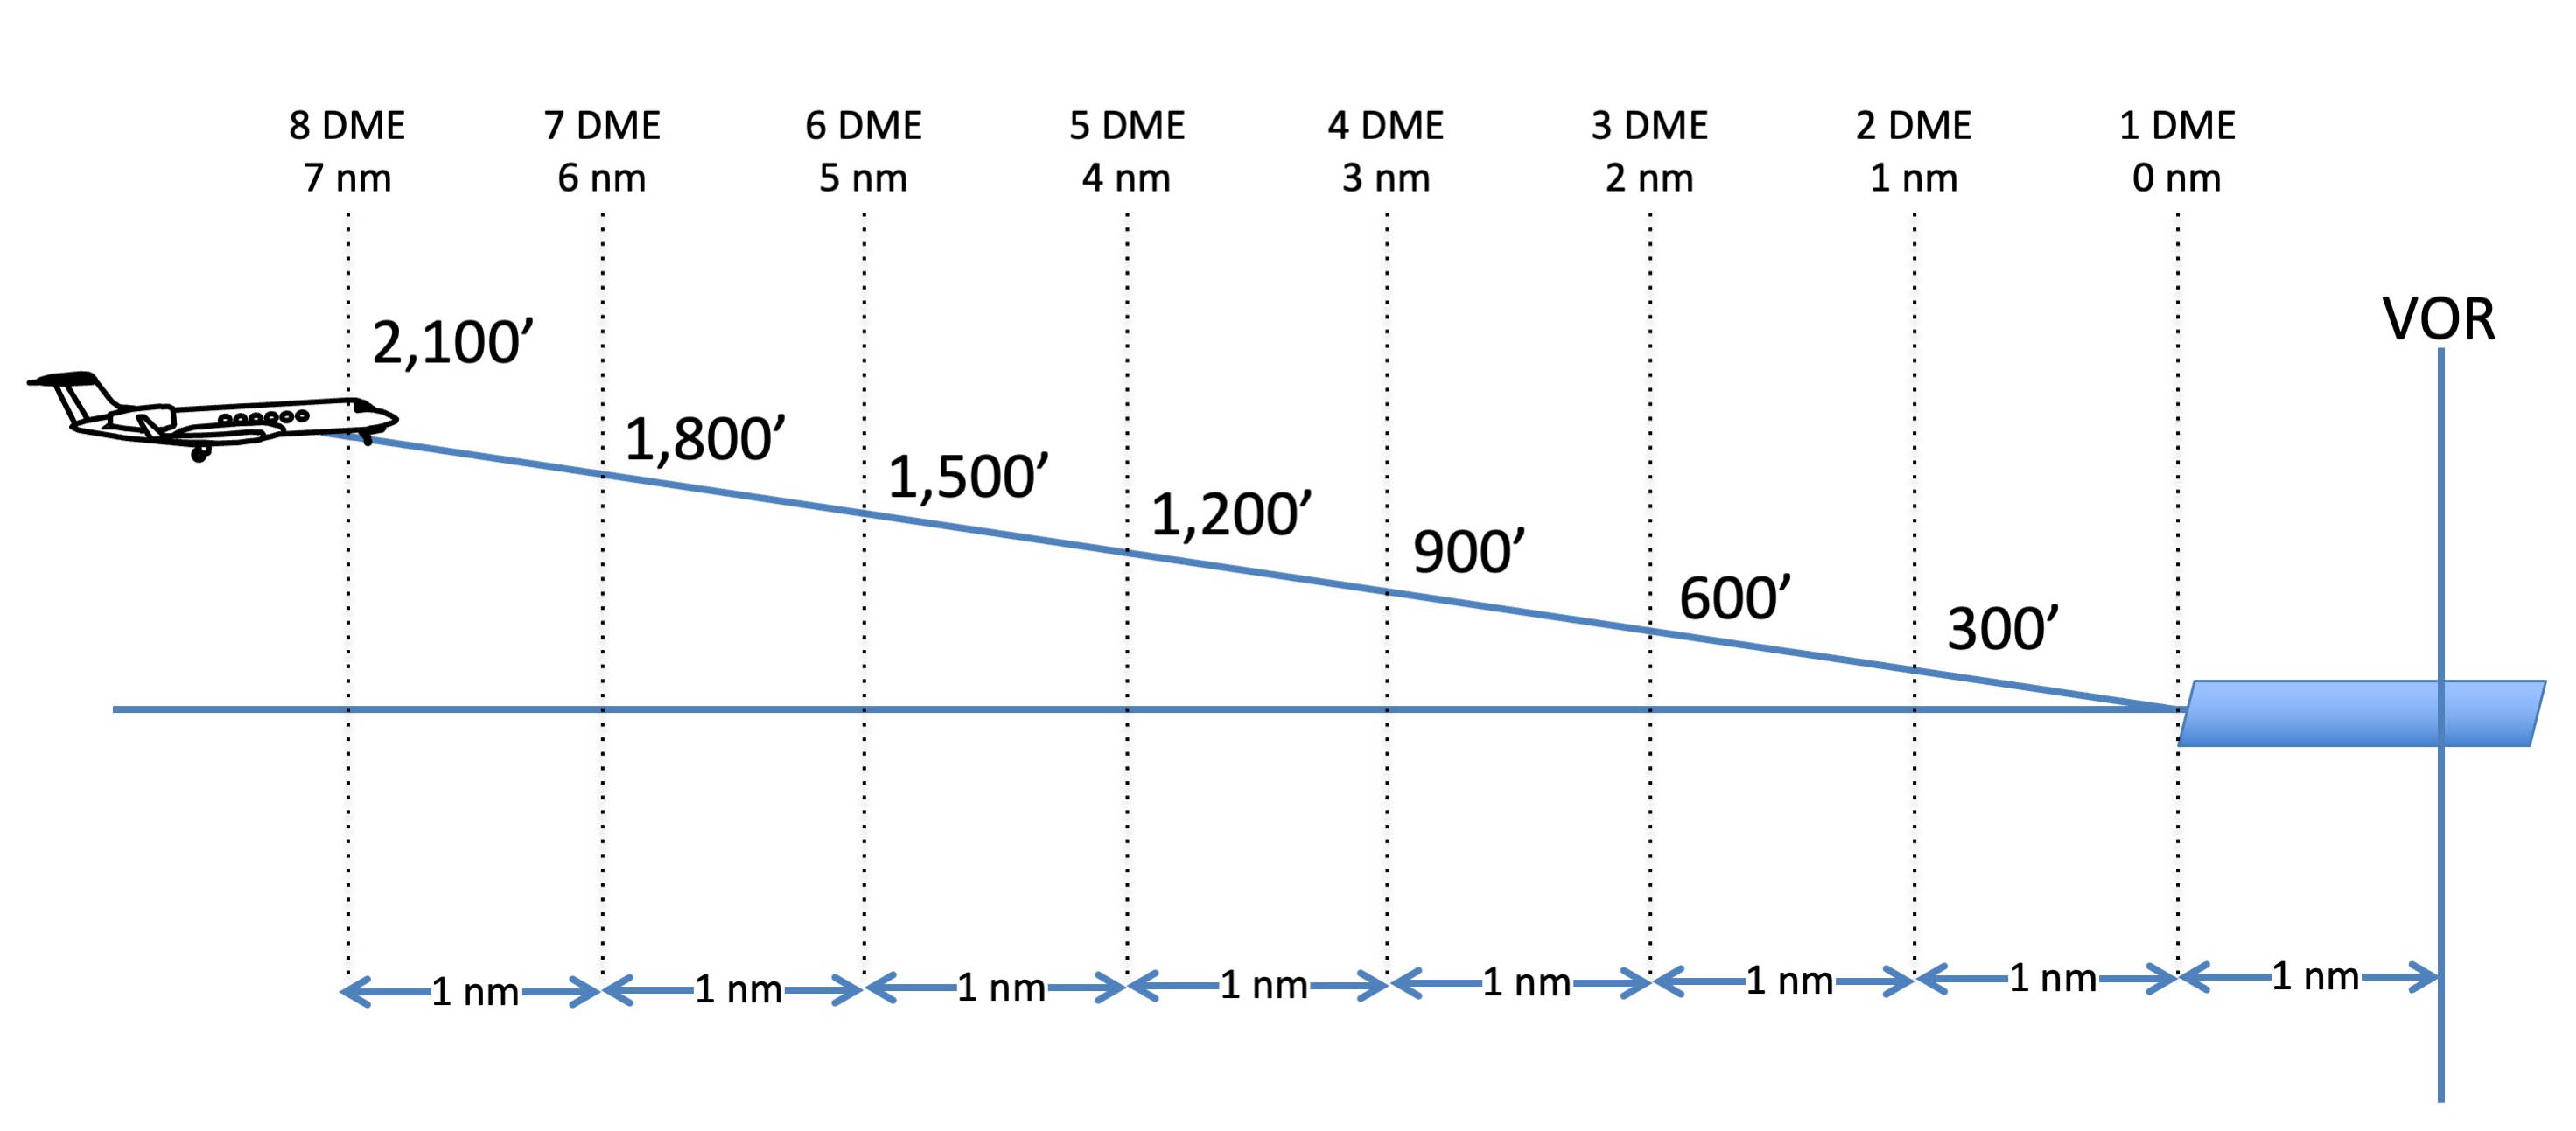
AGL vs. DME
Using the 60 to 1 concept, you know that a three degree glide path should keep you 300 feet in the air for every nautical mile from the runway. At 2 nm you should be at 600', 3 nm at 900', and so on. If there is a VOR near the runway, you can figure the DME at the touchdown zone and subtract that. In the example drawing, for example, the VOR is a mile from the end of the runway.
Your FMS should also have the runway end programmed, giving you another excellent countdown of the miles to go. Just multiply the miles to go by 300'.
Reference Flight Path Angle (FPA) Line and flight path vector
HUD 3° line
Many HUDs draw a line from the airplane to the ground at whatever angle you command. This angle comes from the airplane to the ground. The line it draws on the ground shows where your airplane will end up if you follow that angle. Understanding that the line comes from the aircraft and not the ground is vital to using the line to your advantage. In each of the three following examples, the flight path vector is right on the touchdown zone of the runway.
Aiming short. In the following example, we are following the correct angle, but we are aimed short of the runway:
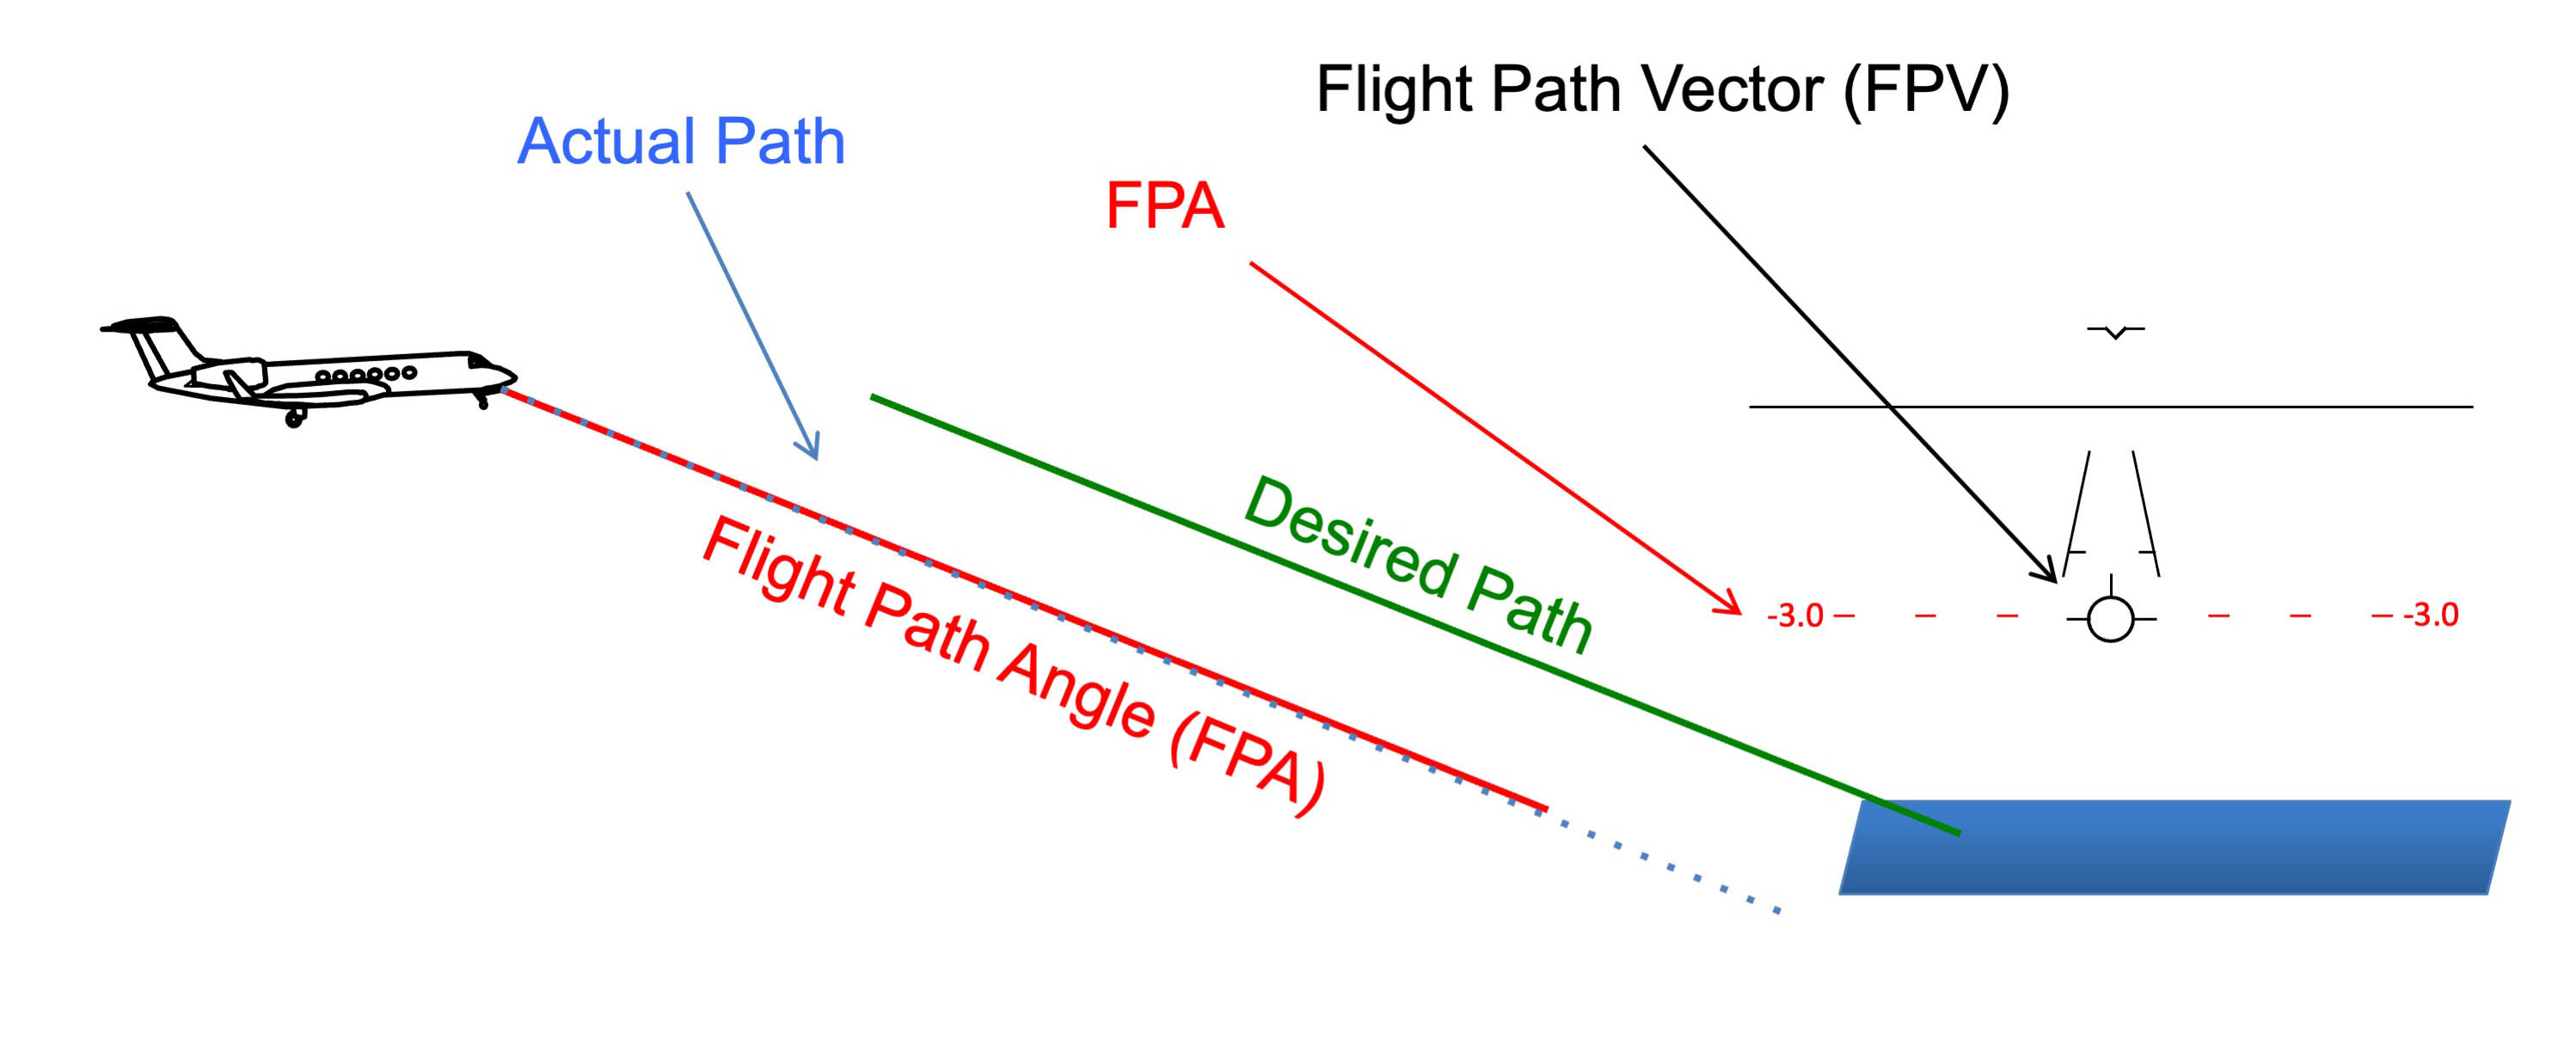
FPA short
Notice that in the first drawing we are flying a stable path, but we will not make it to the runway unless we make a change. If the line is short of the runway, you need to “walk the FPA up” by reducing your angle of descent.
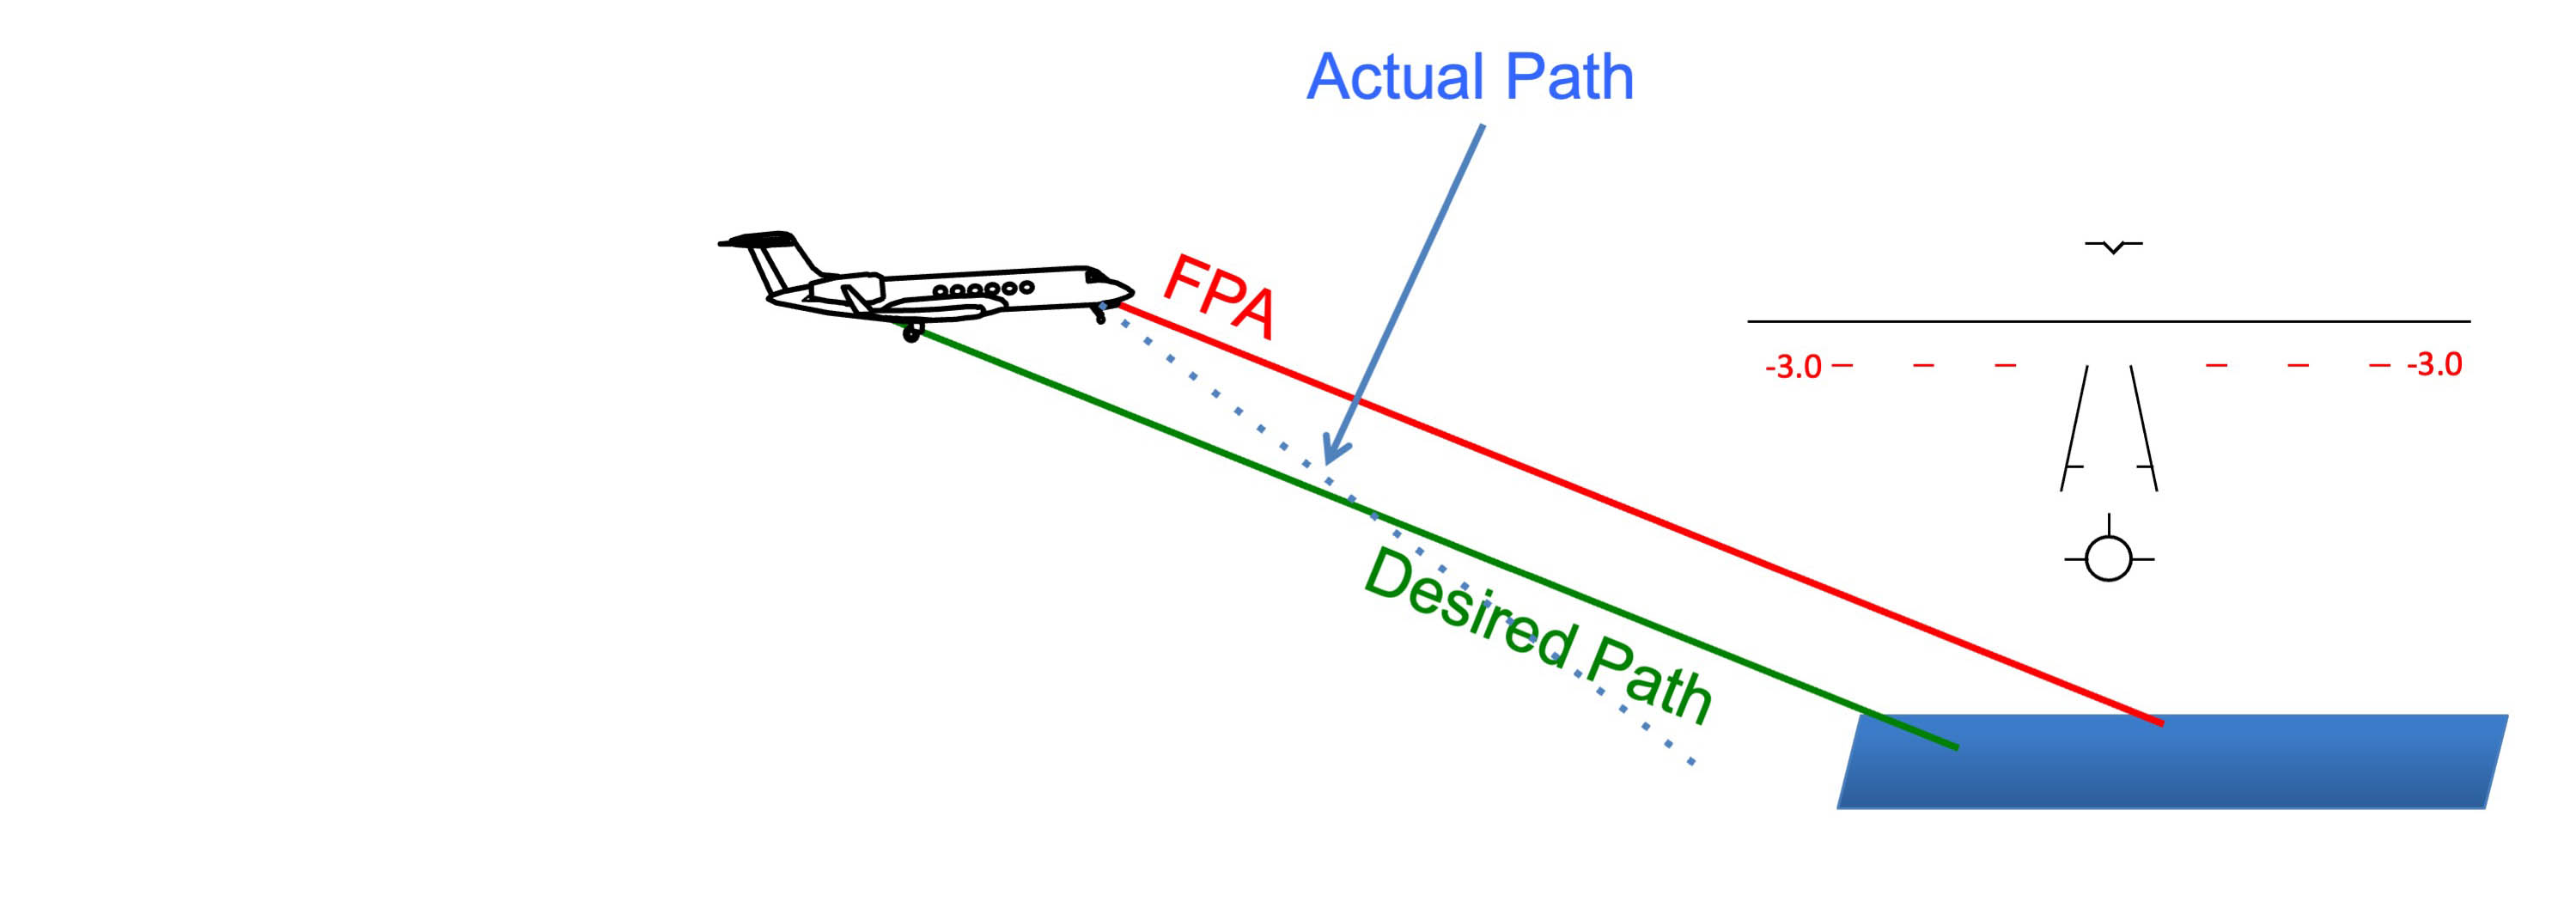
"Walking Up the FPA"
In this drawing you have raised your pitch to beyond the touchdown zone; the aircraft is temporarily headed for long landing to return to glidepath. Once the 3° FPA line gets to the touchdown zone you lower the pitch so that both the flight path vector and the FPA are over the touchdown zone.
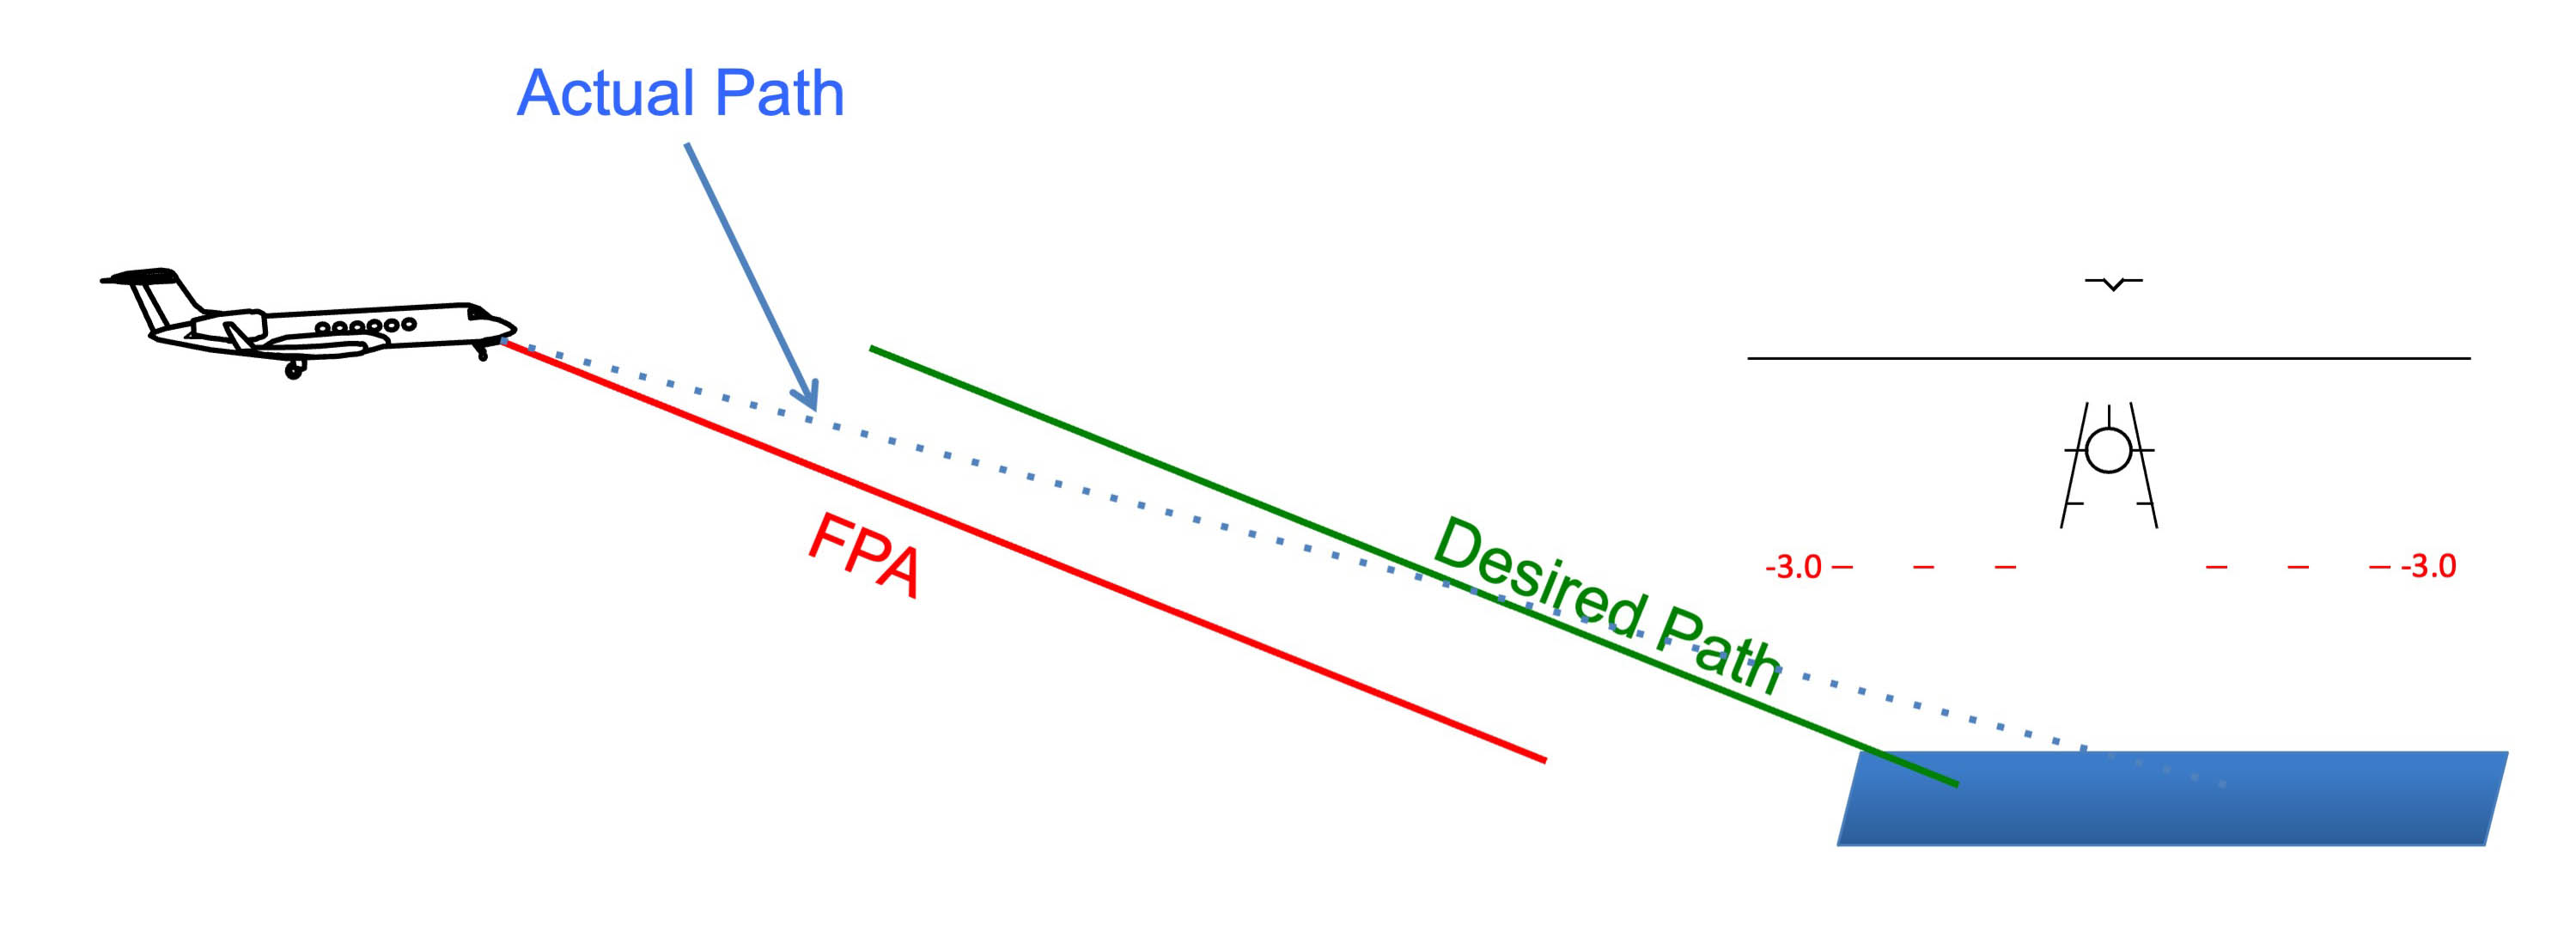
Aiming long. Conversely, if the FPA is beyond the touchdown zone of the runway, you need to “walk the FPA back” by increasing your angle of descent.
"Walking back the FPA"
If time permits and you are above Stabilized Approach height, you should increase your descent angle to "walk back the FPA” to the touchdown zone. In this drawing you have reduced your pitch short of the touchdown zone; the aircraft is temporarily headed for a short landing to return to glidepath. Once the FPA gets to the touchdown zone you raise the pitch so that both the flight path vector and the FPA are over the touchdown zone.
Once these aimed short or aimed long corrections are made, the 3° FPA line shows the correct glide path to the touchdown zone and the flight path vector shows you are on that glide path:
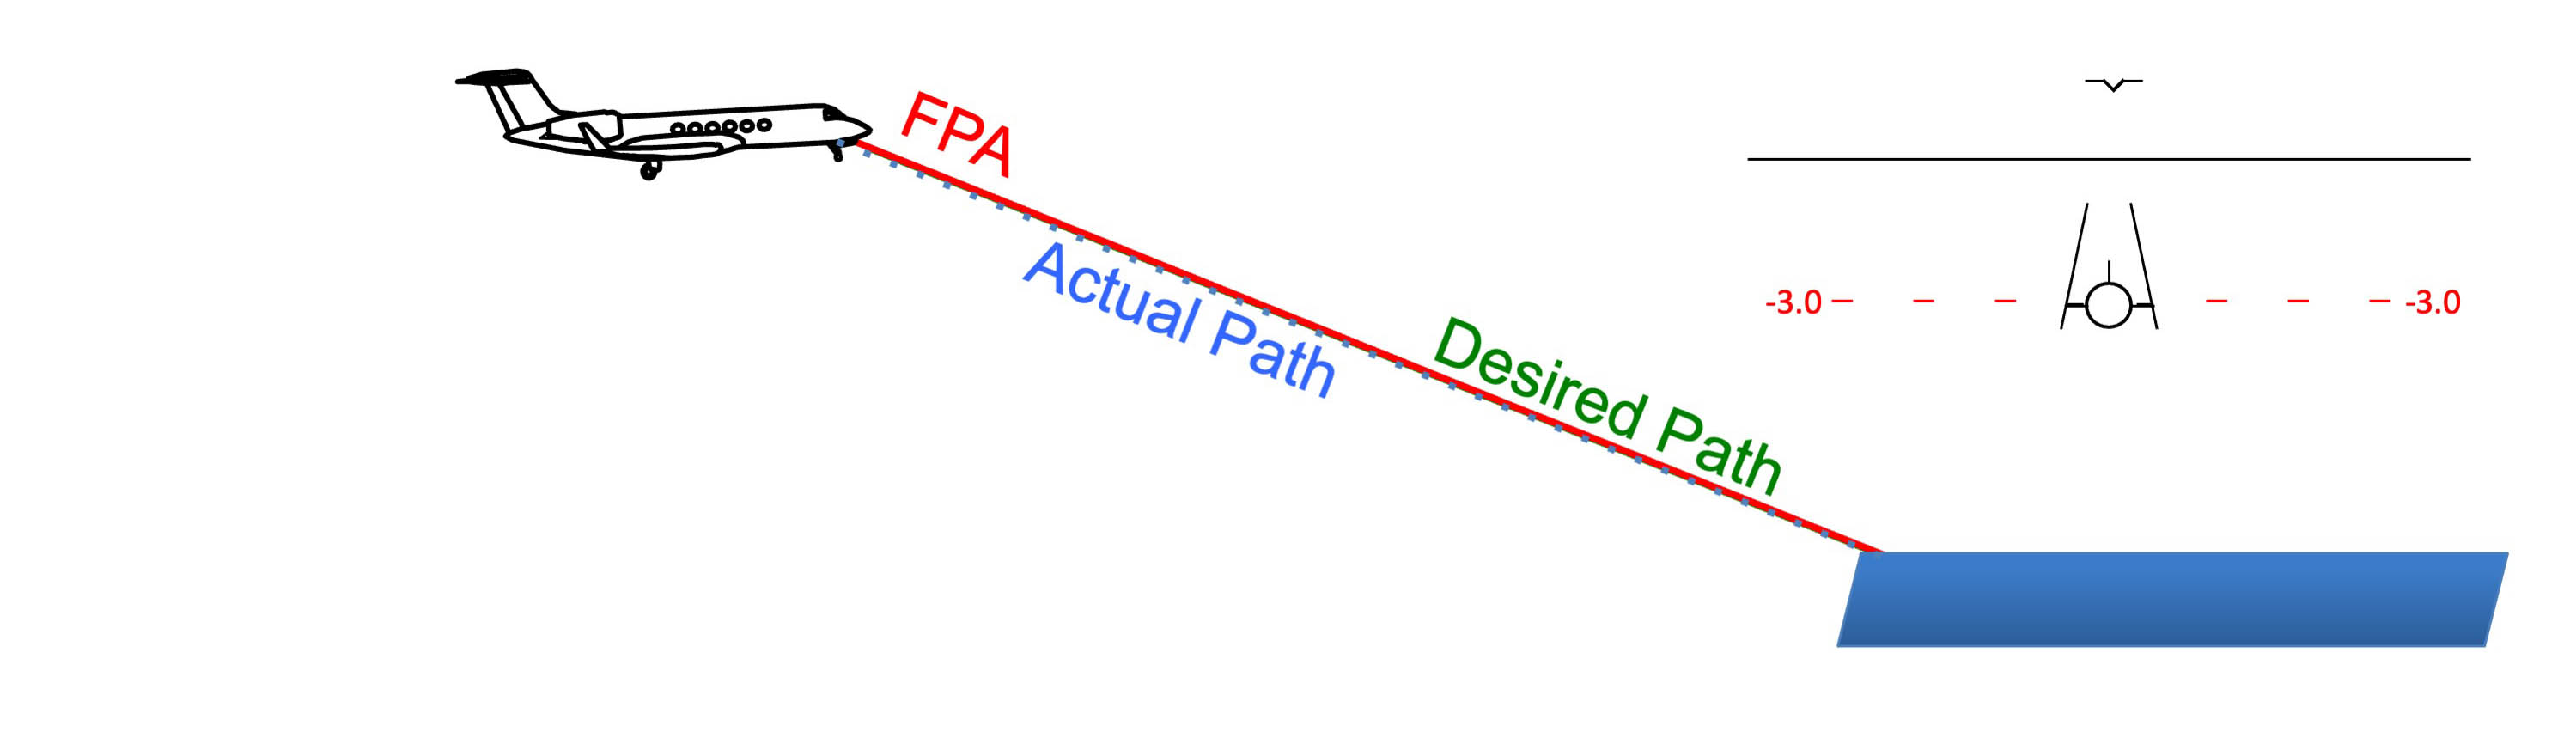
FPA good
Approach Lighting System
Approach lighting system descent cues
You should generally be at 300' when the sequenced flashers begin and 100' at the last “Roll Bar” on a full set of ALSF-II lights. More about: Approach Lighting System.
Approach and Threshold Speed.
Approach speed is often, but not always, based on 1.3 V
Any increase in landing speed has an impact on landing distance squared. Landing ten knots hot, say 130 versus 120, while only an 8 percent increase in speed, ends up increasing landing distance by 17 percent!
The standard wind adjustment is to add half the steady-state headwind and all of the gust increment, up to a certain limit. (In the G450, you always add at least 5 knots but no more than 20 knots.) This is supposed to add a margin of safety in case the wind drops and is theoretically compensated for by the decreased ground speed. It is up to you, however, to lose this extra speed prior to touchdown. More about: Landing Speed
4
The slot (horizontal)
As with the vertical component and glide path, you want to get lined up on the runway's centerline as soon as possible.
You want to have everything lined up before you get to Stabilized Approach Height and the easiest way to do that is with a good, straight-in instrument approach.
ILS, or LOC - keeping in mind the localizer is typically only accurate to 18 nautical miles, capturing the localizer beam is your best method to ensure you are on an extended centerline.
LPV - An LPV gives you "localizer performance" and in some ways it is better; it is not subject to the effects of a vehicle driving in front of an antenna and giving you full scale deflection when just seconds from touchdown. G450 Note: you should "activate vectors" prior to intercepting the LPV course, otherwise you may fail to get a vertical glide path.
VOR, NDB - these methods may be acceptable, keeping in mind they may not be coincident with the extended runway centerline.
RNAV, GPS - these methods may be acceptable, keeping in mind RNAV and/or GPS accuracy may place the instrument centerline offset or off-angle from the actual extended runway centerline.
But what if you don't have a good instrument approach available?
Extended Runway Centerline
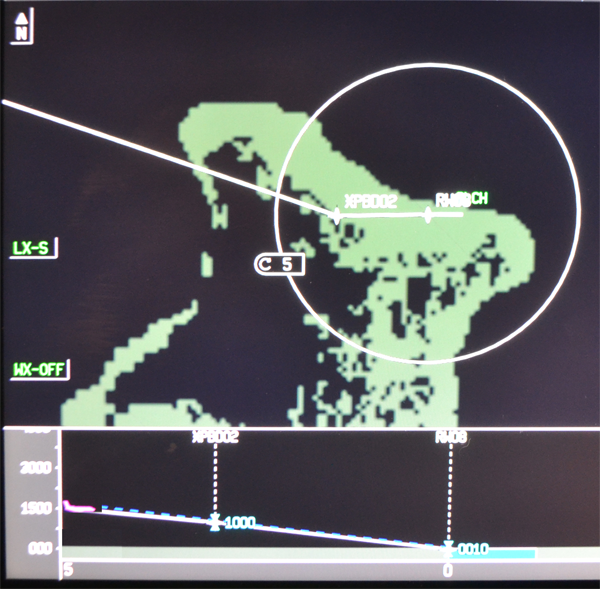
DU map display on final flight segment
Depending on your FMS, you might be able to draw an extended centerline from the runway to your visual approach path, making lateral alignment easy.
Imaginary rope
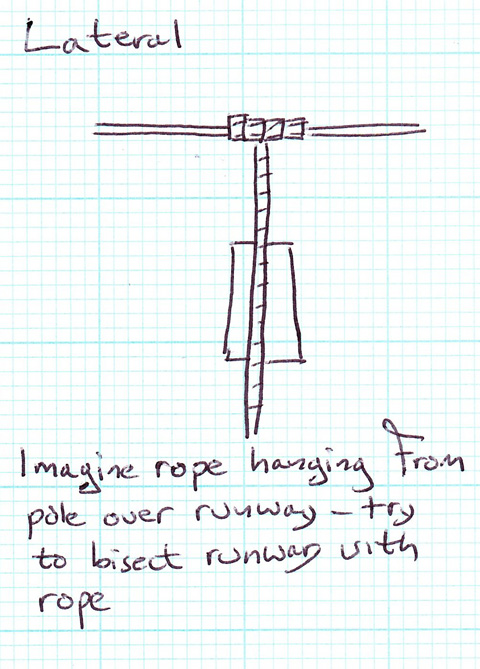
Imaginary rope
Getting a T-37 lined up with a small runway was never a big deal. Flying the Boeing 707 into a small runway always was. To help us with that task we came up with a few gimmicks, some just mind games, some mathematical.
Lateral alignment seemed to be problematic for some. You couldn’t turn the big Boeing on a dime and getting the airplane lined up took some practice. The drawing comes from my original notes back in Hawaii.
It seems silly, after all these years, but this is what we taught and I suppose this was supposed to help. But it is all we had to go with.
“Imagine a rope,” I would tell the younger pilot, “hanging from a pole on the far end of the runway. . .”
Sometimes the imagery would help, sometimes not.
Extended centerline on synthetic vision
With synthetic vision, the runway is drawn on the display with lead in lines complete with index marks. Lateral alignment is simply a matter of flying the airplane over the line.
5
Last minute maneuvering
In the real world you cannot get a ten mile final beginning at 3,000 feet AGL; you are going to have to maneuver to arrive there closer in. The key point is to know if that maneuvering will leave you in a stable condition at the latest comfortable slot position.
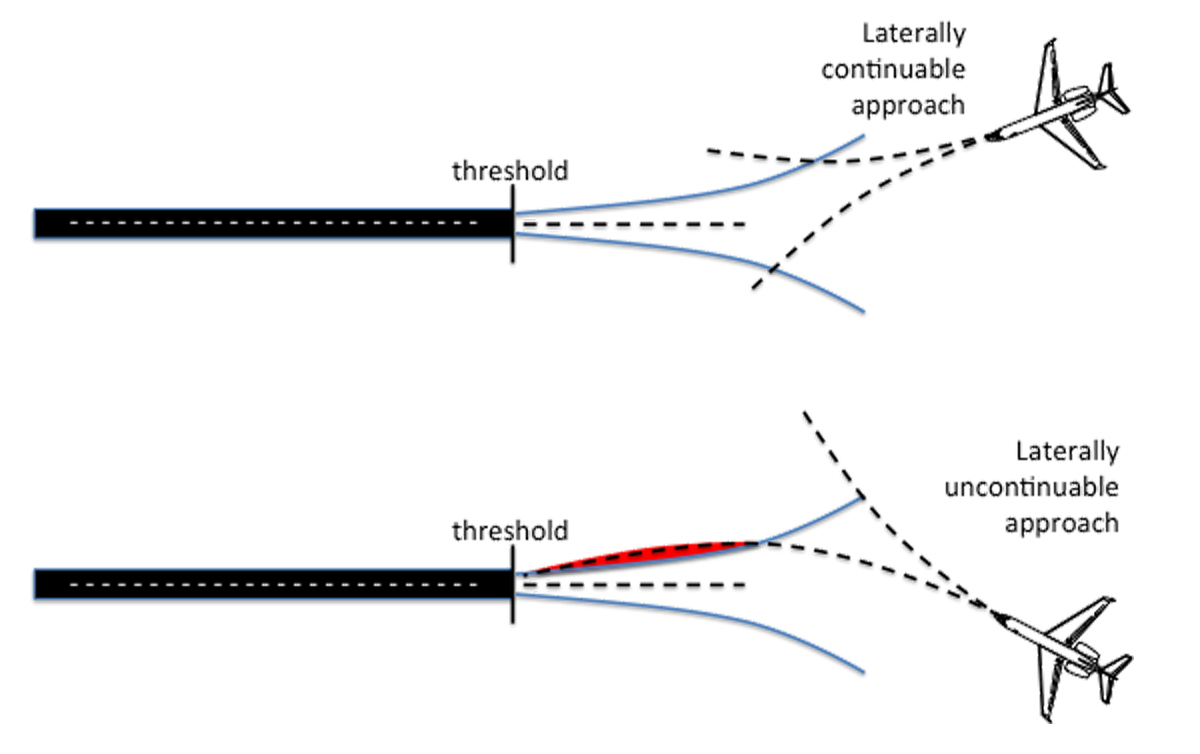
Lateral landing maneuver envelope
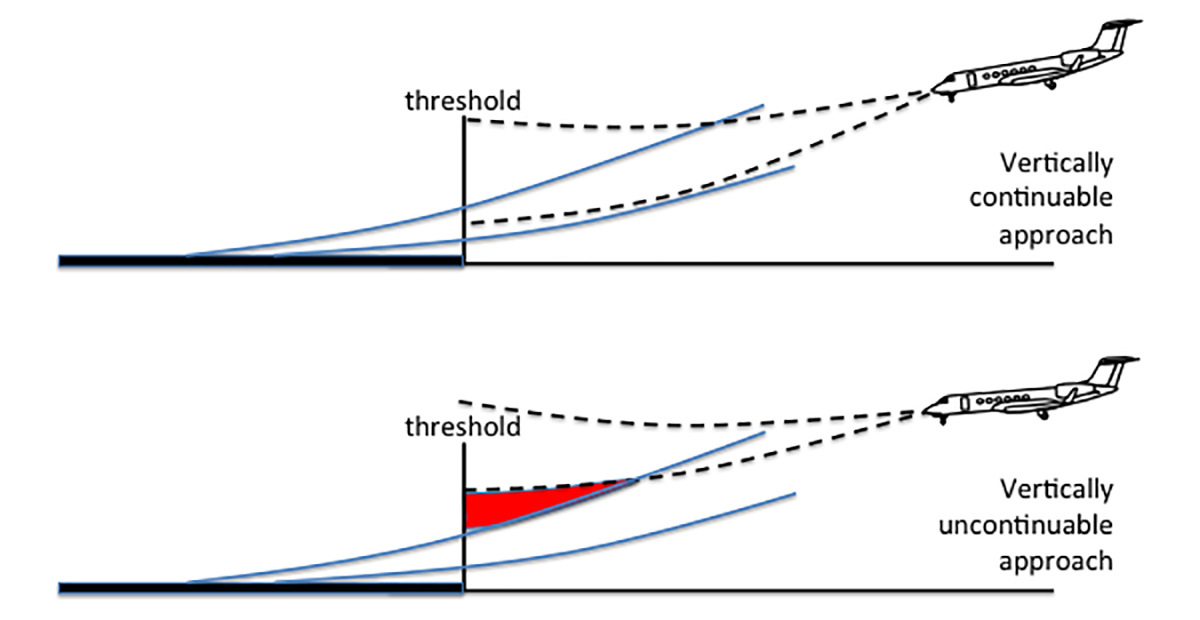
Vertical landing maneuver envelope
You should have a “no later than” stabilized approach position in mind. Most operators use 1,000 feet AGL when IMC and 500 feet when VMC. Here at Incognito Air, we use 1,000 feet above minimums for any straight-in approach, 500 feet above the runway for a visual pattern or circling approach. Keep in mind that at 500' you will be 1.57 nm from touchdown. More about: Stabilized Approach.
6
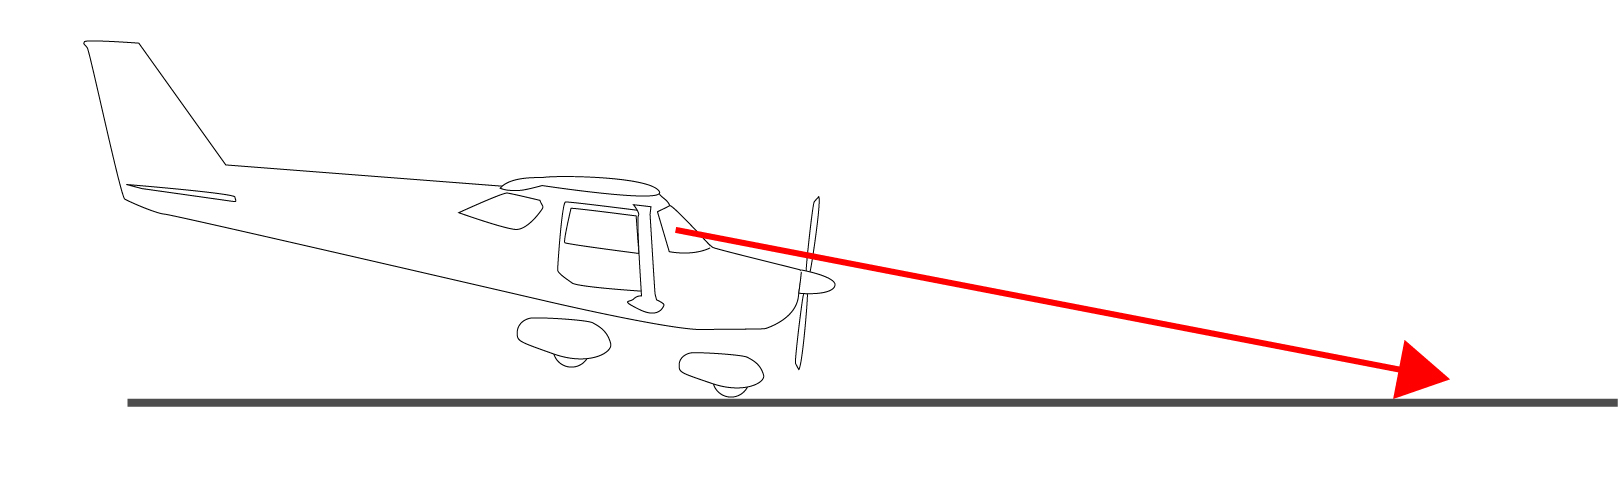
Aim point
Prior to initiating the flare, the pilot's eyes attempt to keep the runway aim point stationary on the windshield. If the pilot does not flare, his eyes will impact the runway at that point, normally 1,000' down the runway. Because most aircraft make this approach with a positive deck angle, the wheels do not simply touchdown at their actual distance behind the pilot, but at around seven times that distance. This seems counter intuitive, but the math is explained at Deck Angle.
A G450, for example, approaches with a 5° nose high attitude on a 3° glide path. Even though the wheels are only 35 feet behind the pilot's eyes, they will touchdown 275 feet behind the aim point if the pilot does not flare.
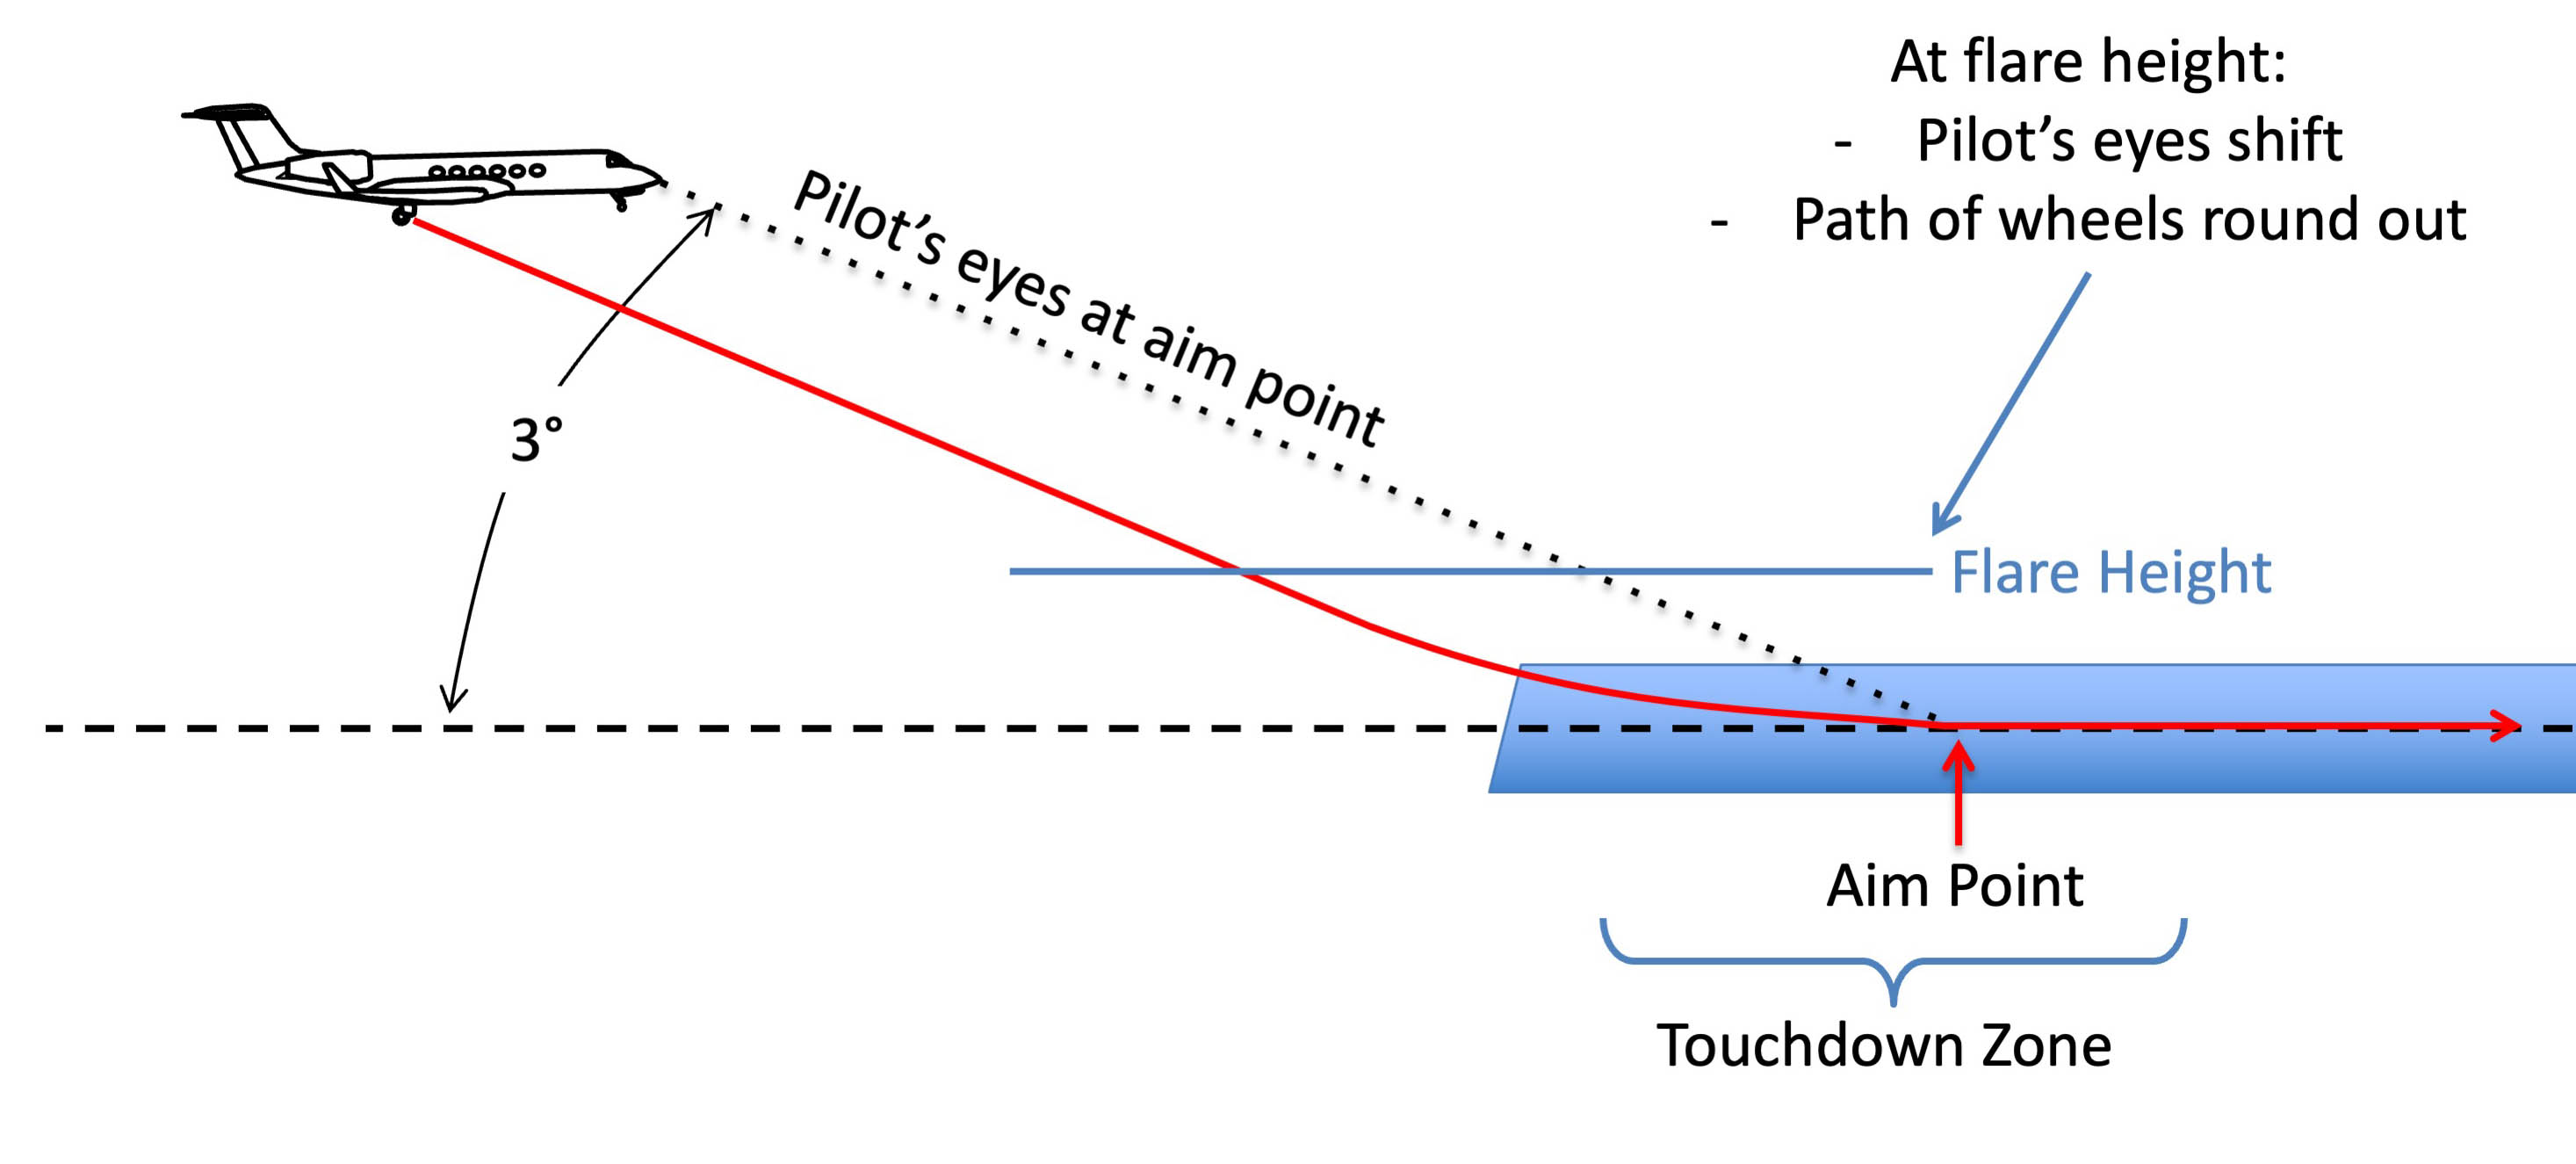
A proper flare,
But the pilot does flare and the round out should carry the wheels to the aim point. We practice to make this happen. The force of the engines and of gravity are driving the airplane down and forward. When you rotate the nose up for the flare, some of the energy that was used to propel the airplane forward is now used to further arrest the force of gravity. You have less force available for forward motion, your speed necessarily decreases. (I prove this mathematically below, under Flare Energy.)
If you do everything right, your wheels touchdown at your aim point and you bleed off the necessary amount of speed. And you did all of that without chopping the power violently at a height above the flare initiation point.
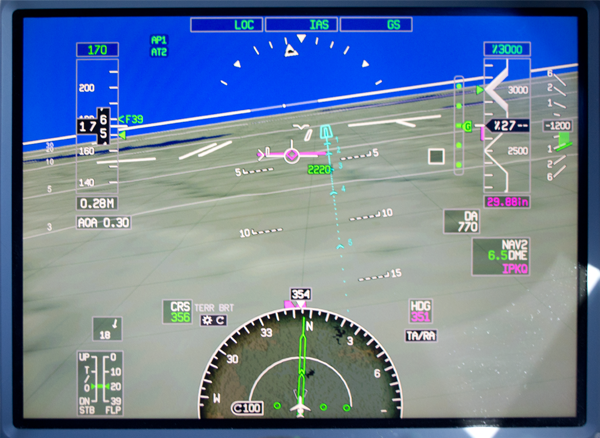
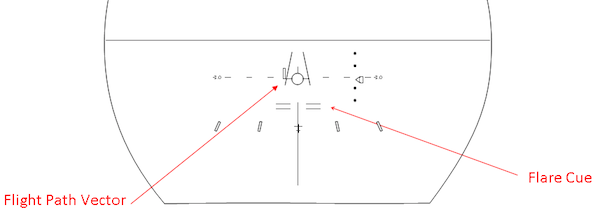
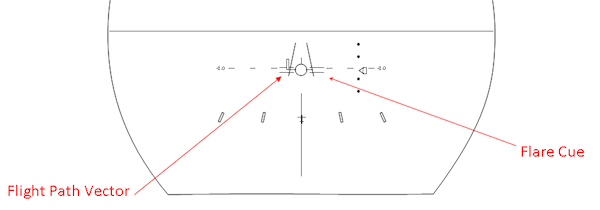
A view from the HUD from minimums to 50 feet:
The green airplane symbol is called the "Flight Path Vector" (FPV) and represents where the airplane is headed at that moment. The horizontal line going through it is a "Flight Path Angle" (FPA) and shows that we are on a 3° glide path that intersects the runway at that line. Notice that despite the gusty winds I have kept the FPV and FPA on the 1,000 foot fixed distance marker, my aim point. That isn't where the wheels are headed, they are headed about 300 feet short of that, just after the 500 foot fixed distance marker.
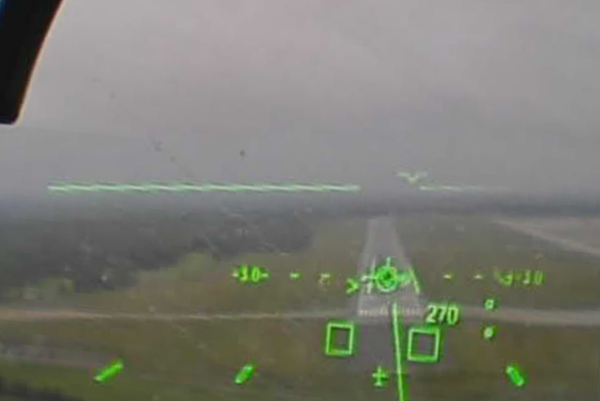
A proper flare,
HUD FPA on touchdown zone, KPSM7
The flare
You may have wondered if your passengers notice when you or one of your fellow pilots take half the runway to touchdown, fighting for that “greaser” of a touchdown. I know from experience that many passengers notice and are aware that “runway behind you” during landing is not a good thing. We certainly don’t want to arrive with a jarring thud, but we also want to land in the touchdown zone. How do we do that? It boils down to understanding the geometry of our aircraft, when to start the flare, and how to flare.
Aimpoint fallacy
When we started flying, be it in a single-engine Piper Cherokee, a single-engine Cessna 150, or something else, we are told to place a point on the runway on our windshield so it becomes stationary. Everything above it moves higher, everything below it moves lower. “Keep it right there,” we are told, “and that is where your wheels will end up.” This lesson is reinforced by the fact it seems to work out that way. Left unsaid is that it sometimes works out that way because our wheels are aimed short and the act of flaring the airplane sometimes gets the wheels to where you were aiming. If you really “keep it right there,” what will happen is a part of the airplane will hit the runway (or short of the runway) before your eyes ever get to the aimpoint. “But that doesn’t matter,” your flight instructor would say if you brought that up, “the wheels are only a few feet behind you.”
We can examine the idea that the “wheels are only a few feet behind you” and the rest of the folklore with some trigonometry. You don’t need a math degree to understand the landing flare, but a short discussion can help cement the concepts and lead to a better grasp of what needs to be done to properly land an airplane.
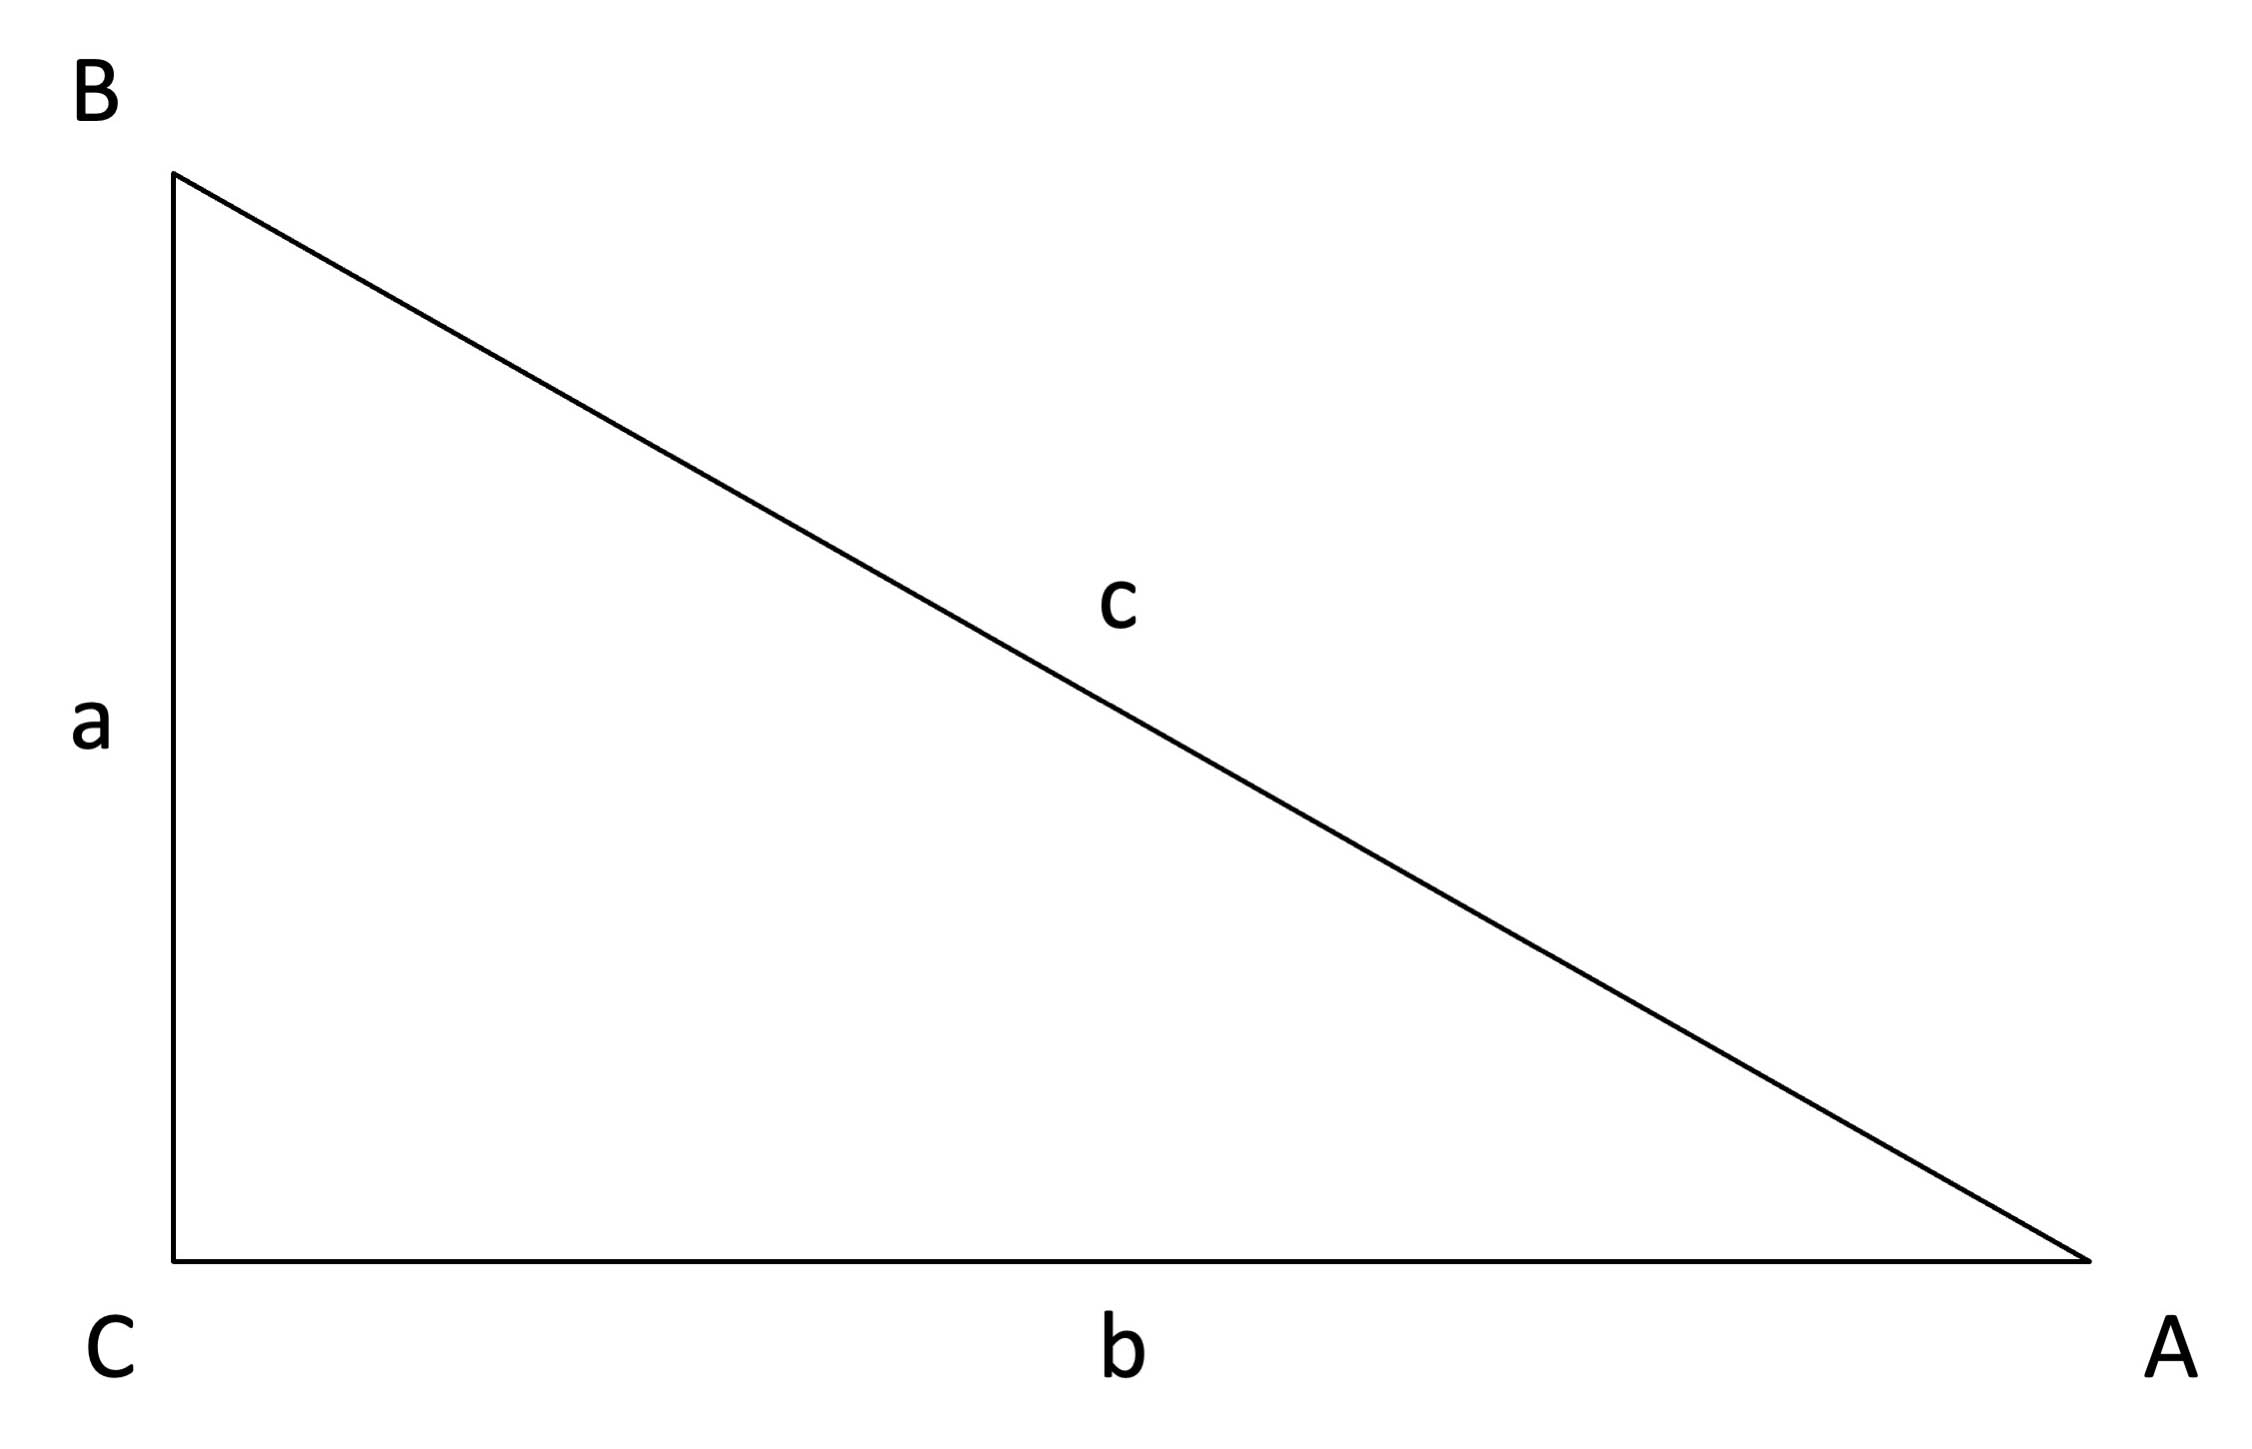
a right triangle
If you consider a right triangle with a left leg of height a, a bottom leg of length b and an angle opposite the leg a of angle A, you get:
If we constrain the angle A to 3°, and consider leg a to be height and leg b to be distance, it becomes easy to find a and b:
and:
Few manufacturers provide the numbers needed to do this, but we can pick as an example one that does: Gulfstream and their G650.
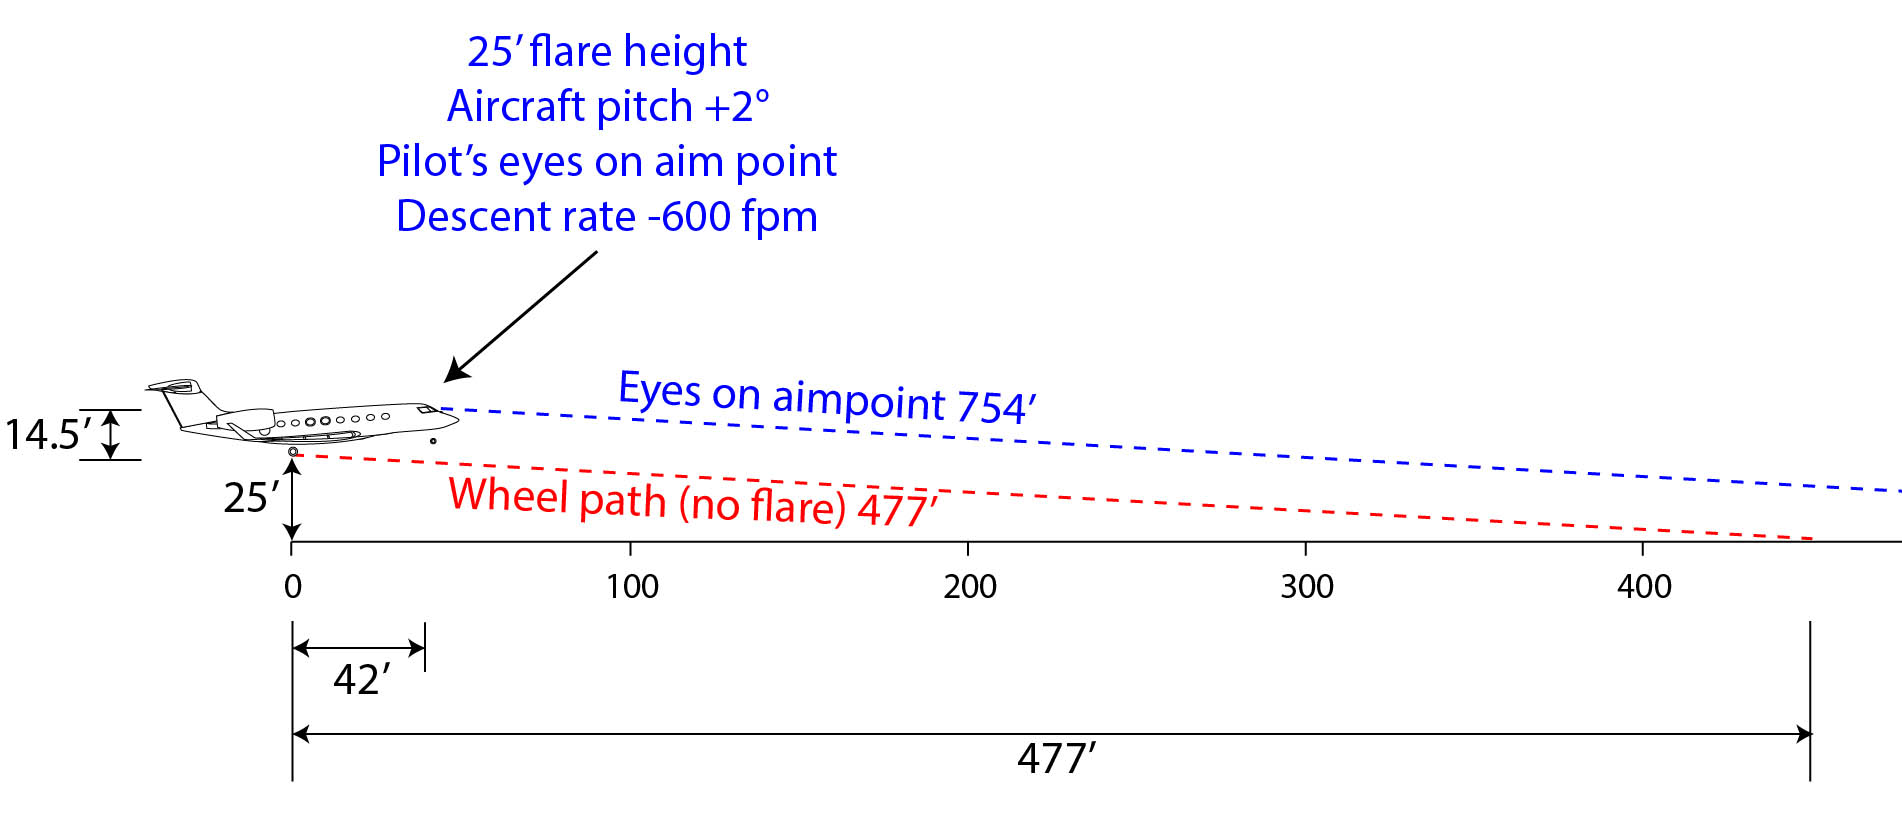
Gulfstream tells us that in the +2° pitch during the approach, the pilot’s eyes are 14.5’ above and 42’ ahead of the MLG. If the aircraft is flying on a 3° glide path, we can find the aimpoint by dividing the pilot’s eye height (39.5’) by tan( 3° ); the pilot’s eyes are looking 754’ ahead of the pilot’s eyes.
We can also determine where the wheels will touch if the pilot forgets to flare: 25 / tan( 3° ) = 477’ ahead of where they were at 25’.
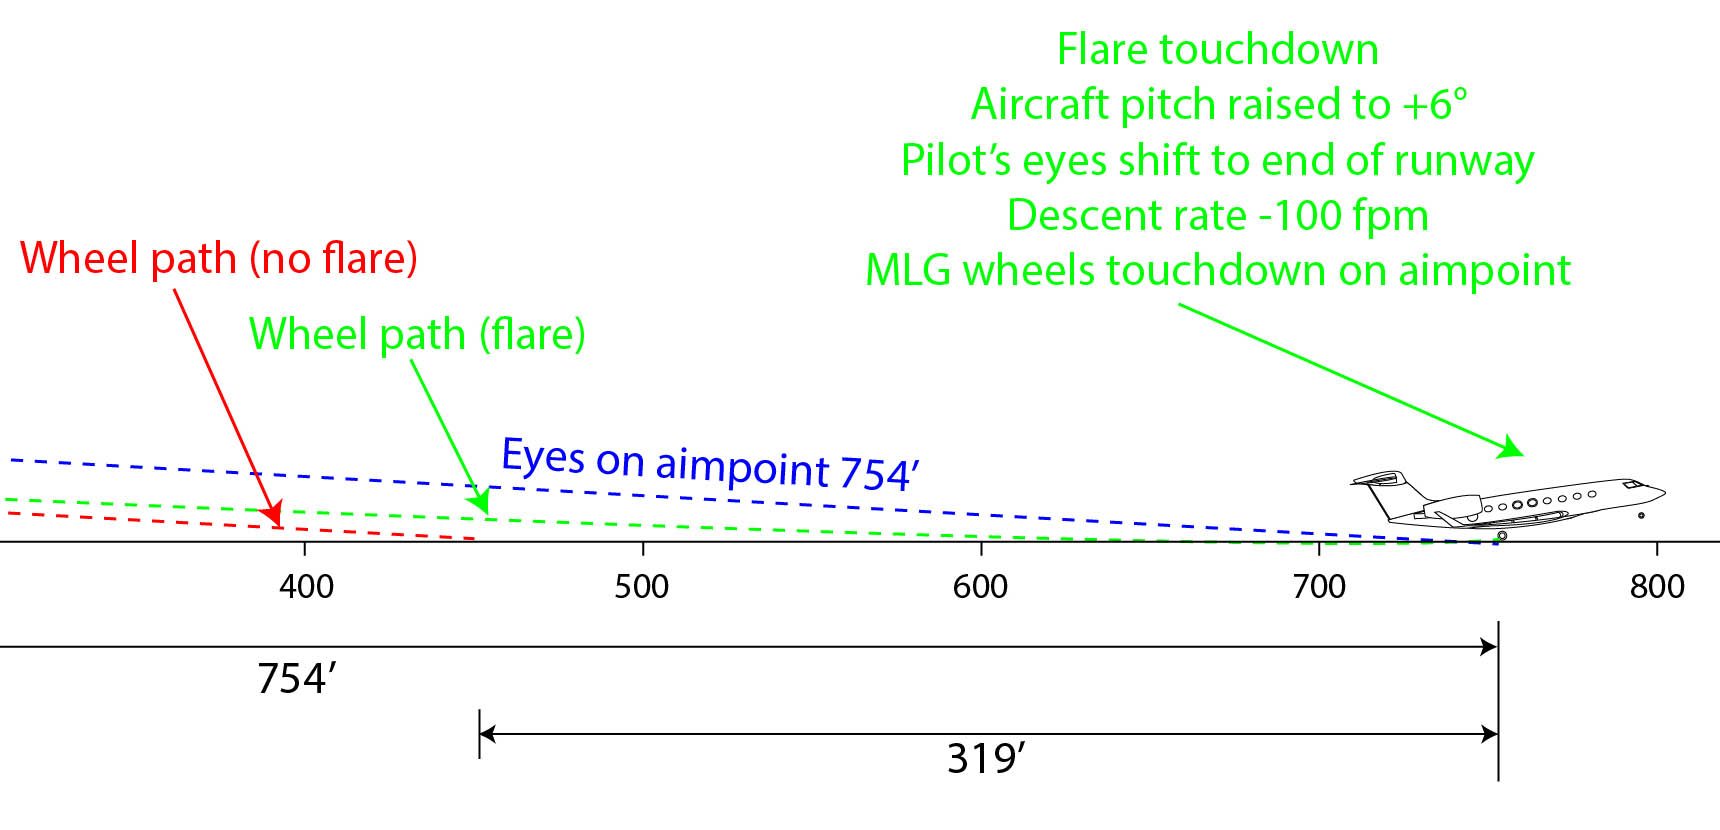
For those who are tempted to aim short, hoping to get the wheels to touchdown at the aimpoint, notice that it isn’t necessary if you don’t exaggerate the flare. I won’t go into the math, but if you reduce your sink rate from 600 fpm to 100 fpm, your wheels will touchdown precisely where you had aimed before the flare.
Of course, the G650 is a large business jet; it is nearly 100’ long. But this fact holds true for most aircraft: the MLG wheels will touch down hundreds of feet short of your aim point. This is a fact lost on many pilots attempting to put their aircraft down on the first inch of pavement. (See BD-700 C-GXPR Case Study for an example where a brand-new Bombardier Global 5000 was destroyed when the pilots arrived just a few feet short of a runway.) The lesson is clear: you need to plan on an adequate threshold crossing height (TCH) that allows for the fact that most of your aircraft is below and behind you.
Flare energy
The rotation-to-flare requires energy to arrest downward momentum; the amount of energy required depends on the glide path angle, any differences in aircraft speed from target speed, and any acceleration/deceleration. It will be to your advantage to make the angle and speed differences the same for every landing.
The rotation-to-flare may or may not bleed airspeed, depending on aircraft flight idle and ground effect characteristics. Here are three examples:
B747 — The combination of a very large wingspan induced ground effect perfectly compensates for energy needed to arrest the descent. Once the descent has been arrested, the flight idle and ground effect result in no airspeed loss at all under most conditions. The airplane has to be flown onto the runway, it will not run out of speed and sit itself down.
GV — The GV also has a very large wingspan and high flight idle engines. The descent can be arrested with very little loss of speed, but the airplane does lose speed gradually if held inches off the runway. But, once again, it should be flown onto the runway to avoid a long landing.
G450 — The G450 will lose about 5 knots in the rotation to flare, which is precisely the minimum speed increment to VREF. Once the rotation to flare is made, speed decay continues as flight idle and ground effect are not enough to maintain speed. Any exaggerated flare for the sake of touchdown will result in a significant loss of speed. Once again, the airplane should be flown onto the runway.
The target speed should consider wind. See the chapter Approach Speed Additive Technique for more about this.
The key point here is that if you do not have the required energy prior to flare rotation, you may not have the ability to flare properly at all without adding thrust. If you find yourself in a last-minute sink rate, for example, the correct solution may be to land without reducing power until touchdown. Very few aircraft should land with the power cut above the flare. Every aircraft I've flown that was certified to land with the autothrottles providing the retard in the flare, lands best doing just that.
How long does it take to flare?
Using the Gulfstream G650 example given in the “Landing Geometry” section, we know our no flare distance is 477’ and our additional distance in the flare is 319’. If we are flying at 125 knots, the time to cover that distance will be:
About 4 seconds. Why is this important? It will give you a good indicator of when to flare. It seems ridiculous, I know, to say you should flare 4 seconds prior to touchdown. But this knowledge will allow you to devise a cue that will work without a radio altimeter or razor-sharp eyes that can somehow calculate wheel height in real time. More about that next . . .
When to flare – height (good answer)
What "the book" says: Very few manufacturers specify a flare height. Gulfstream, for example, leaves you off at 50 feet and the next thing you know, you are in the touchdown zone. Some Bombardier manuals say, "at or below 50 feet." About the only manufacturer that does print a height is Boeing. In their Boeing 777 Flight Crew Training Manual, they say this: "Initiate the flare when the main gear is approximately 20 to 30 feet above the runway by increasing pitch attitude approximately 2° - 3°. This slows the rate of descent." That pretty much agrees with what we did in the Boeing 747.
What my experience says: The Boeing recommendation has worked for me in every Boeing, Challenger, and Gulfstream I've ever flown. By "work," I mean it gives me enough time to complete the flare and still land in the touchdown zone.
When to flare – height (better answer)
You should, of course, consult your manufacturer's books. If the books are silent on the subject, find a mentor who seems to land consistently in the touchdown zone and see what he or she is using. If you don't have anyone with such a track record, spend some time in the simulator. I am betting the answer will be between 20 and 30 feet. But what if you don’t have a radio altimeter? Or what if it is inoperative or doesn’t have an audio function? There is a better way than flaring at a height above the runway.
When to flare – disappearing runway reference (best answer)
Many of us were taught to flare when our aimpoint disappears. As we saw in the “Landing Geometry” section, that is a ridiculous idea. You can, however, figure the point of the runway that disappears which signifies you are at the correct height to flare. If you know the “look down” angle of your cockpit, you can do the math and find that point. But very few aircraft have published look down angles. There is, fortunately, and easier way. All you need is a video camera.
Step 1 – Determine your aircraft’s look down cutoff.
The accompanying photo was taken by a “GoPro” camera mounted behind me at about my eye level. After a few flights I was able to verify the point directly below my vision was accurately captured as shown in the photo.
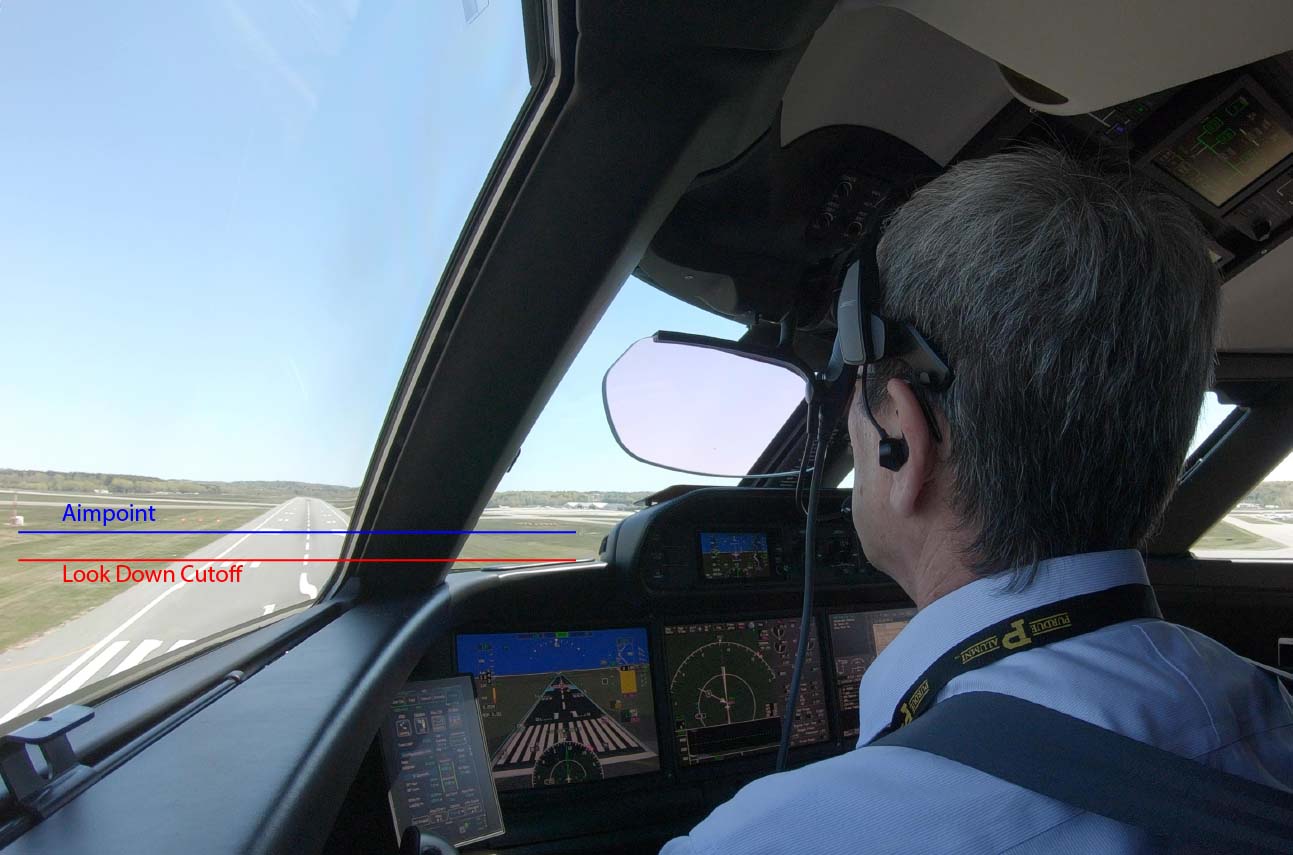
G500 aimpoint vs. lookdown angle
Step 2, Option 1 – Radio altimeter calls
If your radio altimeter provides an audible call that coincides with your flare height, examine the video at that moment to determine the difference between your aimpoint and your look down cutoff. If not, you can time to extrapolate. If, for example, it takes a second to go from “30” to “20” and you want to start the flare at 25, then run the video for half a second after the “30” call. (Many video players will allow you to scroll with these finite increments.)
Step 2, Option 2 – Timing
If you don’t have a usable radio altimeter or don’t have audible calls, you can run the video to touchdown and then reverse the video for 4 seconds and determine the distance between your aimpoint and look down cutoff as before.
Step 3 – Use your look down cutoff point
Armed with the distance between your aimpoint and look down cutoff, you will know when to begin your flare.
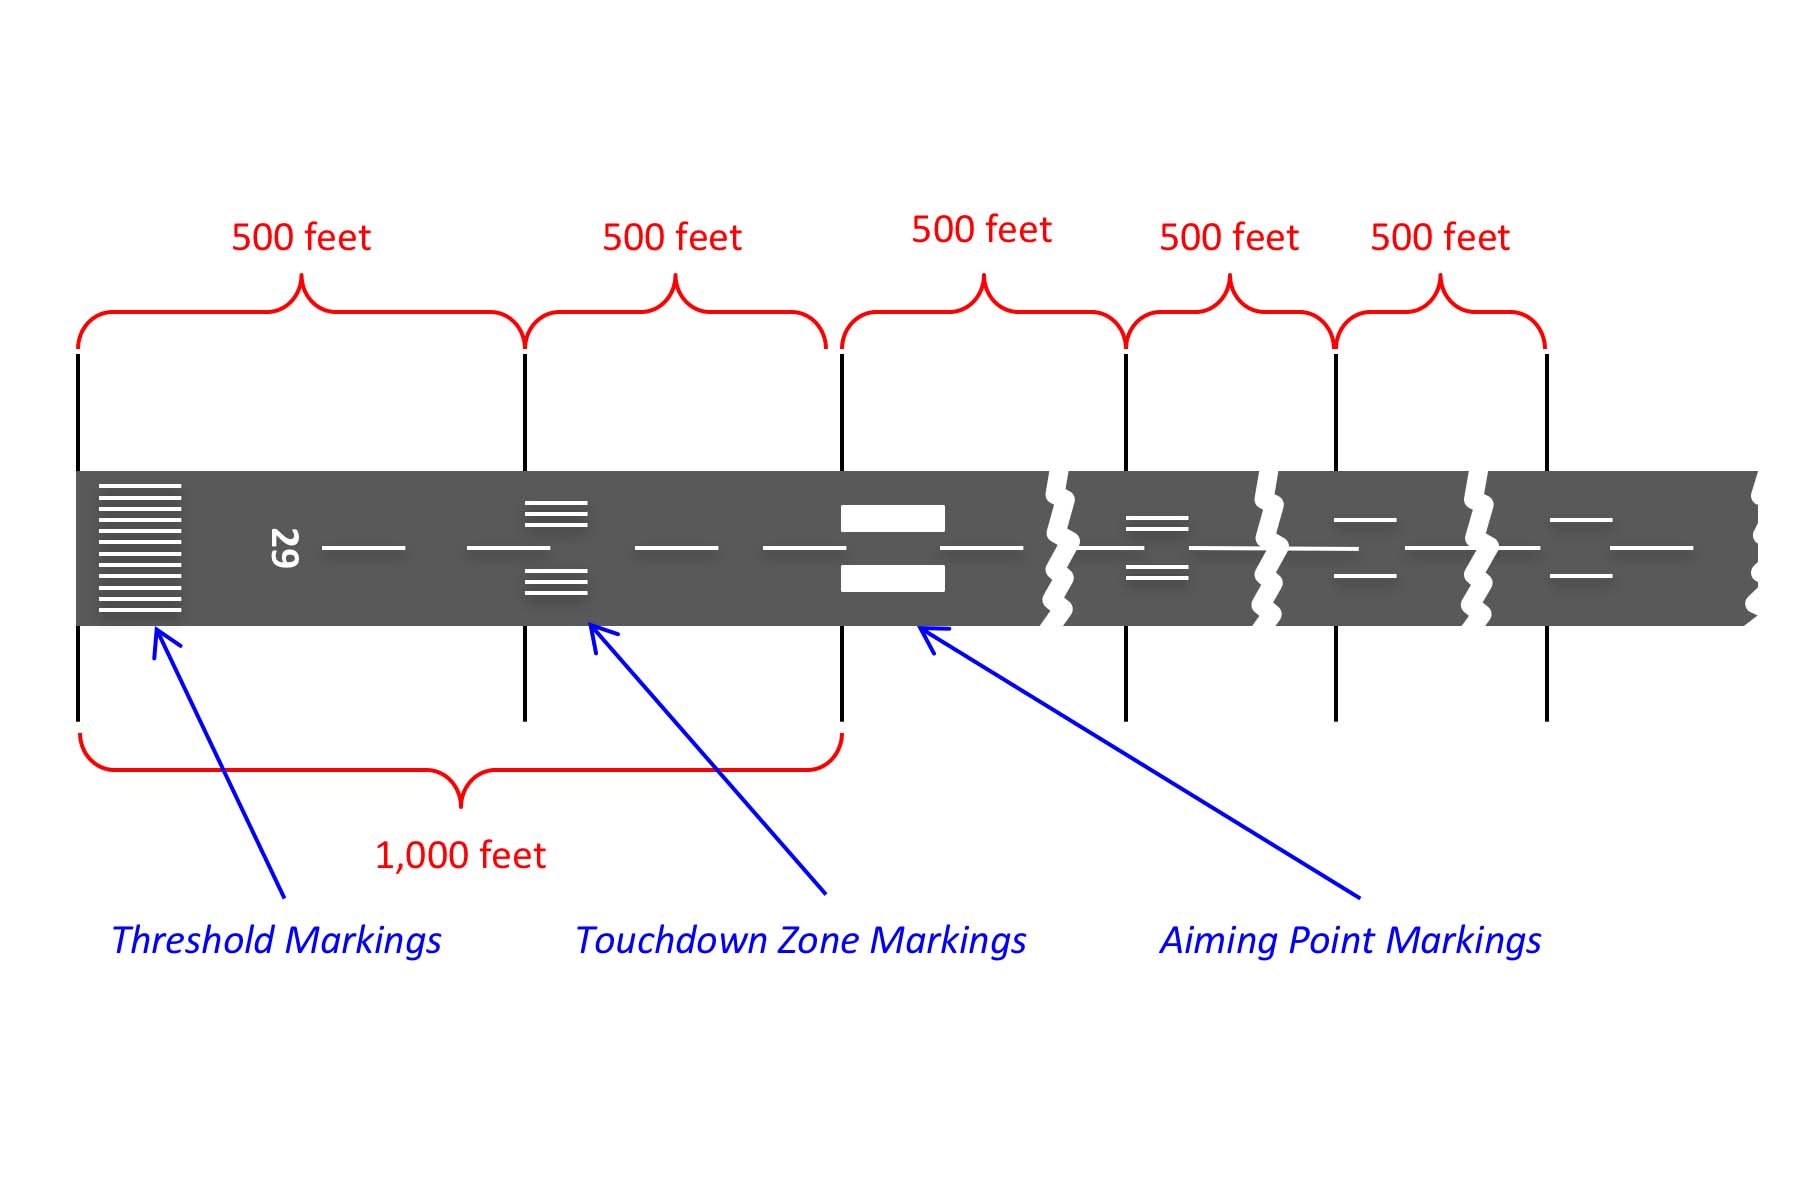
Standard instrument runway markings
In our example in our G500, the difference was just under 500 feet, so we use 500 feet. I aim for the first part of the fixed distance markers and begin the flare when the 500’ touchdown zone marking disappears from view.
How to flare
The best pilot I knew in my Air Force Boeing 747 squadron landed the airplane just like I did at the time: flare the airplane trying to get it down to an inch over the runway, and then apply quick and small nose down adjustments to “feel” for the runway. He usually managed to do it in the first thousand feet, but sometimes it took longer. And sometimes he misjudged horribly. For a few years his signature was apparent at Andrews Air Force Base: the unmistakable imprint of 18 wheels in the displaced threshold. There had to be a better way. I am sure I am not the first with this method, but I came up with it after a few years of hit and miss 747 landings. The method served me well in that airplane and all that followed:
- Determine the correct flare height as discussed before, as well as the look down cutoff point for you and your aircraft.
- Fly a stable approach fully configured, on centerline, on glidepath, on speed, with the correct vertical sink rate. The correct sink rate can be approximated by dividing your ground speed by two and multiplying the answer by 10. (So flying at 140 knot ground speed should yield a descent rate of 700 fpm.)
- When taking over visually from an electronic glide path or when fine tuning your visual glide path, ensure you are aimed for the touchdown zone of the runway. (Long aircraft such as the Boeing 747 will have procedures to aim longer on runways with 1,000’ touchdown zones.)
- Cross the runway threshold at the correct Threshold Crossing Height (TCH), usually 50 feet. Keep in mind that the 50-foot TCH based on your eyes in the cockpit or your ILS antenna below the cockpit means your wheels will be lower than the published TCH. This isn’t a problem unless the runway is designed for smaller aircraft.
- Keep the aimpoint fixed until your predetermined flare height as announced by your radio altimeter or the disappearance of your look down cutoff point. At this point, shift your eyes to the end of the runway (not the horizon), pull back on your stick or yoke in one smooth action. The pull should take four seconds.
- Try to reduce the sink rate to about 100 feet per minute; do not try to level off. With your eyes on the end of the runway you should be able to sense the rate of descent by the changing perspective of the runway edges. A 100 feet per minute descent gives a suitably soft touchdown without risking floating down the runway.
A word about thrust
I’ve left out throttle reduction from the equation since it is aircraft specific and should be accomplished by aircraft manual procedure. Aircraft with autothrottle “retard” functions are no exception. Some manufacturers will have second thoughts after an accident and may vacillate. One of the aircraft types I’ve flown was designed for the autothrottles to handle the thrust reduction automatically until a spate of long landing incidents. They then recommended “chopping” the power manually at 50’ until that proved to have no impact and then they returned to recommending the automatic procedure. I’ve found that for most aircraft, you can land in the touchdown zone as long as you don’t reduce thrust too soon.
Heads Up Display Flare Cue
Some aircraft heads up displays offer a flare cue that provides hints as to (1) when to begin the flare, (2) at what rate to rotate the pitch, and (3) how to complete the touchdown. It has been my experience that the Gulfstream flare cue does the first two items well. The third item? I think it has you raise the nose too high, resulting in a late touchdown.
Landing flare cue 100 feet
With the G450 PlaneView system, the flare cue appears at the bottom about 100 feet AGL. In this example, the flight path vector is over the touchdown zone:
Landing flare cue catches wings
The pilot should maintain the flight path vector right where it is and wait for the flare cue to move upward and “catch” the wings. At this point the pilot begins the flare rotation:
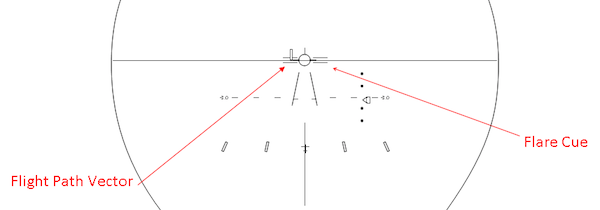
Landing flare cue horizon
Here the manual has you increase the pitch as the flare cue rises, finally to end up with the flight path vector on the virtual horizon, meaning level flight. We've found over the years this tends to be too high and will result in a long landing.
In an ideal world all this works out perfectly. In a less than ideal world, sometimes it works and sometimes it doesn’t. We’ve seen the flare cue level off a foot above the runway to drop the airplane with a thud, or less often flare too late for a bit of a bounce. Even the good landings tend to be a little long. I recommend following the flare cue to about the end of the runway and then maintain that gentle 100 fpm sink rate.
Adjustments
Floaters. I often hear complaints about this method because a particular type of airplane tends to float. That is true if you attempt to flare to zero fpm. Don't do that. Flare to 100 fpm and fly the airplane onto the runway, no adjustment necessary.
Aircraft Weight. Heavier aircraft seem less prone to floating while lighter aircraft are subject to overshooting the required pitch. If you raise your gaze to the end of the runway and attempt to end in a 100 fpm sink, no adjustment necessary.
Runway Slope. If the slope in the touchdown zone is downhill the flare will have to be made to what might be an uncomfortably negative pitch. If the slope is uphill, the flare will have to be exaggerated. Here again, raise your aim point to the end of the runway and end up with a 100 fpm sink so no adjustment will be necessary.
Ground Effect. On large wingspan aircraft, ground effect can have a profound effect on the aircraft’s vertical descent rate while in the flare. Ground effect normally takes effect about one-half the aircraft’s wing span above the ground. A Boeing 747, for example, experiences ground effect over 100 feet in the air. A Gulfstream V, while certainly smaller, still experiences ground effect almost 50 feet in the air which is high enough to impact the entire flare. If the runway sits near a cliff, the normal ground effect will be absent until the last minute, when it arrives all at once. This can lead to ballooning the flare. If the runway is narrower than the wingspan and the edges drop away, the normal ground effect will never materialize at full strength, possibly leading to an abrupt flare. You will notice this effect on the pitch of the airplane, but it is up to you to adjust the controls to maintain the pitch where you want it to end up with 100 fpm at touchdown. So . . . you guessed it . . . no adjustment necessary.
Convection. Sometimes everything looks ideal and at the last moment things go awry for no known reason. Remember your first landing on a hot day to Runway 8L in Honolulu? The warm pineapple fields push the aircraft above glide path, so you pull the throttles back and just as you establish a healthy downward VVI to return to glide path you reach the Pearl Harbor channel where the cool waters rob you of the extra lift and now you are headed down at an alarming rate. Once you've figured that out you are over the hot asphalt of Hickam Air Force Base and the process reverses itself. What to do? Get a shot of the approach path on a terrain chart or Google Earth to anticipate any potential issues. Get on glide path early, carry extra speed if you anticipate flying from warm to cold or on speed if you anticipate cold to warm. When you hit the convection, smoothly increase or reduce power in conjunction with pitch changes. The critical thought: don’t let the convection fly the aircraft and no adjustment will be necessary.
Winds. Many aircraft include a wind factor to the approach speed which has the pilot add half the steady wind plus all of the gust factor up to 20 knots. This will normally be enough to make and adjustments to the flare unnecessary. But if you don't have these adjustments or the wind strength and/or gust is particularly strong, you might need to delay the power reduction to idle but keep the initial and shifting aim points as before. For more about this, see: Approach Speed Additives.
Crosswinds. High crosswinds complicate the landing flare but do not change the basic method. For more about this, see: Crosswind Landing.
8
Touchdown and roll out
Touchdown
"How" you touchdown is a matter for the manufacturer, but in general, I find the following ideas helpful:
- Let the main gear plant themselves solidly to avoid any weight on wheel system confusion. Having the spoilers deploy and then restow can't be good for braking and certainly hurts your landing distance.
- Deploy thrust reversers as soon as your manufacturer allows; they are generally more effective at high speeds than low.
- Bring the nose down as expeditiously as is comfortable, unless the manufacturer recommends otherwise. I've never flown an airplane other than Air Force types where aerobraking is advisable.
Rollout
Nose Gear
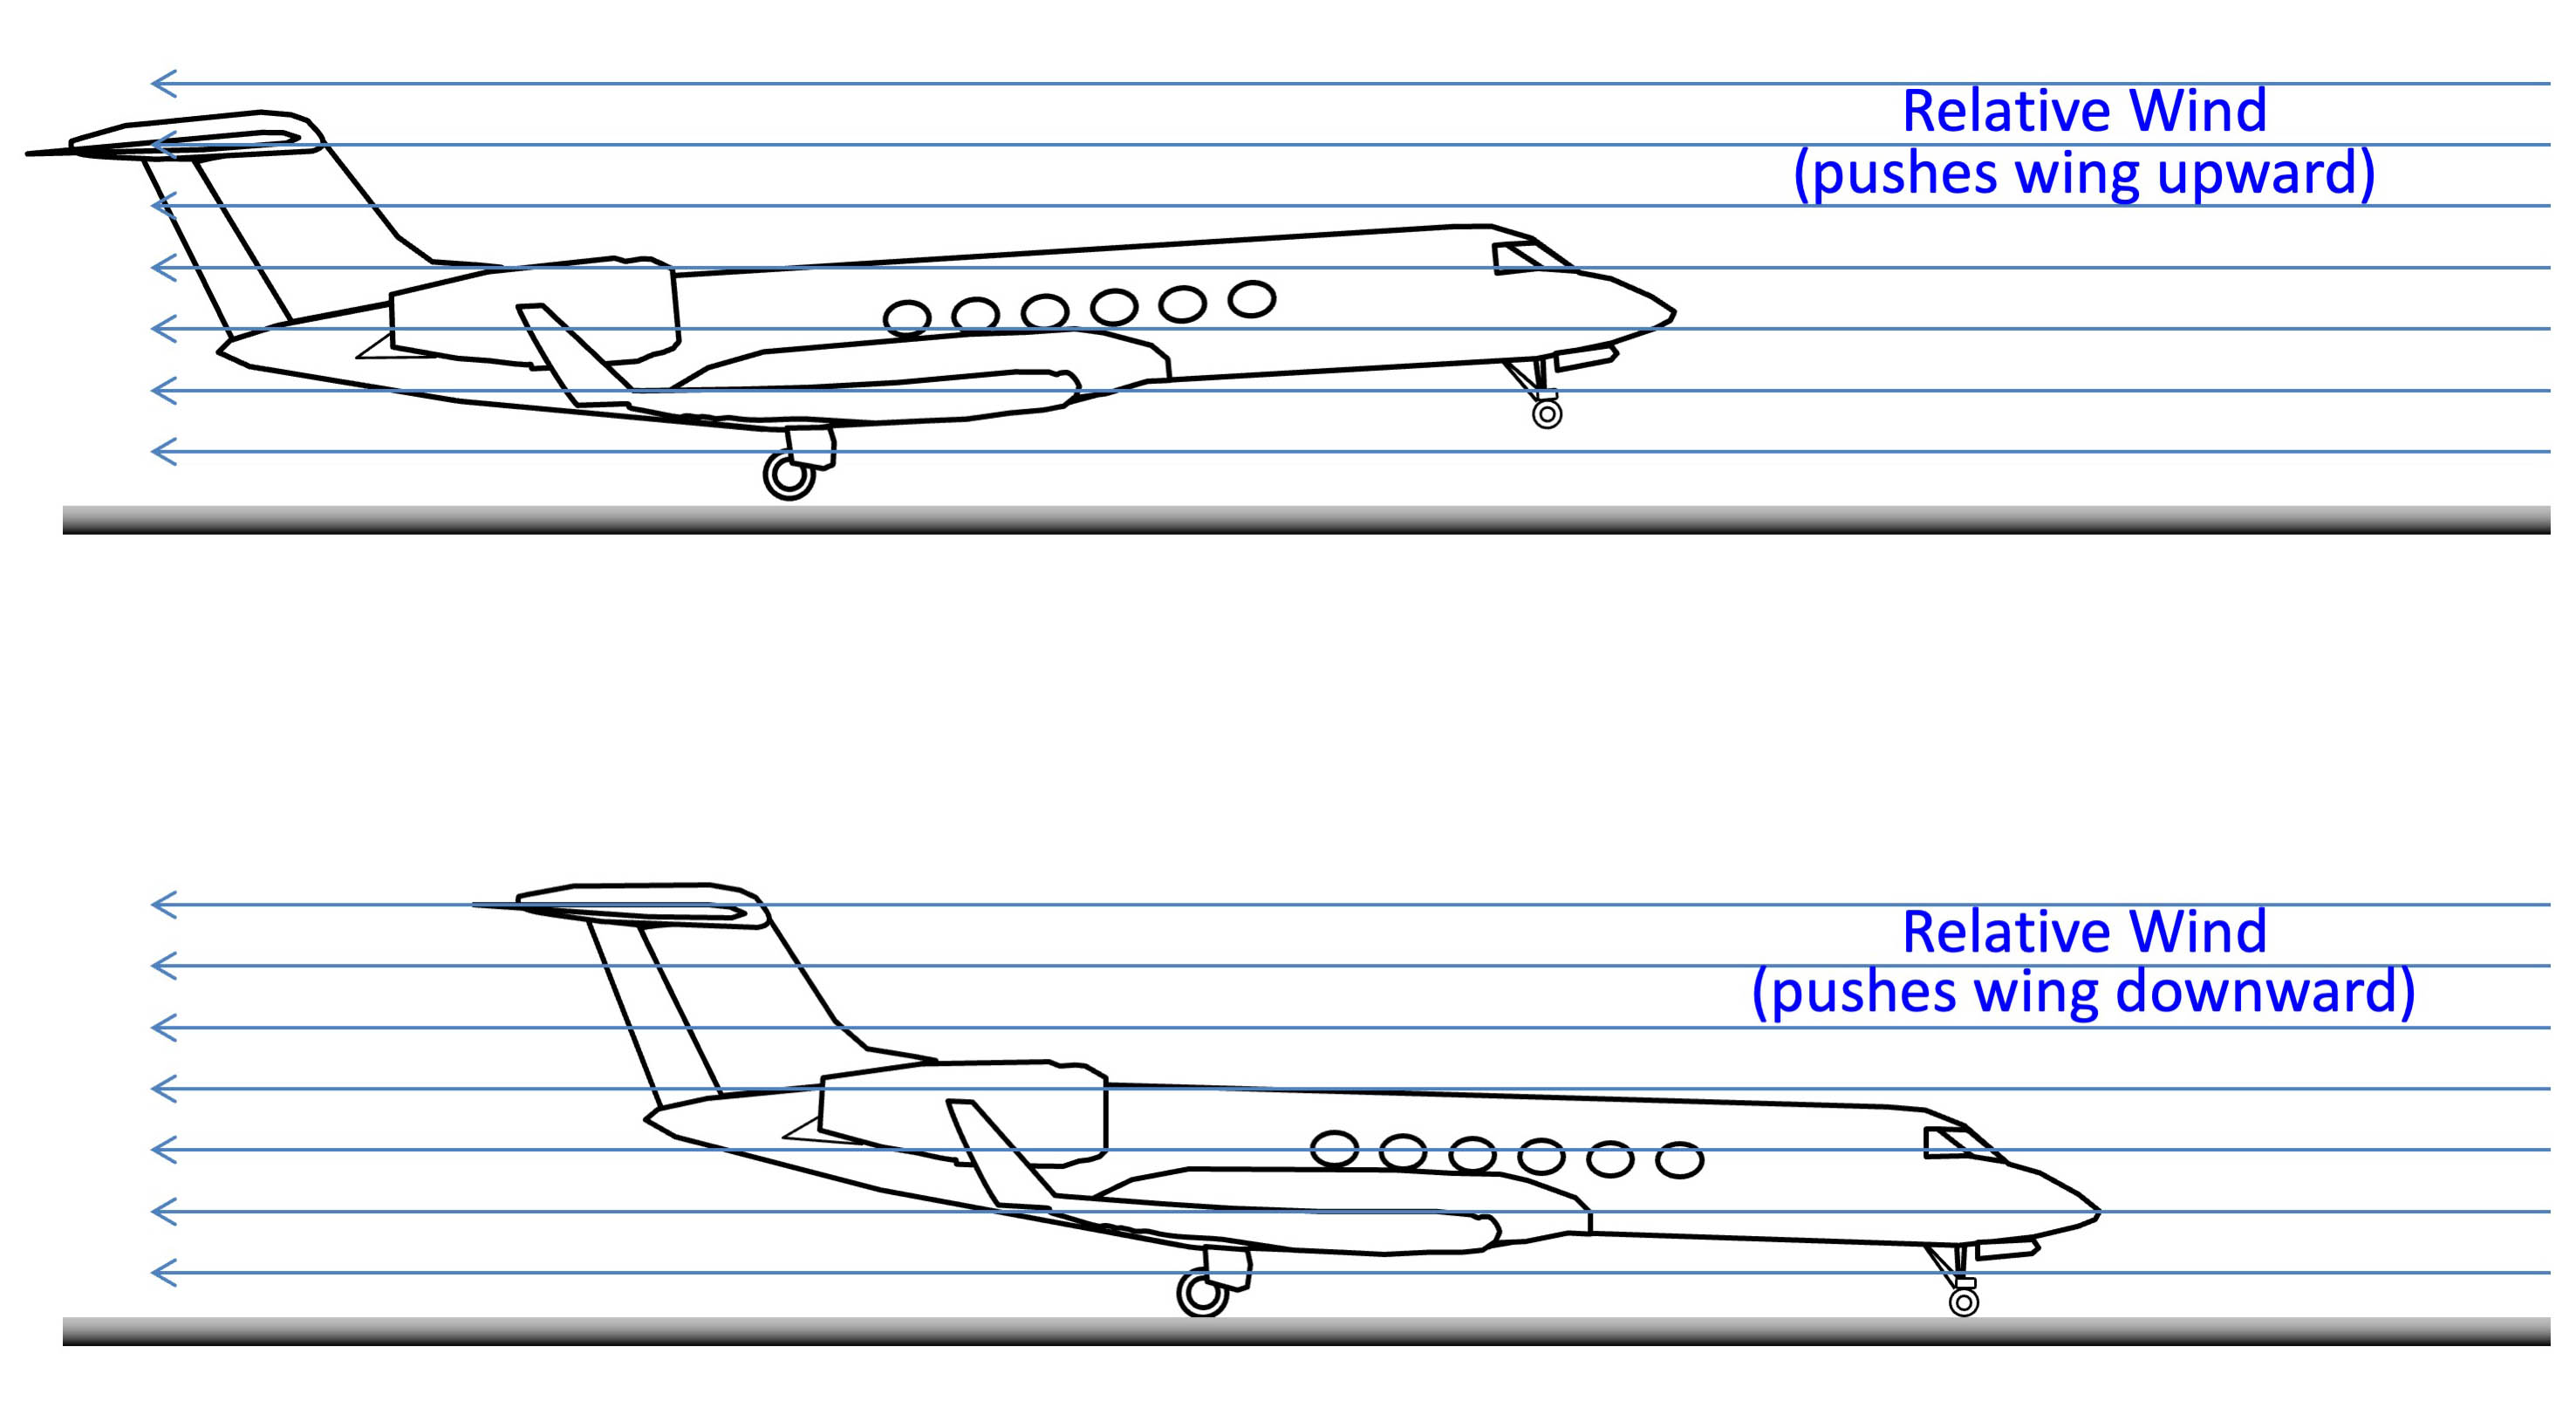
Touchdown relative wind
Most aircraft enter the flare with a nose up pitch and positive angle of attack on the wings. The relative wind hits the wing bottom first, having the effect of pushing the nose of the aircraft upward. As the main gear touch, the momentum of the aircraft continues downward and the aircraft tends to pivot around the main gear, throwing the nose gear downward. If the pilot does nothing with the pitch controls, the nose will on its own slam onto the runway. As the relative wind moves from underneath the wing to above it, it adds to the downward force on the nose. Momentum and the relative wind work together to slam the nose earthward. The pilots must exert increasing back pressure after main gear touchdown.
The difficulty of gracefully lowering the nose to the runway varies with aircraft.
- The B-747 has adequate back pressure available to lower the nose gently all the way down to around 100 knots.
- The GV touchdown speed is so low that you will eventually run out of elevator effectiveness and you can anticipate pulling the yoke all the way back.
- The GIII, GIV, and G450 may present the biggest challenge in the Gulfstream world, the speeds are high enough that pulling the yoke back prematurely can balloon the aircraft back into the air. Timing is important and a deliberate effort to get the nose down in a few seconds is needed.
You need to understand the forces of nature are against you when it comes to going from a two point attitude to three. You need to anticipate the need for more and more back pressure. If you land with the airplane in proper trim you will need back pressure as the relative wind hits the top of the wing, more back pressure as the nose starts to fall, and, at least with the G450, the yoke will end up near your lap as the nose wheel finally touches.
Aerodynamics
As the aircraft decelerates you will need to increase aileron inputs to keep the wings level until the aircraft is in a three-point attitude. You need to get the airplane into a three point attitude before you lose rudder effectiveness and the point this happens probably is not VMCG. VMCG is a number required for certification but the published number only works for a set of conditions of the manufacturer's choosing, it could very well be much higher or lower. More about that: VMCG Minimum Control Speed Ground.
You will need to increase rudder inputs to keep tracking runway centerline. On aircraft with rudder pedal to nosewheel steering interfaces, knowing the mechanics will help with understanding when rudder is more important than nosewheel steering, and vice versa. In the G450, for example, there is a one second delay after nosewheel touchdown before steering inputs are started and nosewheel steering inputs are limited to 7 or 8 degrees.
Reverse and Brakes
On aircraft with true clam shell reversers, such as the GIII, reverse thrust is aimed forward and is fairly effective from high speed to medium speed ranges. Aircraft with cowl “cascade” reversers, such as the Boeing 747 with C-6 engines, aim the reversed air outward and act as very large speed brakes. This type of reverse is only effective at high speeds and is practically useless at medium and lower speeds. Some aircraft with hybrid systems, such as the Gulfstream V, are mostly effective at high speeds with little impact at medium and lower speeds.
Regardless of reverser type, the best impact is at high speeds and it is to the pilot’s advantage to use as much reverser as possible as soon as possible. The axiom “by the time you know you need them, it’s too late” is true with reverse thrust. For a case study about how not to use reverse thrust, see Southwest Airlines 1248.
References
(Source material)
Boeing 737 NG Flight Crew Training Manual, Revision 12, June 30, 2013
Dassault Falcon 900EX Crew Operational Documentation for Dassault non EASy (CODDE), Dassault Aviation, March 26, 2010
Gulfstream G450 Airplane Flight Manual, Revision 35, April 18, 2013
Please note: Gulfstream Aerospace Corporation has no affiliation or connection whatsoever with this website, and Gulfstream does not review, endorse, or approve any of the content included on the site. As a result, Gulfstream is not responsible or liable for your use of any materials or information obtained from this site.