When I found out this year's total solar eclipse would be sailing right over my backyard, I became excited for the first time about solar eclipses. I had never seen one, but I never made an effort to travel to do so. Now the eclipse was coming to me. What follows is relevant to aviators because the lessons along the way apply to how we fly airplanes. Plus this gives me a chance to show off a few photos.
— James Albright
Updated:
2024-04-08
Everything was supposed to be perfect. The April 8, 2024 eclipse was going to be epic. The sun is at "solar maximum" this year, meaning sunspot activity was high and we would be able to see solar flares without the use of telescopes or other magnifying devices. The moon would be at its closest, meaning the size of totality — the area where the moon's shadow covers the earth — would be at its largest. And the weather should be great. Historically, Texas sees clear skies in the month of April 50% of the time. The numbers north and east only got worse, as little as only 10% in New England. As a pilot and an amateur astronomy photographer, I had a good foundation to build upon. It was going to be great.
I'm not sure how much longer the link will be in place, but Xavier Jubier provides an excellent source of all things about solar and lunar eclipses. The page shown allows you to find any location and determine the relevant information about that location and the eclipse you have in mind. Based on that, I found that for the April 8, 2024 eclipse:
- C1 (Start of partial eclipse): 17:17:48.9 UTC
- C2 (Start of total eclipse): 18:35:35.6 UTC
- MAX (Maximum eclipse): 18:37:30.8 UTC
- Obscuration: 100%
- Duration of total eclipse: 3m 50.4s
- Moon/sun size ratio: 1.05613
- C3 (End of total eclipse: 18:39:26.0
- C4 (End of partial eclipse): 19:58:27.3
- Umbral velocity: 1,635 mph
As former U.S. Secretary of Defense Donald Rumsfeld once said: "There are known knowns; there are things we know we know. We also know there are known unknowns; that is to say we know there are some things we do not know. But there are also unknown unknowns—the ones we don't know we don't know." I am in the latter category when it comes to solar eclipse photography. So it was time to ask a few questions.
1
Questions
I've done some lunar photography and have been collecting equipment to begin some astrophotography, but the sun was nothing more to me than a prop for shots at the beach or other landscape photos. So I had some of what I needed:
- Star tracker: A Sky Watcher Star Adventurer GTi which is used to move a camera or telescope in sync with the earth. That allows you to take long exposures of things not on earth so that they don't appear to move. If, for example, you want a shot of a star that requires the camera shutter to be open for more than 10 or 15 seconds, the star will appear elongated because your point on earth is moving. (We on earth are moving about 1,000 mph.) The star tracker works in the northern hemisphere by sighting its longitudinal and lateral axis on Polaris, the north star. Since Polaris is directly above the North Pole, the axis of the star tracker is effectively "motionless." Motors in latitude (called declination) and the lateral axis (called Right Azimuth) allow the telescope or camera to follow the stars, the moon, or the sun precisely. That leads to question one: how do you sight the tracker on Polaris during the day, when you can't see it?
- Cameras: My two main cameras are both Digital Single Lens Reflex (DSLR) cameras which allow for manual control of shutter speed, lens aperture, film sensitivity (ISO), and focus. The Nikon D750 is known as a "full frame" sensor camera, since its digital sensor is 35 x 24 mm, about the size of an older 35 mm film camera. The Fujifilm XT-3 is called a "crop sensor" camera, since its smaller 24 x 16 mm sensor is effectively cropped for a smaller image. My longest telephoto lens for the Nikon is 28 - 300 mm with an aperture of 3.5 to 5.6. My longest lens for the Fujifilm is 150 - 600 mm with an aperture of 5.6 - 8. Neither lens is what I would call professional level, but should be good enough. So, question two: which camera gets the star tracker and which a conventional tripod that has to be moved every few seconds?
- Software: There are several iPhone Apps which interface with the star tracker, providing a way to align it as well as adjust it. Question three: is there software to help with alignment during the day?
Most of my research was done with my friend, Mr. Y. Tube. It appeared that I was short some equipment and could benefit from some software:
- Solar filters: Just as we humans cannot look directly into the sun without suffering permanent damage to our eyes, the cameras would need a filter for the partial phases of the eclipse. I've seen relatively cheap film that can be fashioned into camera filters and I've seen expensive glass filters that are screwed directly to the lenses. Question four: which type of solar filter works best for DSLR cameras?
- Batteries: The duration of the eclipse, from C1 to C4 is about two hours and with setup more like three hours. I have multiple batteries for both cameras but both require the camera be removed from the star tracker or tripod, and that could impact the aim. Question five: how do I best extend camera battery life or smooth the battery swap?
- Timers (Intervelometers): I will more than likely be taking hundreds of photos while changing exposure, on two cameras. It will be hectic and the most critical time, during totality, will be in darkness. Question six: how can I automate the actual camera shutter release and exposure changes?
2
Answers
Mr. Y. Tube not only helped with the "unknown unknowns" by asking questions I hadn't considered, Mr. Tube also pointed me in the right directions for answers:
Aligning the star tracker in the daytime

Question: How do you sight the tracker on Polaris during the day, when you can't see it?
Answer: The iPhone App Polar Scope Align Pro uses the phone's compass to point to magnetic north and then applies the magnetic variation from the GPS location to find true north. It uses the phone's internal gyro for the declination. In effect, it points at true north. Most of Mr. Tube's associates came up with ways to hold the phone parallel to the star tracker itself. I built an iPhone holder that clips into the star tracker's camera dovetail mount. After a few practice sessions, I found this gets me to within two or three degrees of the North Star.
Which camera gets the star tracker?
Question: Which camera gets the star tracker and which a conventional tripod that has to be moved every few seconds?
Answer: I was planning on the full frame sensor for the tracker, thinking it would give me the best shots. But in a practice session I found the longer 600 mm lens on the Fujifilm harder to point with just the tripod. In addition, the Nikon is heavier and while the star tracker has counterweights, I worried about the entire rig falling over if caught by a gust of wind. Once the star tracker is aligned, it will keep the sun in the center of the frame for the entire duration of the eclipse. Putting the Nikon on the manual tripod made more sense, because with its 28 - 300 mm lens I could zoom wide to find the sun and then zoom long to get the best shot. So it was settled: the Fujifilm XT-3 got the star tracker and the Nikon D750 the tripod.
Daytime solar alignment
Question: Is there software to help with alignment during the day?
Answer: The approved solution for many star trackers is an iPhone App called Syscan Pro and that works great at night, where you can pick one, two, or three stars. The process involves finding the stars in your telescope or camera and telling Syscan Pro you are aimed there. The more stars you get, the higher the accuracy. To my surprise, the "1 Star" option during the day includes the sun.
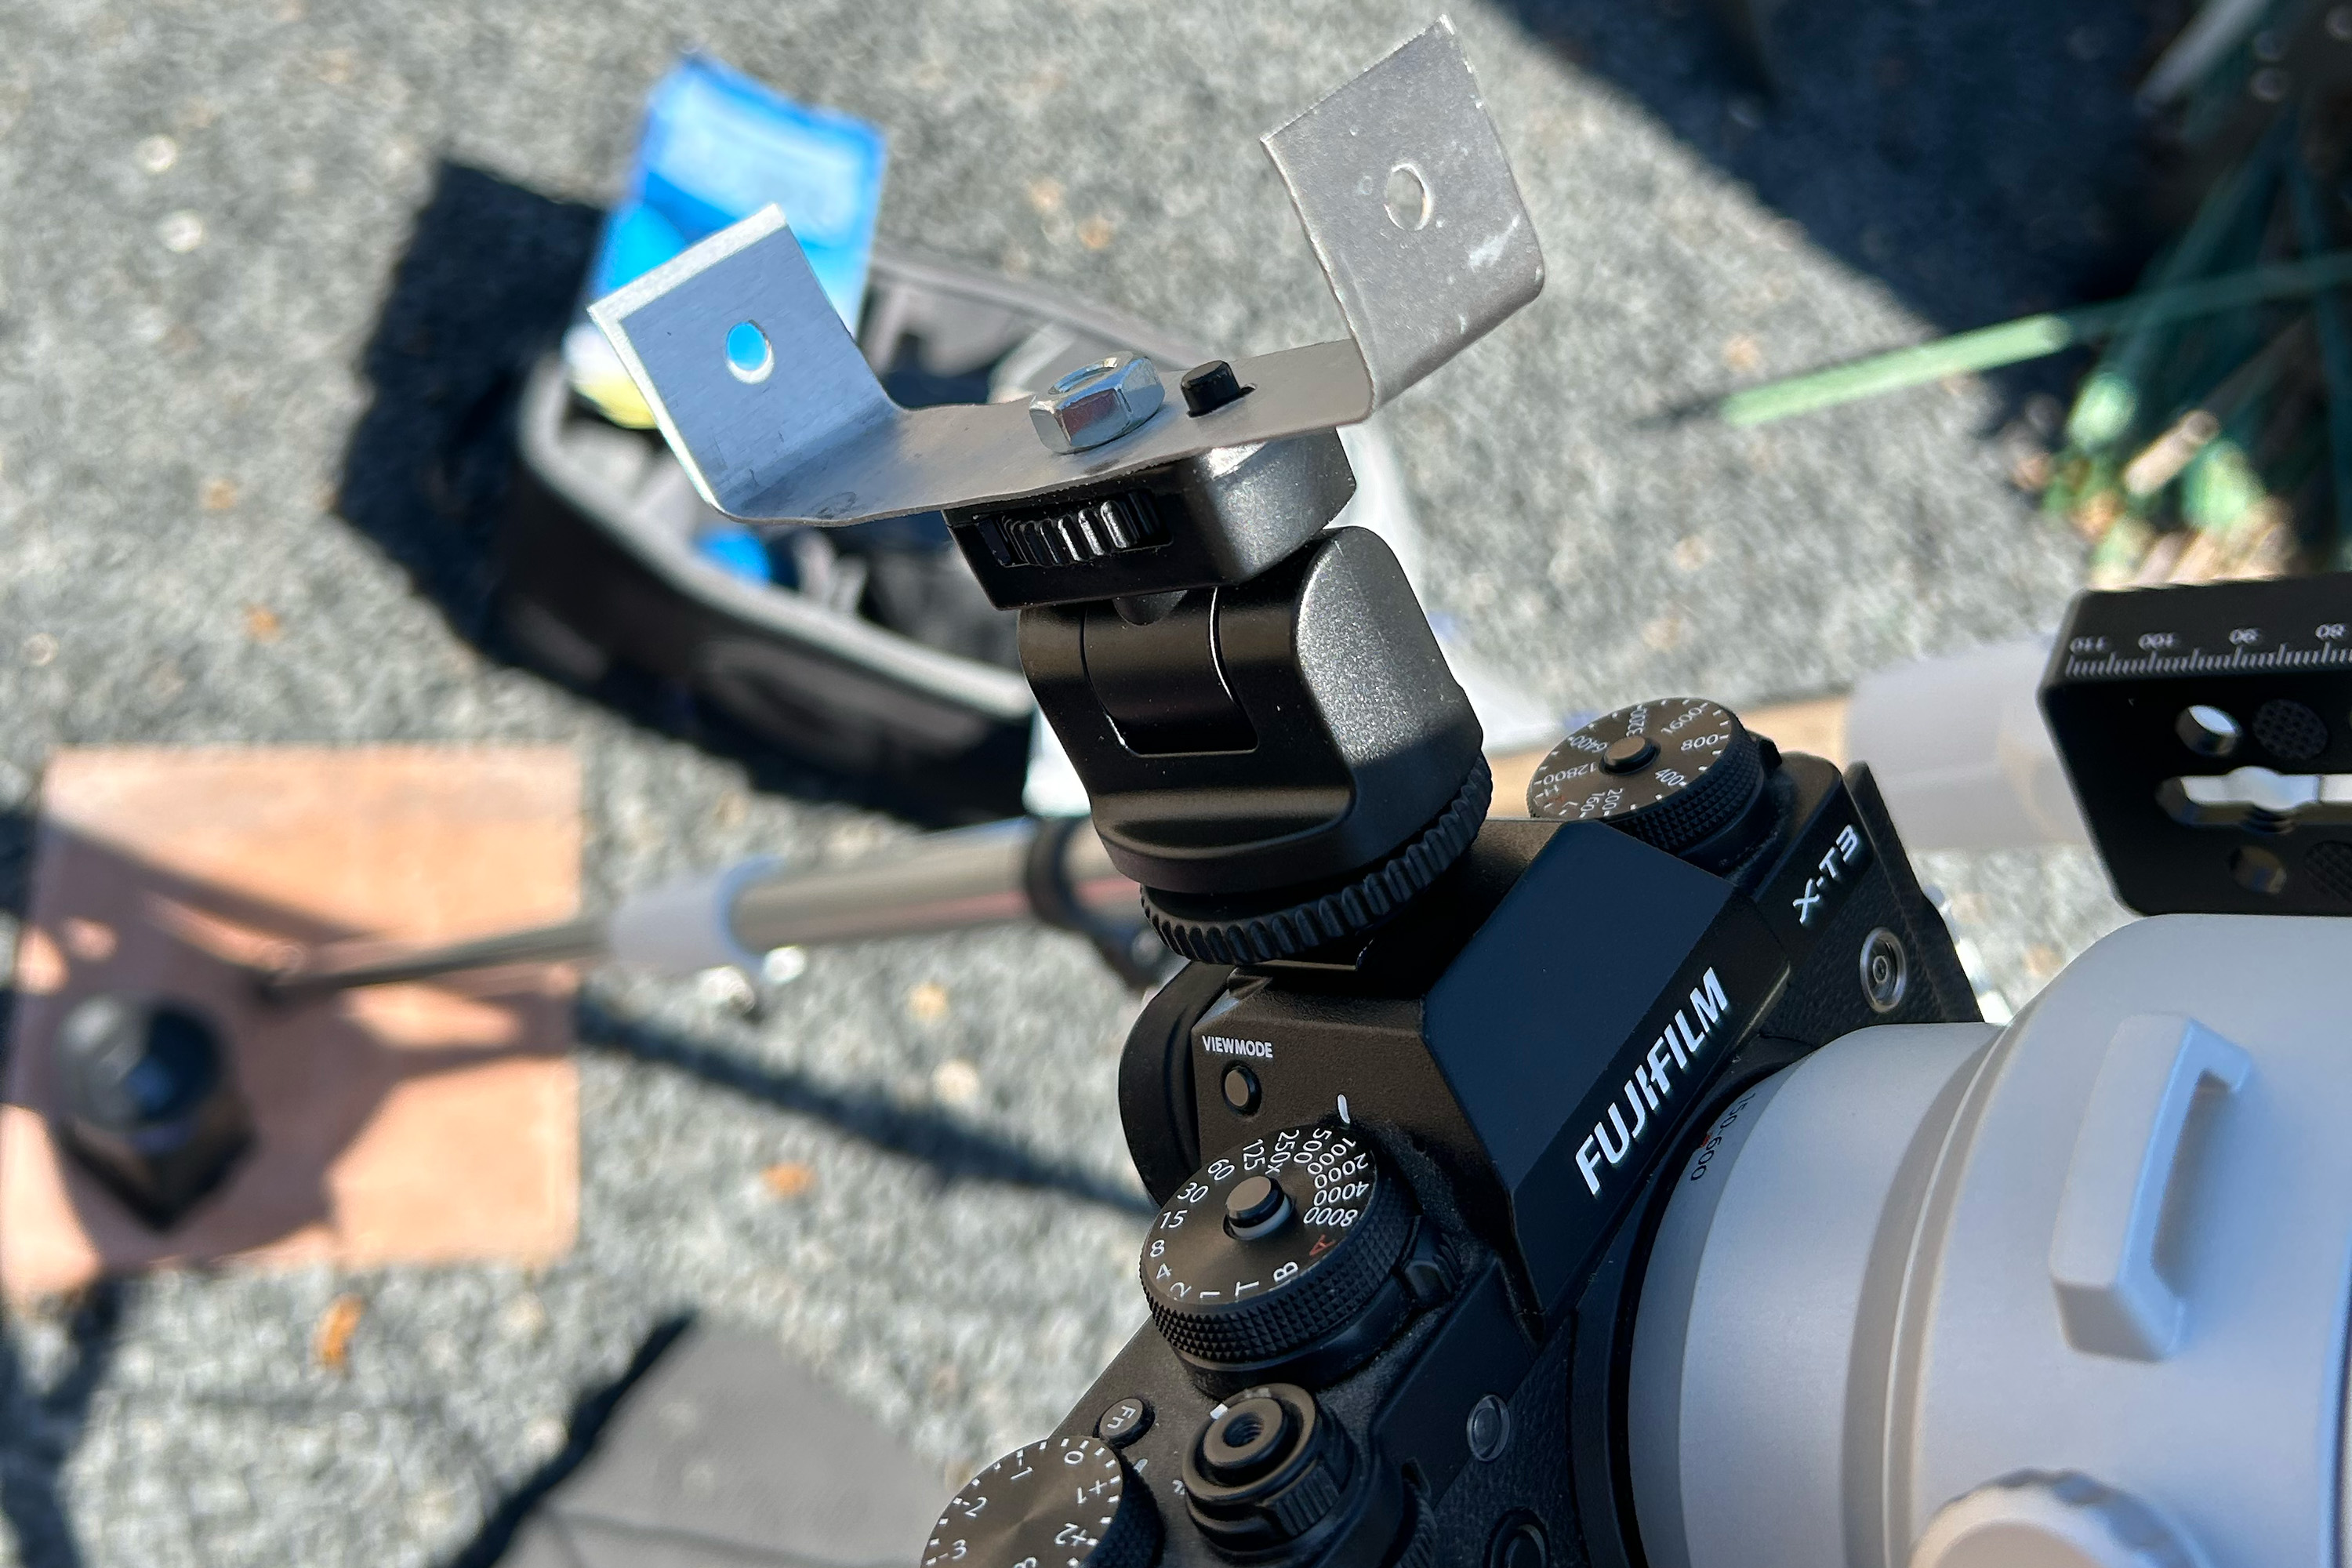
The first time I did this, the star tracker moved the camera and lens into the general direction, but not close enough to view the sun in the camera's electronic display. I had a solar filter installed, so the camera sensor was protected and so were my eyes as long as I used the electronic display. So how do I get the star tracker fine-tuned if it isn't close enough? One of the astrophotography channels showed a simple clip which was little more than a very wide "U" with holes on either end. The clip attached to the camera's flash shoe. You simply allowed the sun to shine in the forward hole onto the back plate. Once the light from the sun is aimed at the aft hole, you are very close. I fashioned my own "U" out of some scrap sheet metal. (See the photo.) It worked!
Solar filters

Question: Which type of solar filter works best for DSLR cameras?
Answer: Based on Mr. Tube's advice, I bought a sheet of Baader Solar Film and constructed a Styrofoam holder that I could easily snap on and off the camera. This was a cheap solution which worked, but was prone to blowing off in the wind. I tried taping it in place, but that sometimes caused the focus to shift. I bought a glass filter for the XT-3 lens, but it had to be twisted on and off and that tended to throw off the aim. I didn't want to deal with having to re-aim in the few seconds available just before totality. My friends at Amazon suggested a magnetic filter mount compatible with the lens. That worked. So I have a glass filter on the XT-3 and my homemade version on the D750.
Battery Life
Question: How do I best extend camera battery life or smooth the battery swap?
Answer: My first test run revealed that both cameras didn't have enough battery power to last three hours. The XT-3, while taking a shot every second would run out in less than an hour. The D750, shooting less often, lasted almost two hours. Replacing the D750's battery was easy, since the tripod locked into position and removing the camera, replacing the battery, and replacing the camera didn't affect its alignment. Doing this on the XT-3 while mounted to the star tracker was impossible without throwing off the aim.
Connecting a portable battery was the answer, of course. But not all portable batteries are created equal. You Tuber Pal2Tech explains that a "Power Distribution" battery provides enough power to keep the camera running without depleting the onboard battery. He recommended and I got the Anker PowerCore+ 2680 mAH battery which did the trick.
Question: How can I automate the actual camera shutter release and exposure changes?
Answer: The App I used to align the star tracker, Syscan Pro, includes an automatic shutter release that connects to the camera and allows you to automatically fire the shutter at intervals of your choosing. I also had a portable intervelometer that connects to the D750. Job done.
3
The plan
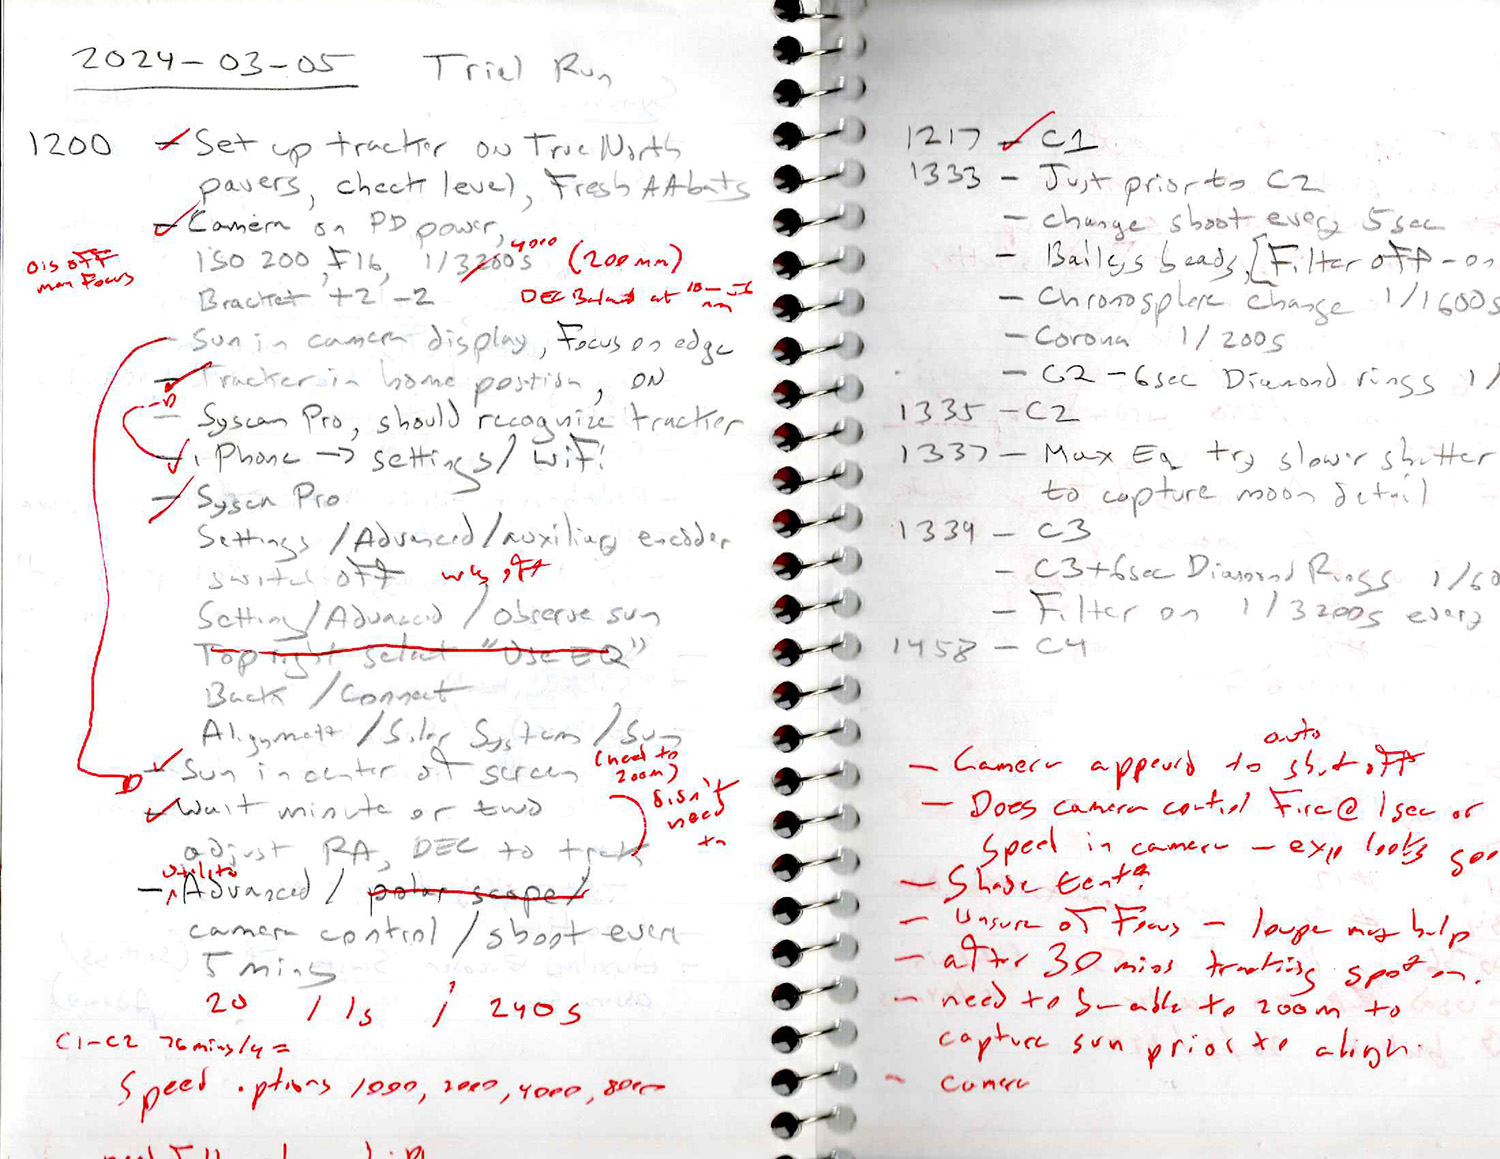
I started practicing the plan about a month before the actual day. The notes in the photo were my original plan with lessons learned from that first day in red. Each test run was planned on a sunny day for the exact timing expected for the actual solar eclipse. Each of the first five tests revealed a problem that required the plan to be changed. The first test, for example, revealed that I needed a method of fine tuning the star tracker without looking at the sun. (Resulting in the metal clip with two holes.) It also revealed that taking the solar filter off without disturbing alignment was almost impossible. (Solution: tighten the RA and Dec clutches before removing the filter, then loosen the clutches to permit the tracker to continue tracking.) And so it went until I had "Plan A" ready to go:
- Morning of shoot: ensure all batteries at 100%, reformat camera SD cards. Ensure XT-3 150 - 600 mm lens installed with solar filter and lens cap, settings ISO 200, f11, 1/1000, bracket -1/+1, manual focus, manual exposure. Ensure D750 28 - 300 mm installed with lens cap, ISO 250, f8, 1/1250, bracket -1/+1, manual focus, manual exposure.
- 1145. Setup D750 on tripod, manual release connected, filter installed. Center on sun, zoom in, focus on sunspots. Set up tracker facing True North, fine tune RA and Dec using PS Align Pro. Place XT-3 on tracker, ensure balanced in RA and Dec. Connect battery to XT-3, connect shutter release from tracker to XT-3. Turn tracker on, connect tracker WiFi to phone. Setup Syscan Pro with "Observe Sun" ON, connect to iPhone, Align/1 star/sun, center sun, zoom 400 mm, focus. Level XT-3 with horizon.
- 1200. Start automated shooting on XT-3, Camera control 40/1/180 (40 shots, 1 every 180 seconds), this will cause the XT-3 to take three bracketed shots every 3 minutes.
- Every few minutes recenter D750 on sun, take several shots.
- 1217 (C1). Ensure XT-3 still shooting, manually take a few D750 shots showing first partial event.
- 1332 (C2 - 3 minutes. XT-3 camera control 480 / 1 / 1 (up to 480 shots, 1 per second).
- 1334:30 (C2 - 30 seconds). All filters off, adjust XT-3 to 1/250 and the 1/60.
- 1335 (C2). Progressively lower XT-3 shutter to 1 second.
- 1337 (Max EQ). Progressively increase XT-3 to 1/60.
- 1339 (C3). XT-3 1/250, then filters on, XT-3 1/1000. Then camera control 50 / 1 / 180).
- 1400. Meridian flip star tracker. (This is flipping the tracker from one side to another when before it approaches the azimuth meridian where it might cause the camera or counterweight to contact the tripod and stop tracking.
- 1458 (C4). Take last shots of full sun.
4
Testing
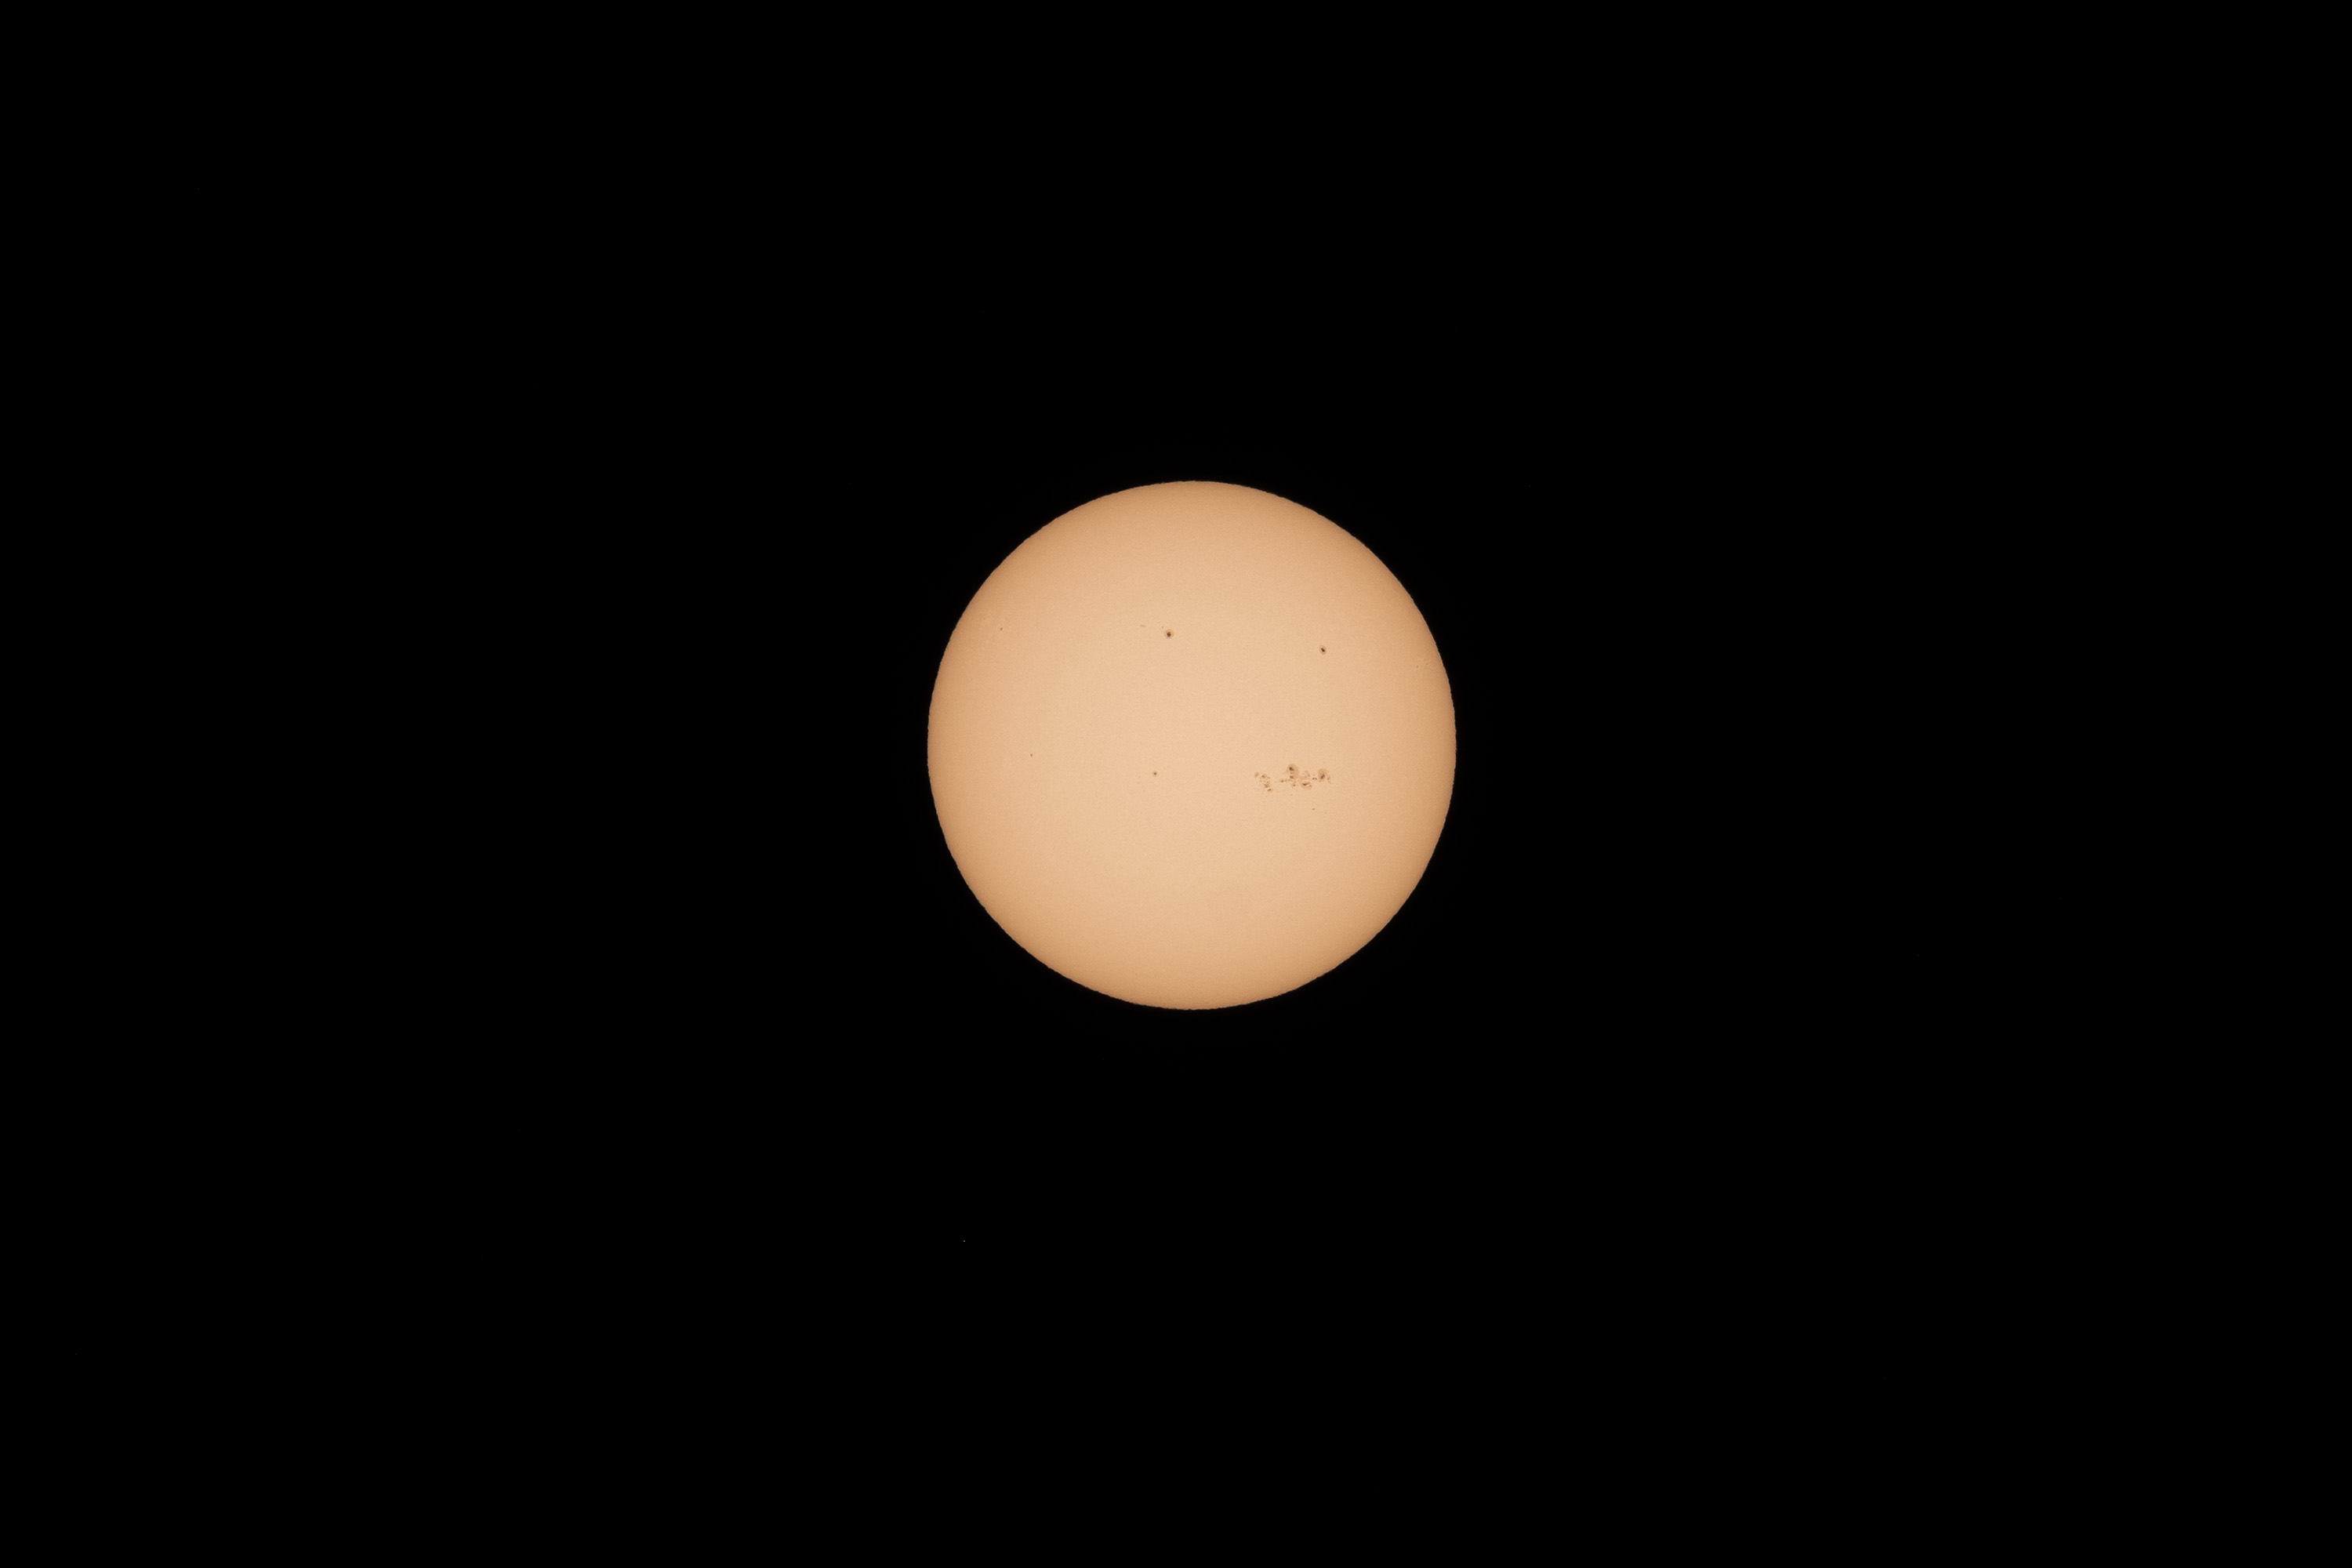
Camera Information: Fujifilm XT-3 with XF 150 - 600 mm lens, ND 100,000 UV/IR filter, 3/25/2024 13:12:19 CST. Settings: f11, 1/1000, ISO 200, 391.4 mm, cropped to 3000 x 2000 pixels.
The fifth test worked to plan. This photo shows the sun about where it would be 20 minutes before totality is expected. The sunspots are sharp and the exposure looks right. The sixth test also worked to plan. It appeared I was ready!
But what if the weather on April 8th was overcast? There were several hot spots along the path of totality where huge solar eclipse events would be held. I decided to travel to Fredericksburg, Texas if their weather was good and ours was bad. I would consider driving to anywhere along the path in Texas. I wasn't going to miss this!
5
Meteorology
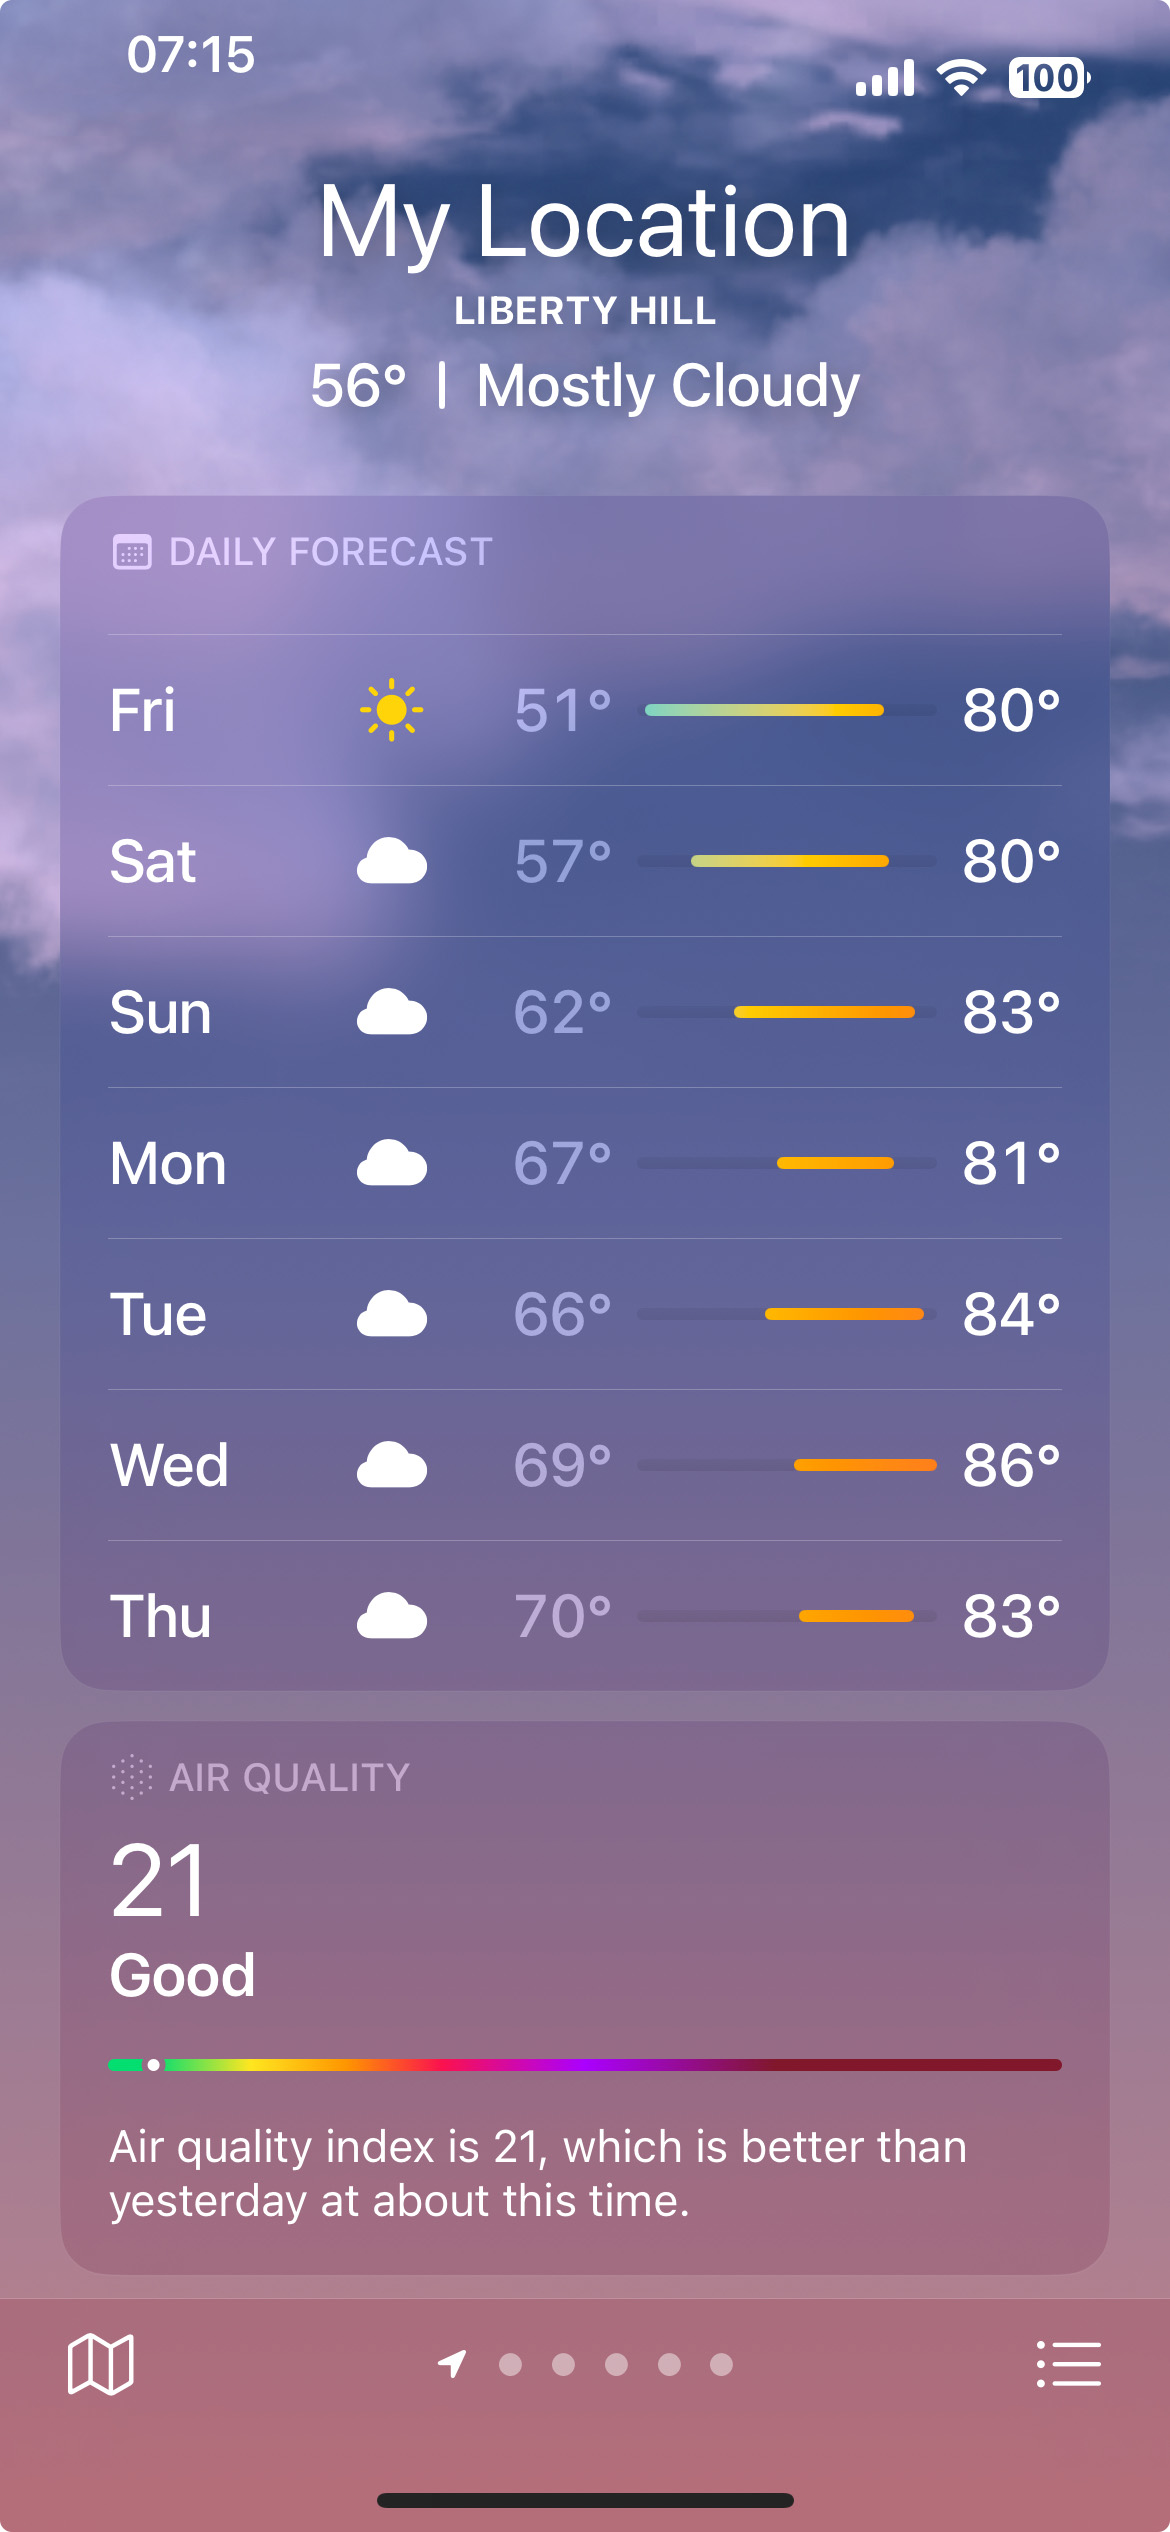
The forecast, from a few days prior.
Starting a week out, the forecast turned gloomy for April 8th, a Monday. The entire corridor from the Mexican border up to Arkansas would be covered with clouds. The Midwest and northeast would have clear skies, we down south would not.
My plan two weeks out was if the forecast turned sour, I would drive to the nearest place along the path of totality and get my photos from there. But news reports in Texas was that the path of totality would be crowded with tourists. My home is in Liberty Hill which has a population of not more than 2,000. Our town was expecting at least 10,000 visitors. All along the totality, hotels were said to be fully booked. The "experts" were saying do not travel, the roads would be jammed!
Having spent most of my life not trusting weather forecasts, I thought perhaps we would be okay not moving. Weather forecasts, after all, are just guesses. That little cloud symbol was for the entire day. We might very well have clear skies. The thought of being snarled in a traffic jam made me change my Plan B. Even if the weather was bad that morning, I was staying in place. I would either see the total solar eclipse from my backyard, or I wouldn't see it at all.
6
Technology
11:56.58 (C1 - 20 minutes)
.jpg)
Fujifilm XT-3 with XF 150 - 600 mm lens, ND 100,000 UV/IR filter, 4/8/2024 11:56:58 CST. Settings: f11, 1/500, ISO 200, 405 mm, cropped to 3000 x 2000 pixels.
We woke up on April 8th to a solid overcast with the same reported along the length of the line of totality in Texas. I set up my cameras in hopes of getting something, anything! The overcast was total.
With about twenty minutes before C1, the clouds lifted just enough for the sun to peek through. I managed to zoom the XT-3 into 405 mm and manually focused on a sunspot near the center. You can see the clouds against the sun. I had planned a shutter speed of 1/1000th of a second. Because of the clouds, I had to halve that.
From that point on, the tracker worked flawlessly. I never had to re-aim the XT-3. The D750 mounted on a stationary tripod required re-aiming every five minutes.
12:23:01 (C1 + 6 minutes)
.jpg)
Fujifilm XT-3 with XF 150 - 600 mm lens, ND 100,000 UV/IR filter, 4/8/2024 12:23:01 CST. Settings: f11, 1/250, ISO 200, 405 mm, cropped to 3000 x 2000 pixels.
The plan was to take a photo every 120 seconds starting a few minutes before C1, but the clouds were too thick to do that. So I set the automatic shutter to fire away knowing I would be getting a lot of very dark clouds. Whenever the clouds thinned, I adjusted the exposure. Here you see I’ve got the shutter at 1/250th of a second, a fourth of what I would have needed without the clouds. Nevertheless, it is a shot of a partial eclipse, so I wouldn’t come away empty handed!
12:32.54 (C1 + 17 minutes)
.jpg)
Fujifilm XT-3 with XF 150 - 600 mm lens, ND 100,000 UV/IR filter, 4/8/2024 12:32:54 CST. Settings: f11, 1/500, ISO 200, 405 mm, cropped to 3000 x 2000 pixels.
Here we are, 11 minutes later, and the clouds have thinned out some more. I was able to cut my shutter speed in half and there were fewer cloud artifacts. We were able to use our solar glasses and even spot the main sunspot using our eyes.
13:07.27 (C2 - 18 minutes)
.jpg)
Fujifilm XT-3 with XF 150 - 600 mm lens, ND 100,000 UV/IR filter, 4/8/2024 13:07:27 CST. Settings: f11, 1/500, ISO 200, 405 mm, cropped to 3000 x 2000 pixels.
About 40 minutes later the skies are still mostly clear but we can see what looks like rain clouds upwind, not good. The Fujifilm XT-3 is pretty much on autopilot here. The tracker moves the camera to keep the sun in the center of the frame. (The sun moves across the sky 360° / 24 hours which comes to 0.25° / minute. The sun is 0.5° wide from our vantage point.)
An iPhone shot with news
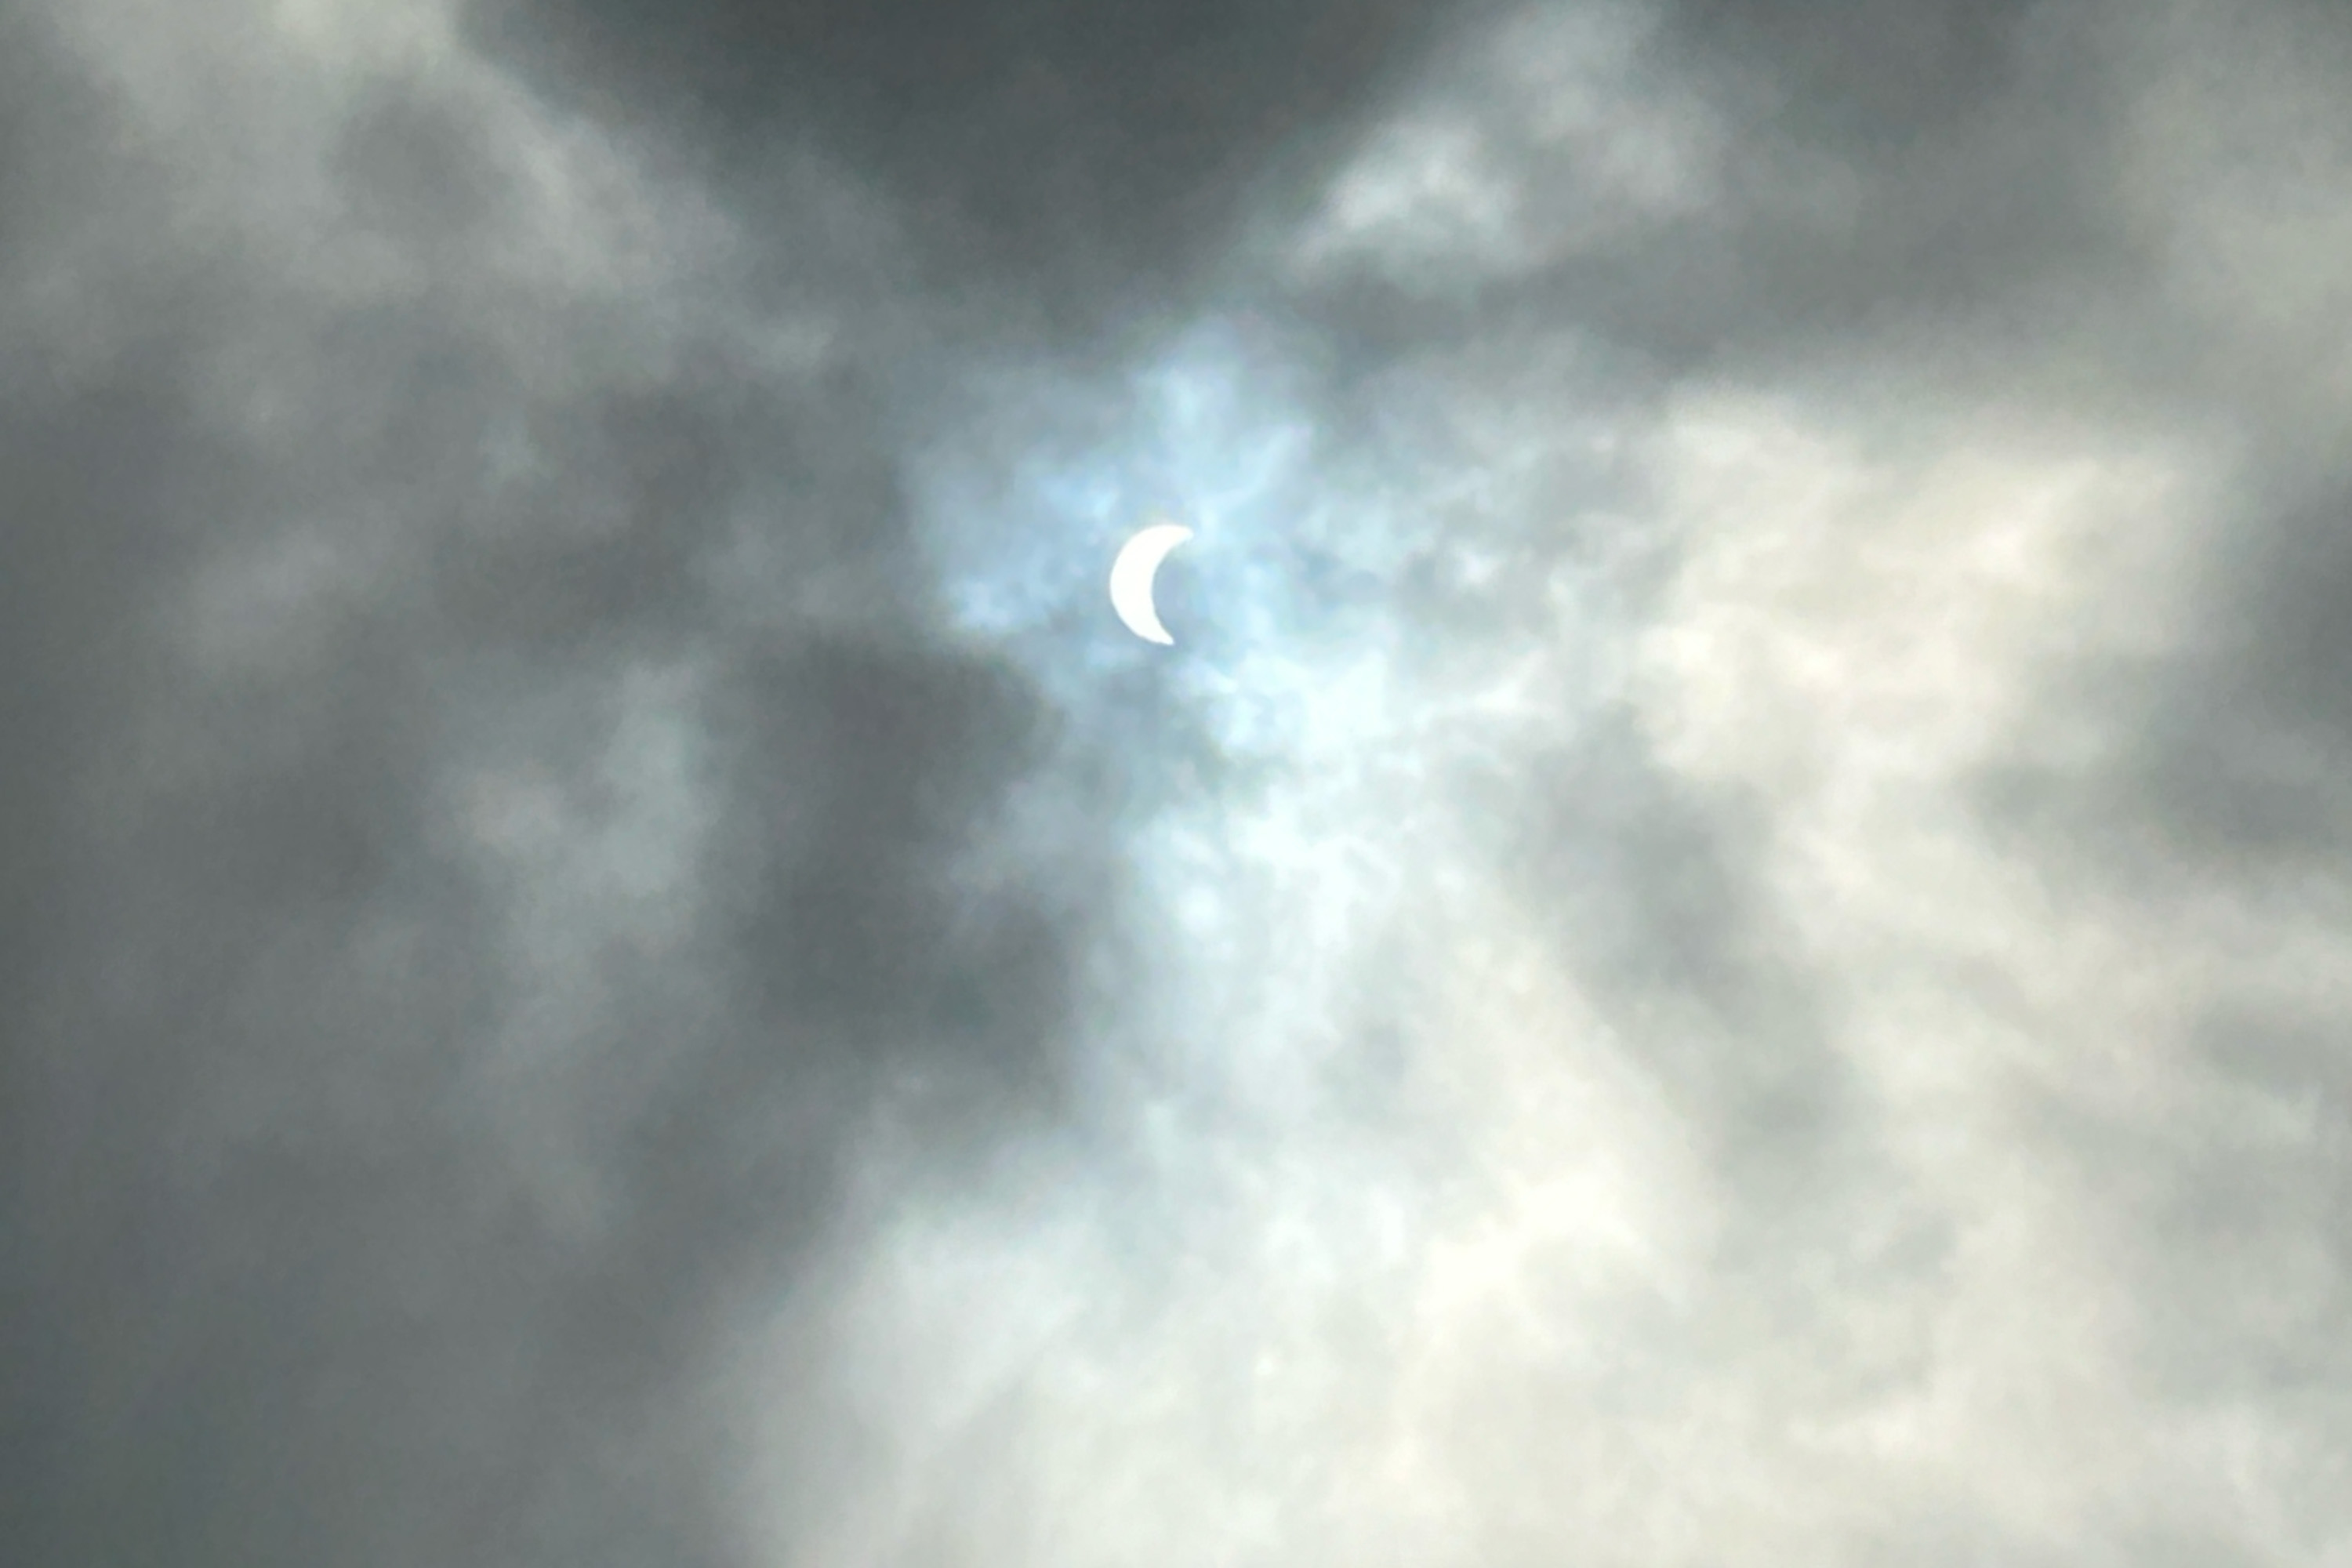
iPhone 12 photo
With the clouds covering the sun intermittently, I was able to take s shot with my phone. I texted that photo to my children, just to make sure they didn't miss totality. (They both live in the path of totality.) My daughter told me that the news reported that Fredericksburg, Texas, home to a large astrophotography group meeting, was covered in thick clouds.
13:29.22 (C2 - 6 minutes)
.jpg)
Fujifilm XT-3 with XF 150 - 600 mm lens, no filter, 4/8/2024 13:29:22 CST. Settings: f11, 1/2000, ISO 200, 247 mm, cropped to 3000 x 2000 pixels.
A thin layer of broken clouds persisted, but with less than six minutes to go, I removed the filter and increased the shutter speed to 1/2000th of a second. This is C2 - 6 minutes. They say a digital camera’s sensor can survive a few minutes before totality without the filter. So I jumped the gun. After I took this photo I replaced the filter and removed it only to take a shot. At C2 - 30 seconds I removed the filter for the duration of totality.
Right about now the temperature took a dip and the birds started singing their evening songs. While we were suitably impressed with the experience, I was also amazed at just how accurate the timing had been. I became more and more confident that totality would start at 13:35.
13:35:28 (C2 - 9 seconds)
.jpg)
Fujifilm XT-3 with XF 150 - 600 mm lens, no filter, 4/8/2024 13:35:28 CST. Settings: f11, 1/30, ISO 200, 247 mm, cropped to 3000 x 2000 pixels.
The moon now completely covers our view of the sun. The red flares around the moon are plasma “prominences” shooting out from the sun. Technically, they are filaments of plasma and magnetic fields, extending from the sun’s surface, often in a loop. They are always there, but the sun itself outshines them. With the moon blocking the sun itself, we can see the prominences. I was expecting to see them through the telephoto lens, but not with my unaided eyes. But I saw them!
13:35.31 (C2 - 6 seconds)
.jpg)
Fujifilm XT-3 with XF 150 - 600 mm lens, no filter, 4/8/2024 13:35:31 CST. Settings: f11, 1/4, ISO 200, 247 mm, cropped to 3000 x 2000 pixels.
C2. The NASA map shown at the top of this page gives exact times for any location on the map and since I had the camera automatically shooting three photos every second at this point, I managed to capture a shot at the exact moment the moon first fully blocked the sun. The jagged edges of the moon are known as ‘Bailey’s Beads,” named after astronomer Francis Bailey. He noted that the craters of the moon could be seen on the edges through the bending sunlight, but only right at C2 and C3. Unfortunately, the clouds got a little thicker and the shot isn’t as good as I had hoped for.
13:37.31 ("Max Eclipse")
.jpg)
Fujifilm XT-3 with XF 150 - 600 mm lens, no filter, 4/8/2024 13:37:31 CST. Settings: f11, 1/30, ISO 200, 247 mm, cropped to 3000 x 2000 pixels.
This is known by some as “Max Eclipse,” the midpoint between C2 and C3. I was shooting at 405 mm for the partials and zoomed out to 247 mm for totality, in hopes of getting a large corona. The corona is only visible to us on earth during totality in a total solar eclipse. As you can see here, the cloud cover obscured most of the corona.
13:37:31 ("Max Eclipse" a second shot)
.jpg)
Nikon D750 with 28 - 300 mm lens, no filter, 4/8/2024 13:37:31 CST. Settings: f11, three photos stacked (1/20, 1/30, 1/125) ISO 250, 300 mm, cropped to 3000 x 2000 pixels.
Of course I had my backup camera positioned during all this. It is technically a better camera because it has a larger sensor and “faster” lens, meaning it accepts more light. Going through the shots, I found a series of three shots that I was able to stack. Stacking is the process of overlapping photos to bring out the best of each. So I got some of the corona after all.
13:38.46 (C3 - about a minute)
.jpg)
Fujifilm XT-3 with XF 150 - 600 mm lens, no filter, 4/8/2024 13:38:46 CST. Settings: f11, 1/2, ISO 200, 247 mm, cropped to 3000 x 2000 pixels.
The clouds got thicker for C3 but the prominences showed up clearly along with the clouds. At this point I realized I had checked off everything I wanted to see, except one. As the moon first fully covers the sun, and again when it first uncovers it, the sun can shine brightly over one side with a ring around the rest. This is known as the “Diamond Ring” effect. I didn’t see this at C2. One more chance . . .
13:39.26 (C3)
.jpg)
Fujifilm XT-3 with XF 150 - 600 mm lens, no filter, 4/8/2024 13:39:26 CST. Settings: f11, 1/8, ISO 200, 247 mm, cropped to 3000 x 2000 pixels.
The clouds were getting thicker but the strength of the “Diamond Ring” was unmistakable. We saw this with our eyes unaided. This was also the last time we could look at the sun without wearing protective glasses, or at least that is what we are told. But, as we will see, that isn’t exactly true. When I checked the time stamp of the photo against the prediction, I was amazed to see it was spot on. The NASA algorithm set up years ago timed the Diamond Ring to the tenth of a second.
13:46.36 (C3 + 7 minutes)
.jpg)
Fujifilm XT-3 with XF 150 - 600 mm lens, ND 100,000 UV/IR filter, 4/8/2024 13:46:36 CST. Settings: f11, 1/1000, ISO 200, 247 mm, cropped to 3000 x 2000 pixels.
Now the moon exits and we see the sun again, albeit through a layer of clouds which were getting thicker.
14:04.08 (C3 + 25 minutes)
.jpg)
Fujifilm XT-3 with XF 150 - 600 mm lens, ND 100,000 UV/IR filter, 4/8/2024 14:04:08 CST. Settings: f11, 1/800, ISO 200, 405 mm, cropped to 3000 x 2000 pixels.
Now the cloud cover is complete, but the view is still pretty good.
14:39.02 (C4 - 19 minutes)
.jpg)
Fujifilm XT-3 with XF 150 - 600 mm lens, ND 100,000 UV/IR filter, 4/8/2024 14:39:02 CST. Settings: f11, 1/125, ISO 200, 405 mm, cropped to 3000 x 2000 pixels.
Now the clouds are thick and those approaching are even thicker. This was the last usable shot for the day.
7
Methodology

A montage of the images
Note: I took all of the photos in the montage, but the last one is the first one darkened a bit. The clouds thickened just prior to C4 and the sun never reappeared until the following day.
Lessons learned (meteorology)
Mr. Tube sent me multiple stories of heartbreak and triumph in the hunt for good weather. A German astrophotographer who had planned a trip to Fredericksburg, Texas way back in 2017, made it all work. He flew in from Germany despite the gloomy forecast, saw that the weather would actually be better in New England, flew to Boston, rented a car and drove up to the tip of New Hampshire and got great photos. Meanwhile, the folks in Fredericksburg barely got five minutes of the partial eclipse prior to totality, and no totality shots at all. Others who bailed from other parts of Texas flew off to other locations and got nothing. We stayed put and got a lot of time with partials and totality.
Meteorology is almost a science, but there is still a lot of guess work involved. I've flown into airports where I needed one or two alternates, but the weather was just fine. I've also flown into airports where no alternate was legally required, but when we got there we had to divert. You should never depend on a forecast. You should always give yourself options.
Lessons learned (technology)
The motions of our planet, our moon, and the sun are well documented. The NASA predictions for C1, C2, C3, and C4 were spot on. The star tracker followed the sun for three hours without a need for any adjustment. But the best photo of the day came from a camera mounted on a tripod without any kind of tracking help.
Technology: good. But it is still prudent to understand what the technology is doing and be prepared to take over.
Lessons learned (methodology)
I had five practice sessions that changed the plan over and over again before I settled on Plan A. Two more practice sessions validated the plan. But when the actual battle day arrived, I had to abandon my planned shutter speeds and adjust depending on cloud cover.
What it all means
As Helmuth von Moltke said in 1880, "no plan survives first contact with the enemy." As we used to say in the Air Force, "flexibility is the key to air power." You cannot lock yourself into a course of action in aviation, as in life in general. Keep flexible and be prepared to adjust the plan or to throw it out in its entirety.