A liberal reading of AC 91-70B would lead you to believe that doing all of your "plotting" on the aircraft's navigation display should be adequate, but no government inspector is going to allow that.
— James Albright

Updated:
2021-10-03
There are, however, paper alternatives that make life quite easy over the high seas.
2 — Is that iPad really legal for use in a cockpit?
3 — Plotting on an electronic image of a chart (PDF or other photo-like image)
4 — Using an application-based plotting tool
In other articles, we'll cover:

1
Theory meets reality
After reading the "B" update to AC 91-70, you might think that doing all of your "plotting" on the aircraft's navigation display satisfies all requirements:
You can use various additional techniques in order to verify that the correct points are loaded for your planned route. Verify the total route distance in your FMS against your master document to help find embedded mistakes. You should also cross-check course/headings and distances between each waypoint to ensure the FMS routing matches your master document. Referencing your plotting or orientation chart here can also be beneficial.
Source: AC 91-70B, ¶6.3.2.6.3
Ten Minutes After Waypoint Passage. Cross-check navigational performance and course compliance by one of the following methods:
D.2.9.1 The “plotting” method is appropriate for all aircraft navigation configurations.
- Verify your plotting/orientation chart reflects the currently effective route clearance.
- Plot your present latitude/longitude and record the time on your chart.
- You should plot your position using coordinates from the nonsteering LRNS.
- Investigate/take corrective action if your plotted position does not agree with your currently effective route clearance.
- Using the steering LRNS, verify the next waypoint is consistent with the currently effective route clearance.
- Verify your autopilot steering mode is in LNAV/VNAV or other appropriate mode to ensure steering to the next intended waypoint.
D.2.9.2 The “navigation display” method is appropriate for and available for use in aircraft equipped with an operable FMS:
- Confirm the aircraft symbol is on the programmed route on the navigation display (at smallest scale).
- Check system-generated cross-track deviation or similar indication of any deviation from the programmed route of flight.
- Using the steering LRNS verify the “TO” waypoint is consistent with your currently effective route clearance.
- Investigate/take correction action to address any anomalies or unexpected deviations.
- Verify your autopilot steering mode is LNAV/VNAV or other appropriate mode to ensure steering to the next intended waypoint.
Source: AC 91-70B, ¶D.2.9.2
After investigating a GNE in response to an FAA inquiry in 2005, I asked if this method of plotting was adequate and was told no. As late as 2018 I asked members of the FAA navigation branch and was told the same thing. You should not simply look at the navigation displays and see that your airplane is where it is supposed to be and consider your plotting chores complete. But you don't have to resort to a paper plotting chart, a plotter, and a sharp pencil. There are other methods that are easier and more accurate . . .
2
Is that iPad really legal for use in a cockpit?

Pilot Greg Bongiorno and his iPad
Operating an iPad and a portable GPS receiver that is independent of the aircraft systems would seem to be the ideal crosscheck of your aircraft avionics. But is it legal? The basic regulation seems to indicate that it is, provided you can determine the device in question "will not cause interference with the navigation or communication system" of your aircraft. But how can you make that determination?
These rules were established in 1961 but were relaxed considerably in 2000 and again in 2006 with the release of Advisory Circular 91-21.1B which gave operators the latitude to allow the use of non-transmitting Personal Electronic Devices (PEDs) and gave some guidance on Transmitting PEDs and Medical PEDs. Operators were also given guidance on how to make these determinations. But no guidance was given for PEDs that receive GPS signals.
The latest version of AC 91.21-D cleared a lot of this up. The basic rule is that if your aircraft was certified with an onboard WiFi system, you are considered "PED Tolerant." Otherwise, you either have to get them tested (very hard to do) or restrict your use to ground taxi operations and cruise flight above 10,000 feet (easy to do).
So for the purpose of oceanic operations and plotting, the iPad and even a portable GPS unit are generally okay. (Operating commercially, you will need OpSpec/MSpec/LOA A061.) If you are using your iPad (or other Electronic Flight Bag hardware) to view your airfield diagram during taxi, that's okay too. But if you want to use these devices for takeoff and landing, you have more work to do. More about all of this: Portable Electronic Devices.
Aircraft Type Data Certification Sheet . . . Good to go.
If you are flying something that was certified relatively recently, you may find the aircraft's PED tolerance explicitly stated. This for the Gulfstream GVII-G500:
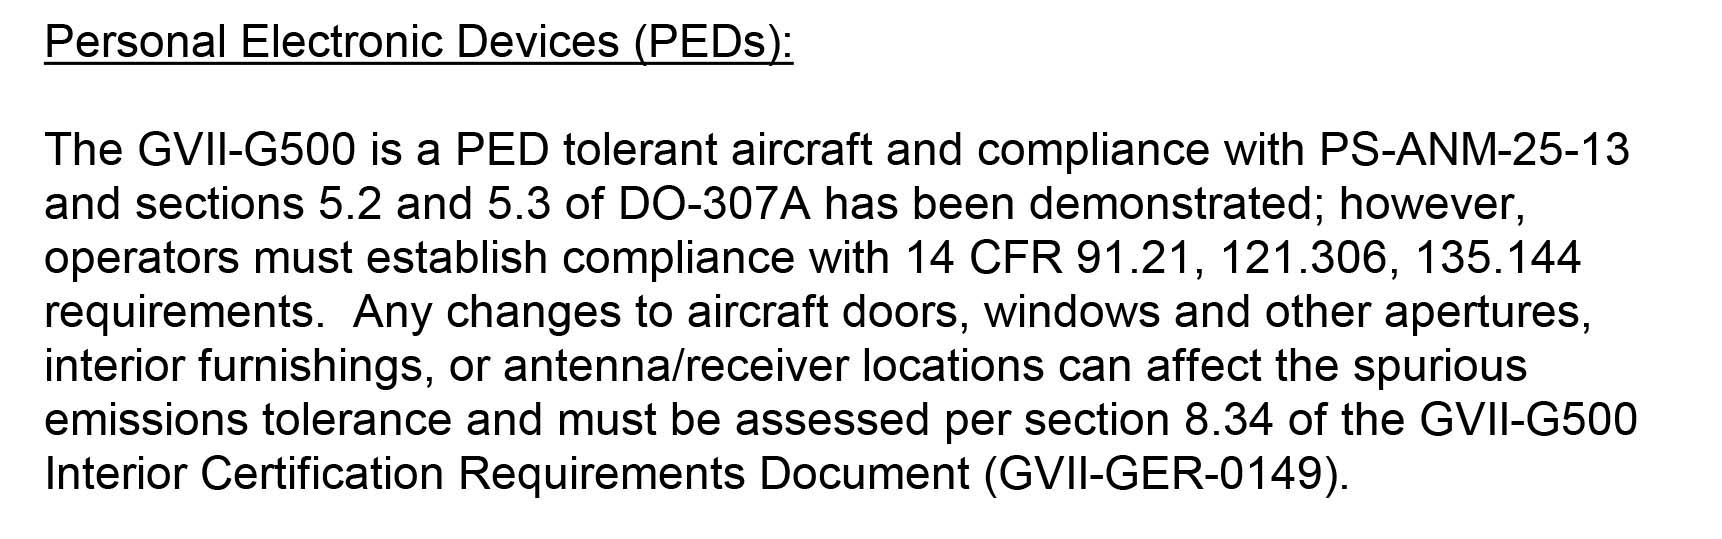
GVII-G500 PED Tolerance, from its Type Data Certification Sheet
So if you are flying a GVII-G500, you are good to go. Most aircraft certified more than 5 years ago, such as my trust Gulfstream G450, will not have this statement. But that doesn't mean you are not PED tolerant, as we shall now see.
Airplane certified with a demonstrated tolerance for PEDs . . . Good to go.
Aircraft Designed and Certified PED Tolerant. Aircraft manufacturers with access to aircraft electronic system qualifications and aircraft radio receiver antenna installation data can easily demonstrate an aircraft meets the requirements of RTCA DO-307A. Operators may obtain statements of such demonstrations from an aircraft manufacturer to substantiate PED tolerance of the aircraft. Operators can also use the RTCA DO-307A methods in demonstrating PED tolerance of their aircraft. RTCA DO-307A separates demonstration methods for tolerance to intentional transmissions from PEDs versus tolerance to spurious emissions from PEDs. Aircraft with an FAA-approved system—such as an Onboard Mobile Telecommunications System (OMTS), Wireless Fidelity (WiFi), airborne access systems (AASs), or Network Control Units (NCUs)—are considered PED-tolerant for PEDs used with the installed system. If an aircraft model has demonstrated tolerance for both transmitting and non-transmitting PEDs, the operator may allow PED use during all phases of flight on this aircraft model.
Source: AC 91.21-1D, ¶7.2.1
If your aircraft is certified with one of the listed systems (OMTS, WiFi, or AAS), then you are "PED Tolerant" and can use PEDs during all phases of flight. Of course you will have a few precautions to take, like turning the cellular system off by using "Airplane" mode and making sure it is properly stowed for takeoff and landing, but you can use it in the cockpit for all phases of flight.
Airplane passes risk assessment . . . Good to go.
Aircraft Not Designed and Certified PED Tolerant. An operator may choose to conduct a safety risk assessment following the process in RTCA DO-363 if it 1) does not have a designed and certified PED-tolerant aircraft, and 2) chooses not to test its aircraft fleet types according to RTCA DO-307A or obtain supporting documentation from an aircraft manufacturer. The operator’s assessment must evaluate the avionics configuration of its fleet and failure modes of communication, navigation, surveillance, and other electronic systems with respect to electromagnetic interference. This assessment ultimately outlines mitigations and controls the operator needs to adopt to expand PED use into various phases of flight.
Source: AC 91.21-1D, ¶7.2.2
There are two phases to the risk assessment, as outlined in InFO 13010 Sup: "Back door" and "front door" assessment. "Back door coupling" refers to intentional radio frequency emissions from transmitting PEDs which can interfere with aircraft systems. Appendix B of InFO 13010 Sup provides instructions on how to determine if an analysis must be performed. Many aircraft have the necessary statement in their Type Certificate Data Sheet (TCDS) that allow them to assume the back door assessment is already completed. The front door assessment is much harder to determine and most operators will not be able to obtain such an assessment on their own.
Aircraft missing demonstrated tolerance or required assessment . . . Good to go for cruise flight only.
Aircraft Not Demonstrated PED Tolerant. If the operator has not demonstrated PED tolerance for their aircraft, they may allow PED operation during cruise flight. If interference to aircraft systems from PEDs is experienced during cruise flight, the devices causing interference should be isolated, and applicable conditions recorded. The device responsible for the interference should be turned off.
Source: AC 91.21-1D, ¶7.2.3
Unless your aircraft is PED tolerant or you have done an RTCA DO-363 risk assessment, this is what you are left with: you can only allow PED use during cruise flight.
Operator Procedures. If an operator allows PEDs aboard its aircraft or the aircraft being operated, procedures should be established to control PED use during aircraft operations. RCTA DO-363 section 7.5 and InFO 13010SUP provide further guidance on what to include in the operator’s policies, procedures, and training programs. In general, the procedures should address:
- PEDs approved for use onboard the aircraft;
- Times of approved PED operation;
- How and when PEDs must be secured or stowed;
- PED modes of operation used and not used;
- How and when to inform passengers of the aircraft operator’s PED policies and procedures; and
- How to manage scenarios such as suspected or confirmed electromagnetic interference, PED unit or battery smoke or fire, or other scenarios.
Source: AC 91.21-1D, ¶8.1
Passenger Communication. This paragraph outlines methods to inform passengers of permissible times, conditions, and limitations of PED usage. These methods may be accomplished through the departure briefing; passenger information cards; flightcrew, flight attendant (F/A), or prerecorded announcements; or other methods deemed appropriate by the operator. Operators should inform passengers of PED use restrictions, such as prior to departure, after takeoff (at 10,000 feet), prior to landing (at 10,000 feet), and after landing. For air carrier operations conducted under part 121 or 135, the limitations, at a minimum, should state the use of all such devices—except medical electronic devices such as heart pacemakers or portable oxygen concentrators (POC)—is prohibited during phases of operation when they could interfere with communication or navigation equipment onboard the aircraft or the ability of the flightcrew to give instructions in the event of an emergency. Methods of passenger communication may include:
- Procedures to terminate operation of PEDs suspected of causing interference with aircraft systems.
- Procedures for reporting PED interference to a responsible Flight Standards office.
- Procedures for cockpit-to-cabin coordination and cockpit flightcrew monitoring procedures.
- Procedures for determining acceptability of PEDs for operation aboard its aircraft. Acceptable PED identification should be clearly spelled out in oral departure briefings and by written material provided to passengers.
- Procedures for takeoff and landing preparation must be considered when allowing the PED operation during these phases of flight. Operators must recognize that the potential for personal injury to passengers is a crucial consideration, as well as the possibility of missing significant safety announcements during takeoff and landing. InFO 13010 and InFO 13010SUP provide guidance to address these considerations.
Source: AC 91.21-1D, ¶8.2
A part 91K, 121, 125, or 135 operator must have an EFB program authorized by the FAA in order to use EFB applications on either portable or installed equipment in flight operations. EFB program specifics (i.e., operating procedures, maintenance procedures, administrative procedures, and training modules) must be developed, as applicable, and be available to the FAA. FAA authorization for an EFB program will be granted upon successful evaluation of an applicant’s program operation.
Source: AC 120-76D, ¶12
Bottom Line:
It is up to the operator to determine if you can use that iPad and portable GPS during cruise flight, taxi before takeoff, and taxi after landing. Under 14 CFR 91K, 121, and 135, the operator is the company that controls the operation and have a program "authorized by the FAA" usually with OpSpec/MSpec/LOA A061. Under 14 CFR 91, it is you, the pilot.
3
Plotting on an electronic image of a chart (PDF or other photo-like image)
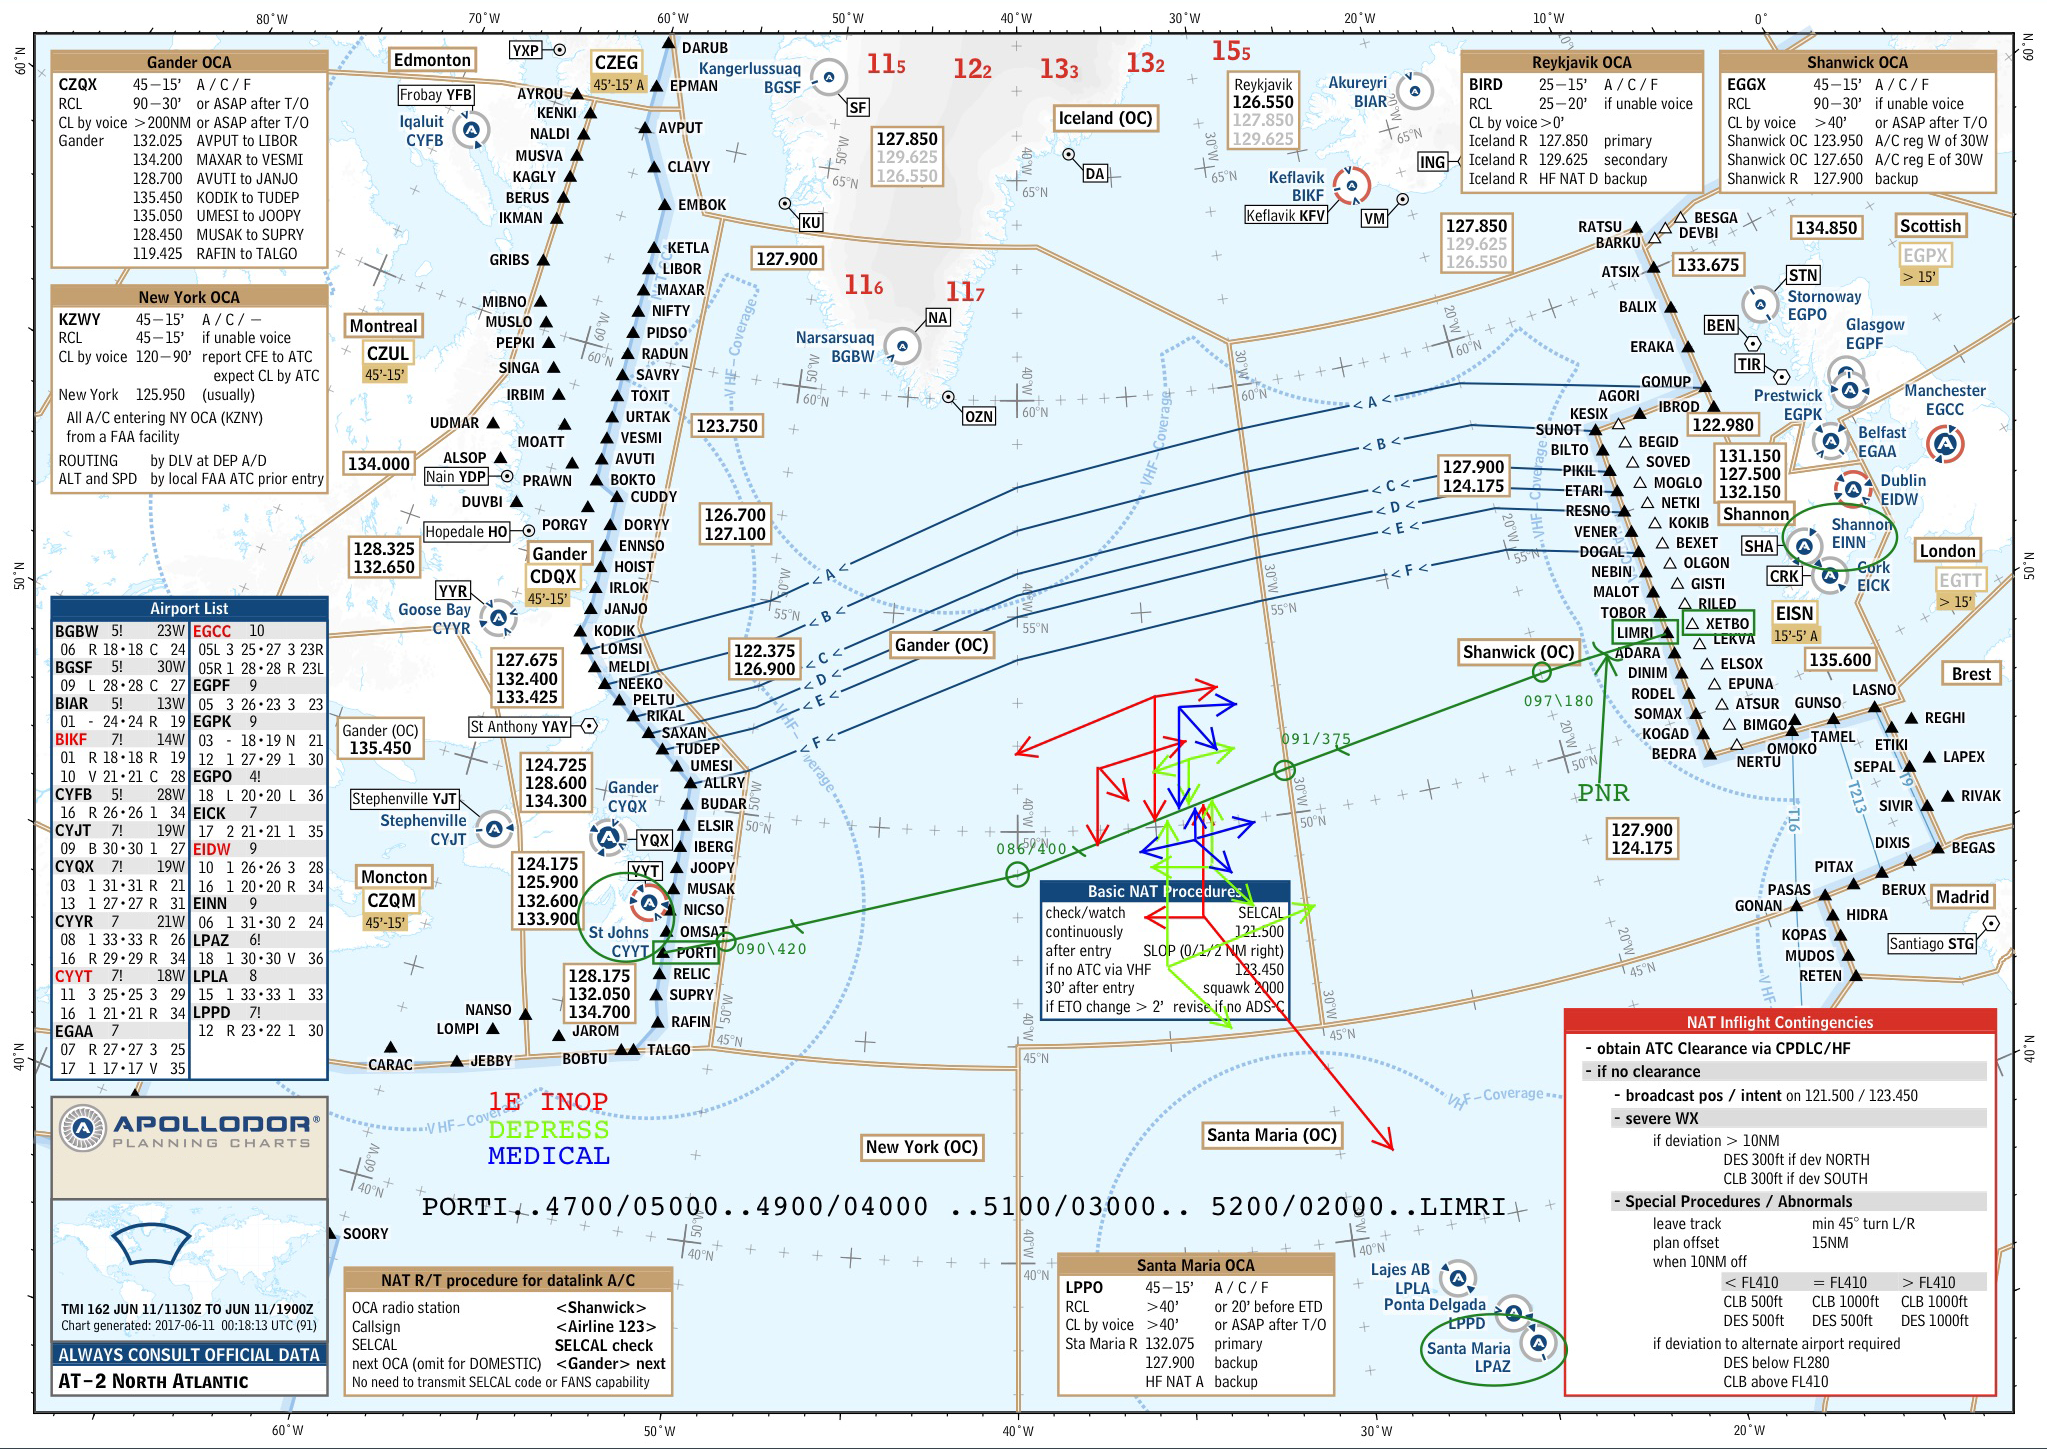
Completed PDF plotting chart example
There are various vendors out there who will sell you a PDF chart the day of your flight that already has the relevant oceanic tracks plotted. Alternatively, some vendors will sell you a chart without the tracks for a little less money. In either case, it is up to you to plot your course, ETPs, and all other items just as you would on paper. This would seem to be the easiest way to transition from paper to plastic since you are doing the same thing only on an iPad. It is actually very difficult and frustrating for reasons that I hope to make clear.
This method is easy enough but there are a few things that may not be entirely intuitive. Here are a few pointers.
Plotting a course
You can use a plastic plotter on an iPad but the second you touch the screen with your hands, the position and scale of the map can change. Try a larger plotter and place it on the iPad in the correct position before making contact with the screen.
iPad course measuring
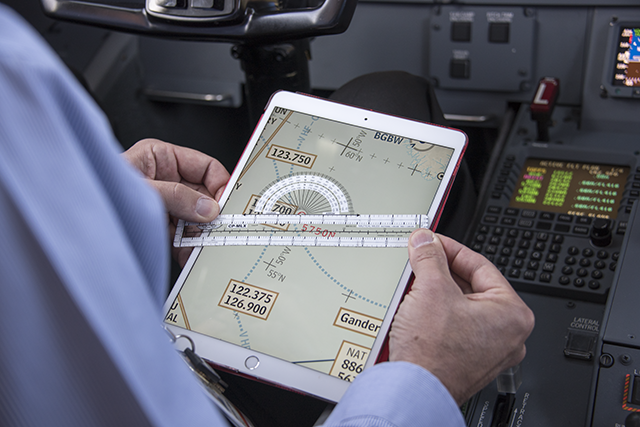
Measuring a distance
Measuring distance is even harder because the scale is prone to change the second you make contact with the screen. We had our best luck with a pair of dividers with the pointy ends dulled with a file.
Makeshift iPad dividers
Finding an exact latitude/longitude point
Finding the exact longitude and latitude can be easier if you draw straight lines from the nearest scale, pick the intersection, then erase the lines.
Is it worth the trouble?
This method of plotting on a PDF works but it isn't very accurate. Getting courses and distances will take a fair amount of time and can be frustrating. Placing your finger or stylus on exactly an exact latitude/longitude isn't easy. If you have access to a charting application, that is definitely easier, faster, and more accurate.
The remaining steps, such as plotting your position or doing a navigation accuracy check, are completed as you would with paper, just using the same steps to plot your route. We used this method for a few months in parallel with paper procedures. Paper was consistently faster.
4
Using an application-based plotting tool
I first looked into this in in 2015 and fully examined the process for a speech I gave to the 2019 NBAA International Operators Conference. The software I used was ForeFlight, Garmin Pilot, and JeppFD. Since then, several others have come on market that are quite good. In fact, I now use ARINCDirect exclusively because it is so much better. But that is a pricey program and they offer specific training should you decide to go that route. I'll detail the process for ForeFlight and JeppFD to show generally how it is done. You should look for application-specific instructions. (Even for the ones I am showing here, as they are sure to have improved since 2019.)
Understanding Latitude and Longitude Units of Measurement
As international pilots we all have an intuitive understanding of geographic coordinates from the days of Ferdinand Magellan:
- The globe is divided by 360 degrees of latitude and longitude, measured from 0 to 180 going east and west starting at the prime meridian, and 0 to 90 degrees going north and back to 0 degrees going south starting at the equator in one direction and south back to north in the other.
- Each one of those degrees is divided another 60 times into "minutes."
- Each of those minutes is further divided another 60 times into "seconds."
More about this: Coordinates.
- HDD°MM'SS" — You will often see these coordinates where the H is N, S, E, or W, with a degree symbol, a single quote, and a double quote. For example, N39°53'41" means 39 degrees, 53 minutes, 41 seconds North latitude. Your FMS doesn't do it this way and chances are your application software doesn't either.
- HDD°MM.dd — Your FMS probably uses a different format that uses decimal minutes instead of seconds. For example, the earlier latitude would translate to N39°53.68 and might even appear as N39.5368. Confused? You can tell it is using decimal minutes and not seconds because the seconds are never higher than 59. Some applications also use the NDD°MM.dd format, which makes your plotting life easier.
- HDD.dddd — Some applications use degrees and decimal degrees.
It is important to know which method your FMS, your Master Document, and your plotting software are using. You can not mix one method with the other without first doing some math or implementing provided translators. Let's say your Master Document show s your ETP is at N53°05.30, using the same format that your FMS uses, HDD°MM.dd. But now let's say your plotting software uses HDD.dddd. If you type in N53.0530, that will translate to N53°08.83.
You can do the math on your own if you have no other choice. To convert decimal values into minutes or seconds, multiply by 60. For example, the .83 minutes in the last example become (0.83) x (60) = 50 seconds. To convert seconds or minutes into decimal values, divide by 60. So 50 seconds becomes (50) / (60) = .83 minutes.
If you plotting application uses HDD.dddd, there is probably a way to automatically convert your inputs. In ForeFlight, for example, you can have it automatically change all your inputs into the needed NDD.dddd through the settings tab. Or you can have it make the conversion if you follow a particular format. Typing in your coordinate in the format HDDDMMS tells it your are using degrees, minutes, and decimal minutes. ForeFlight will do the translation for you, but when you examine the same point it will be in HDD.dddd format.
Application-based plotting tools
For our purposes here, I will look at two party applications that take the flight plan you provide and turns that into a plotting chart. Those will be ForeFlight and JeppFD. I've also used Garmin Pilot which was similar in features to ForeFlight. I currently use the built-in plotting tool found in the ARINCDirect flight planning application. You may also want to try adding a portable GPS or ADS-B receiver linked to your iPad. More about that option: Plotting, Fully Electronic Methods.
5
ForeFlight example
Plotting your route
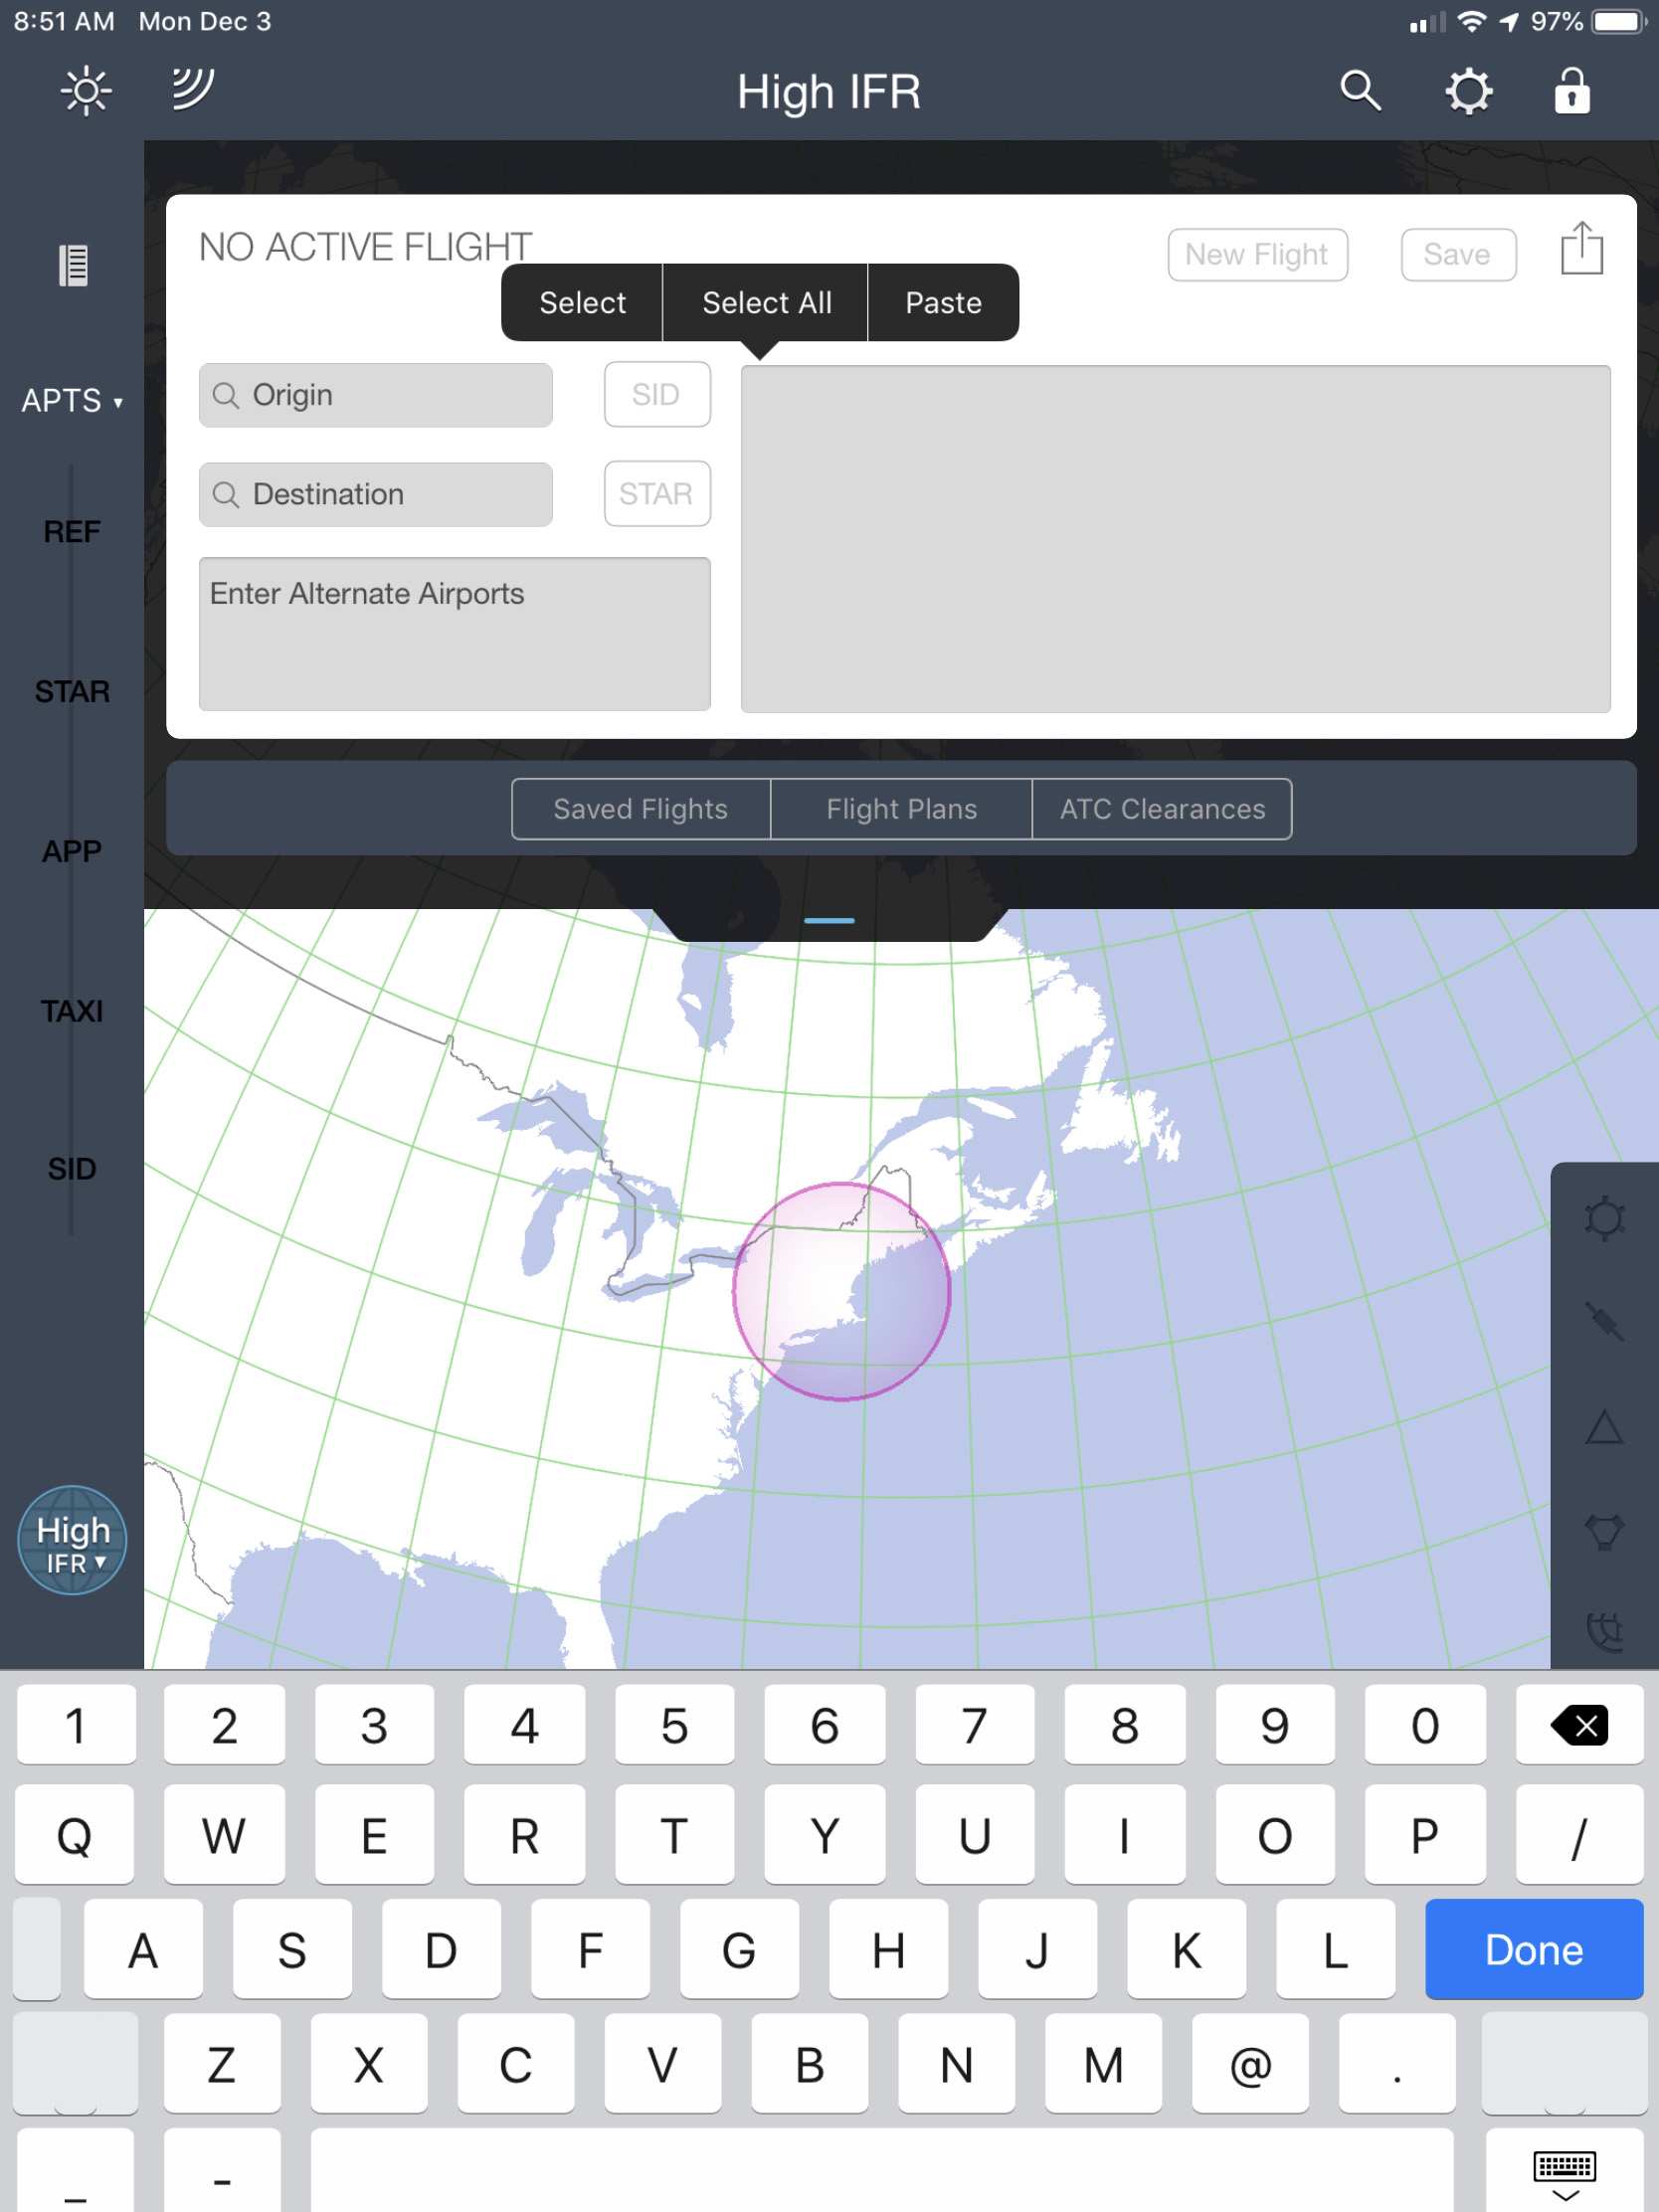
Copying the route
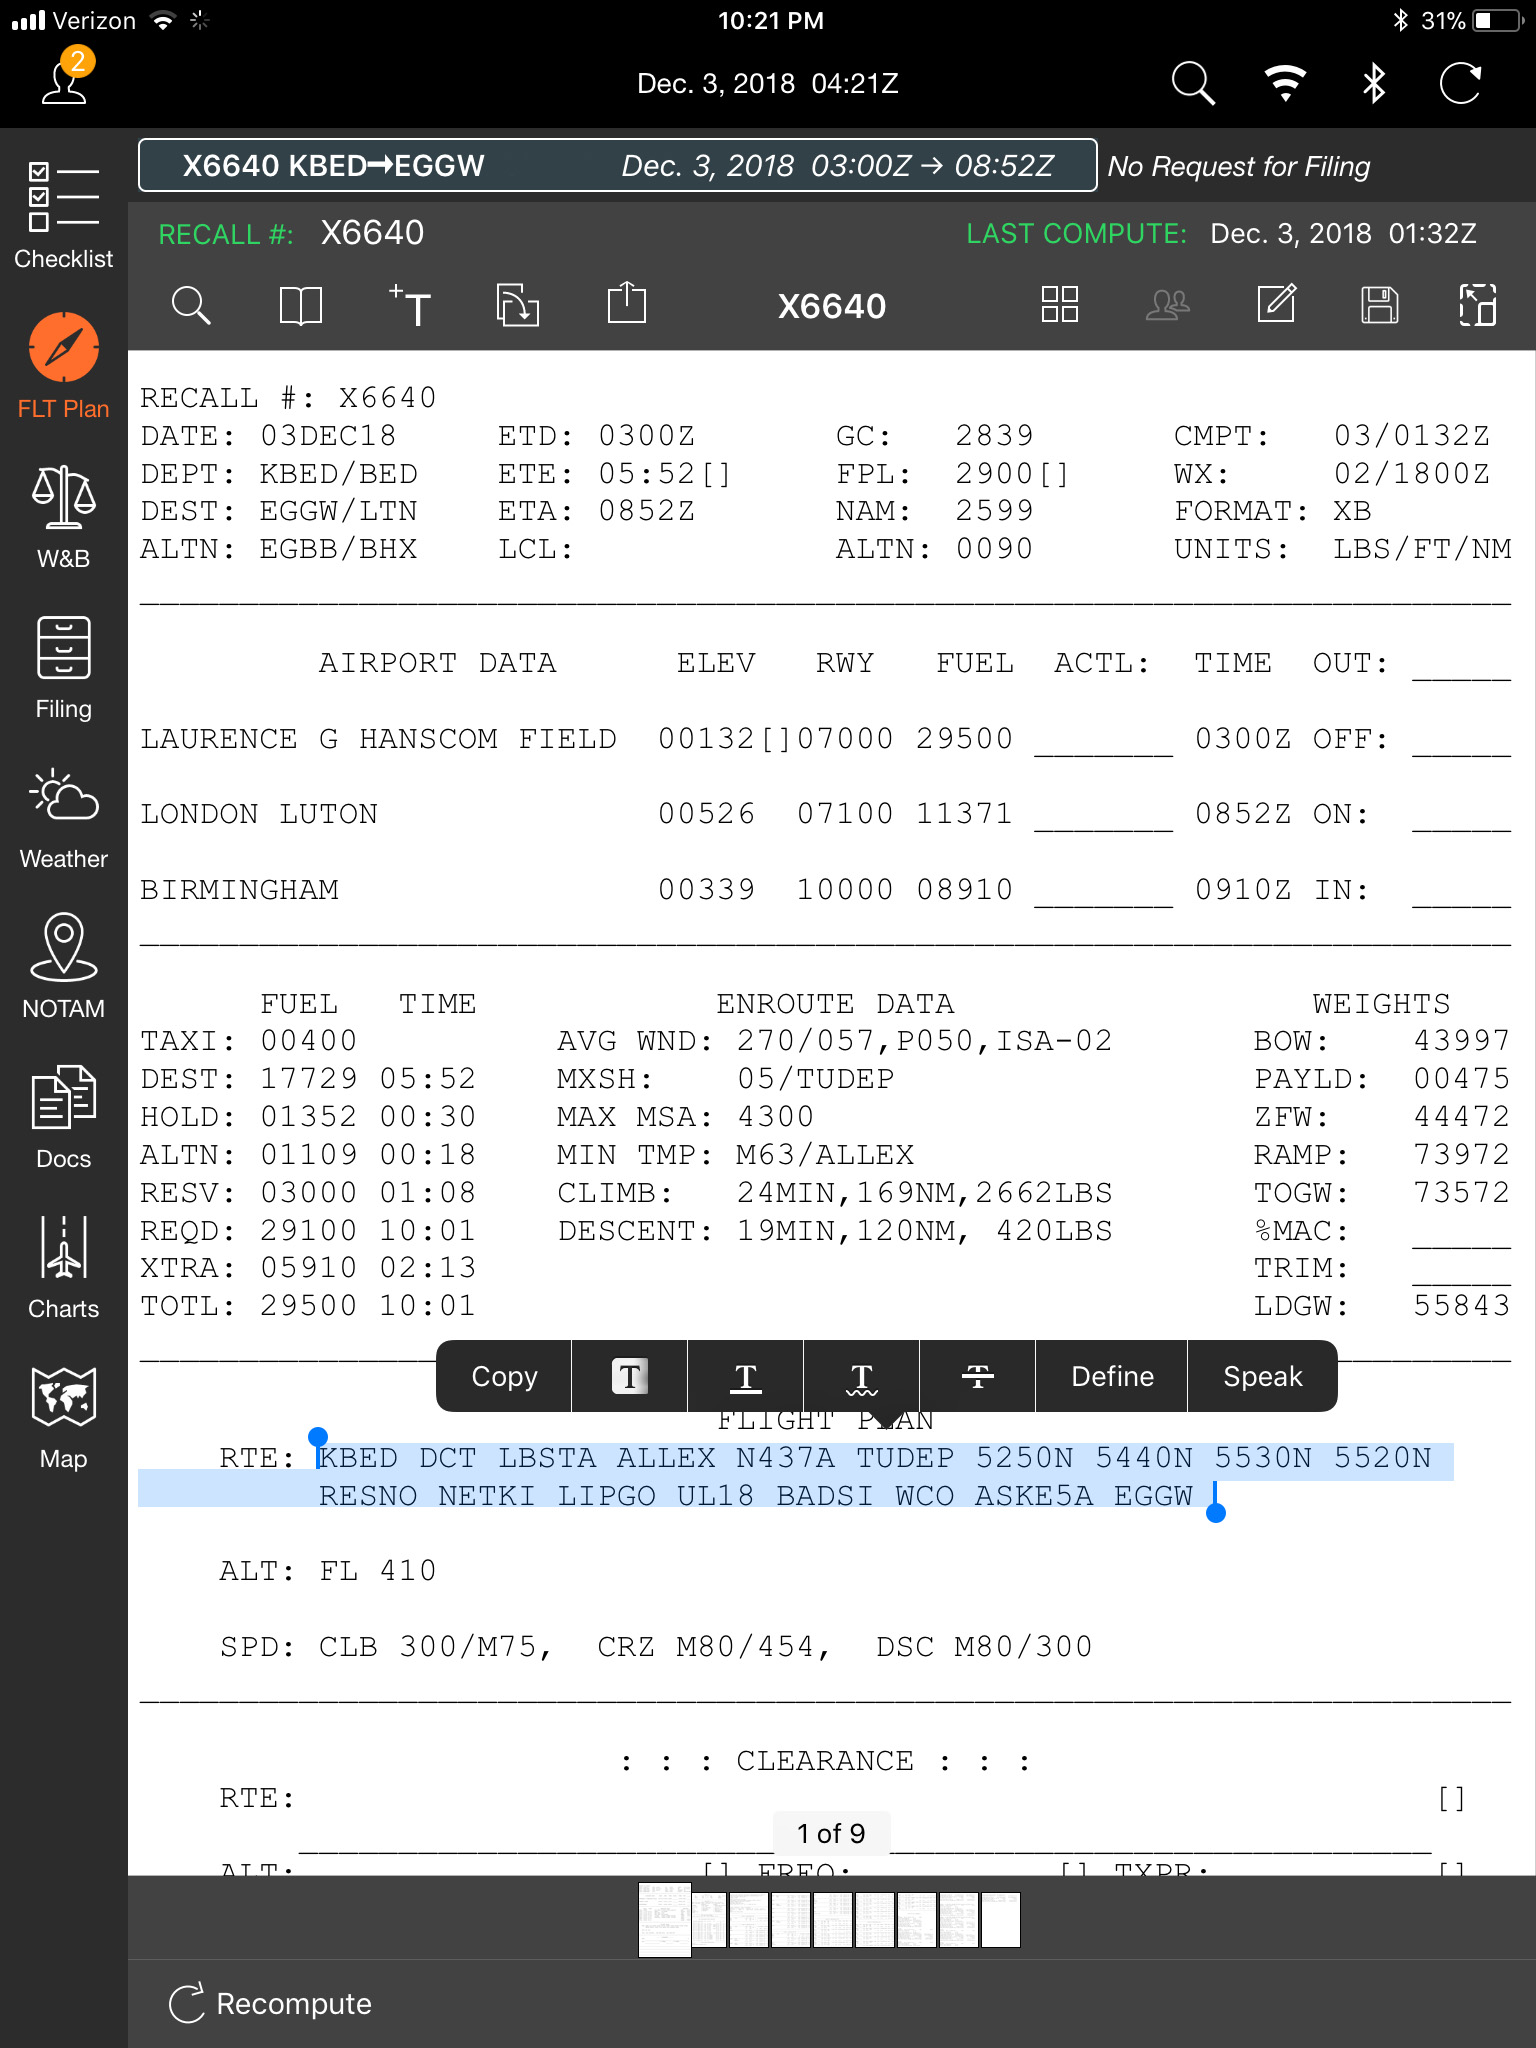
If you are using an interactive application to produce your plotting chart, you can cut and paste the route from either the application's master document or the PDF version of the master document. Press and hold any portion of the route until at least a portion of the route appears in inverse video. Then drag the start and end handles until the entire route is highlighted. Then select "Copy." You then go to the plotting application to the route entry appears, press and hold until you see a "paste" button.
To cut and paste your routing into ForeFlight you will first have to export the master document PDF file into ForeFlight. From that point you select the file from the bottom Documents tab.
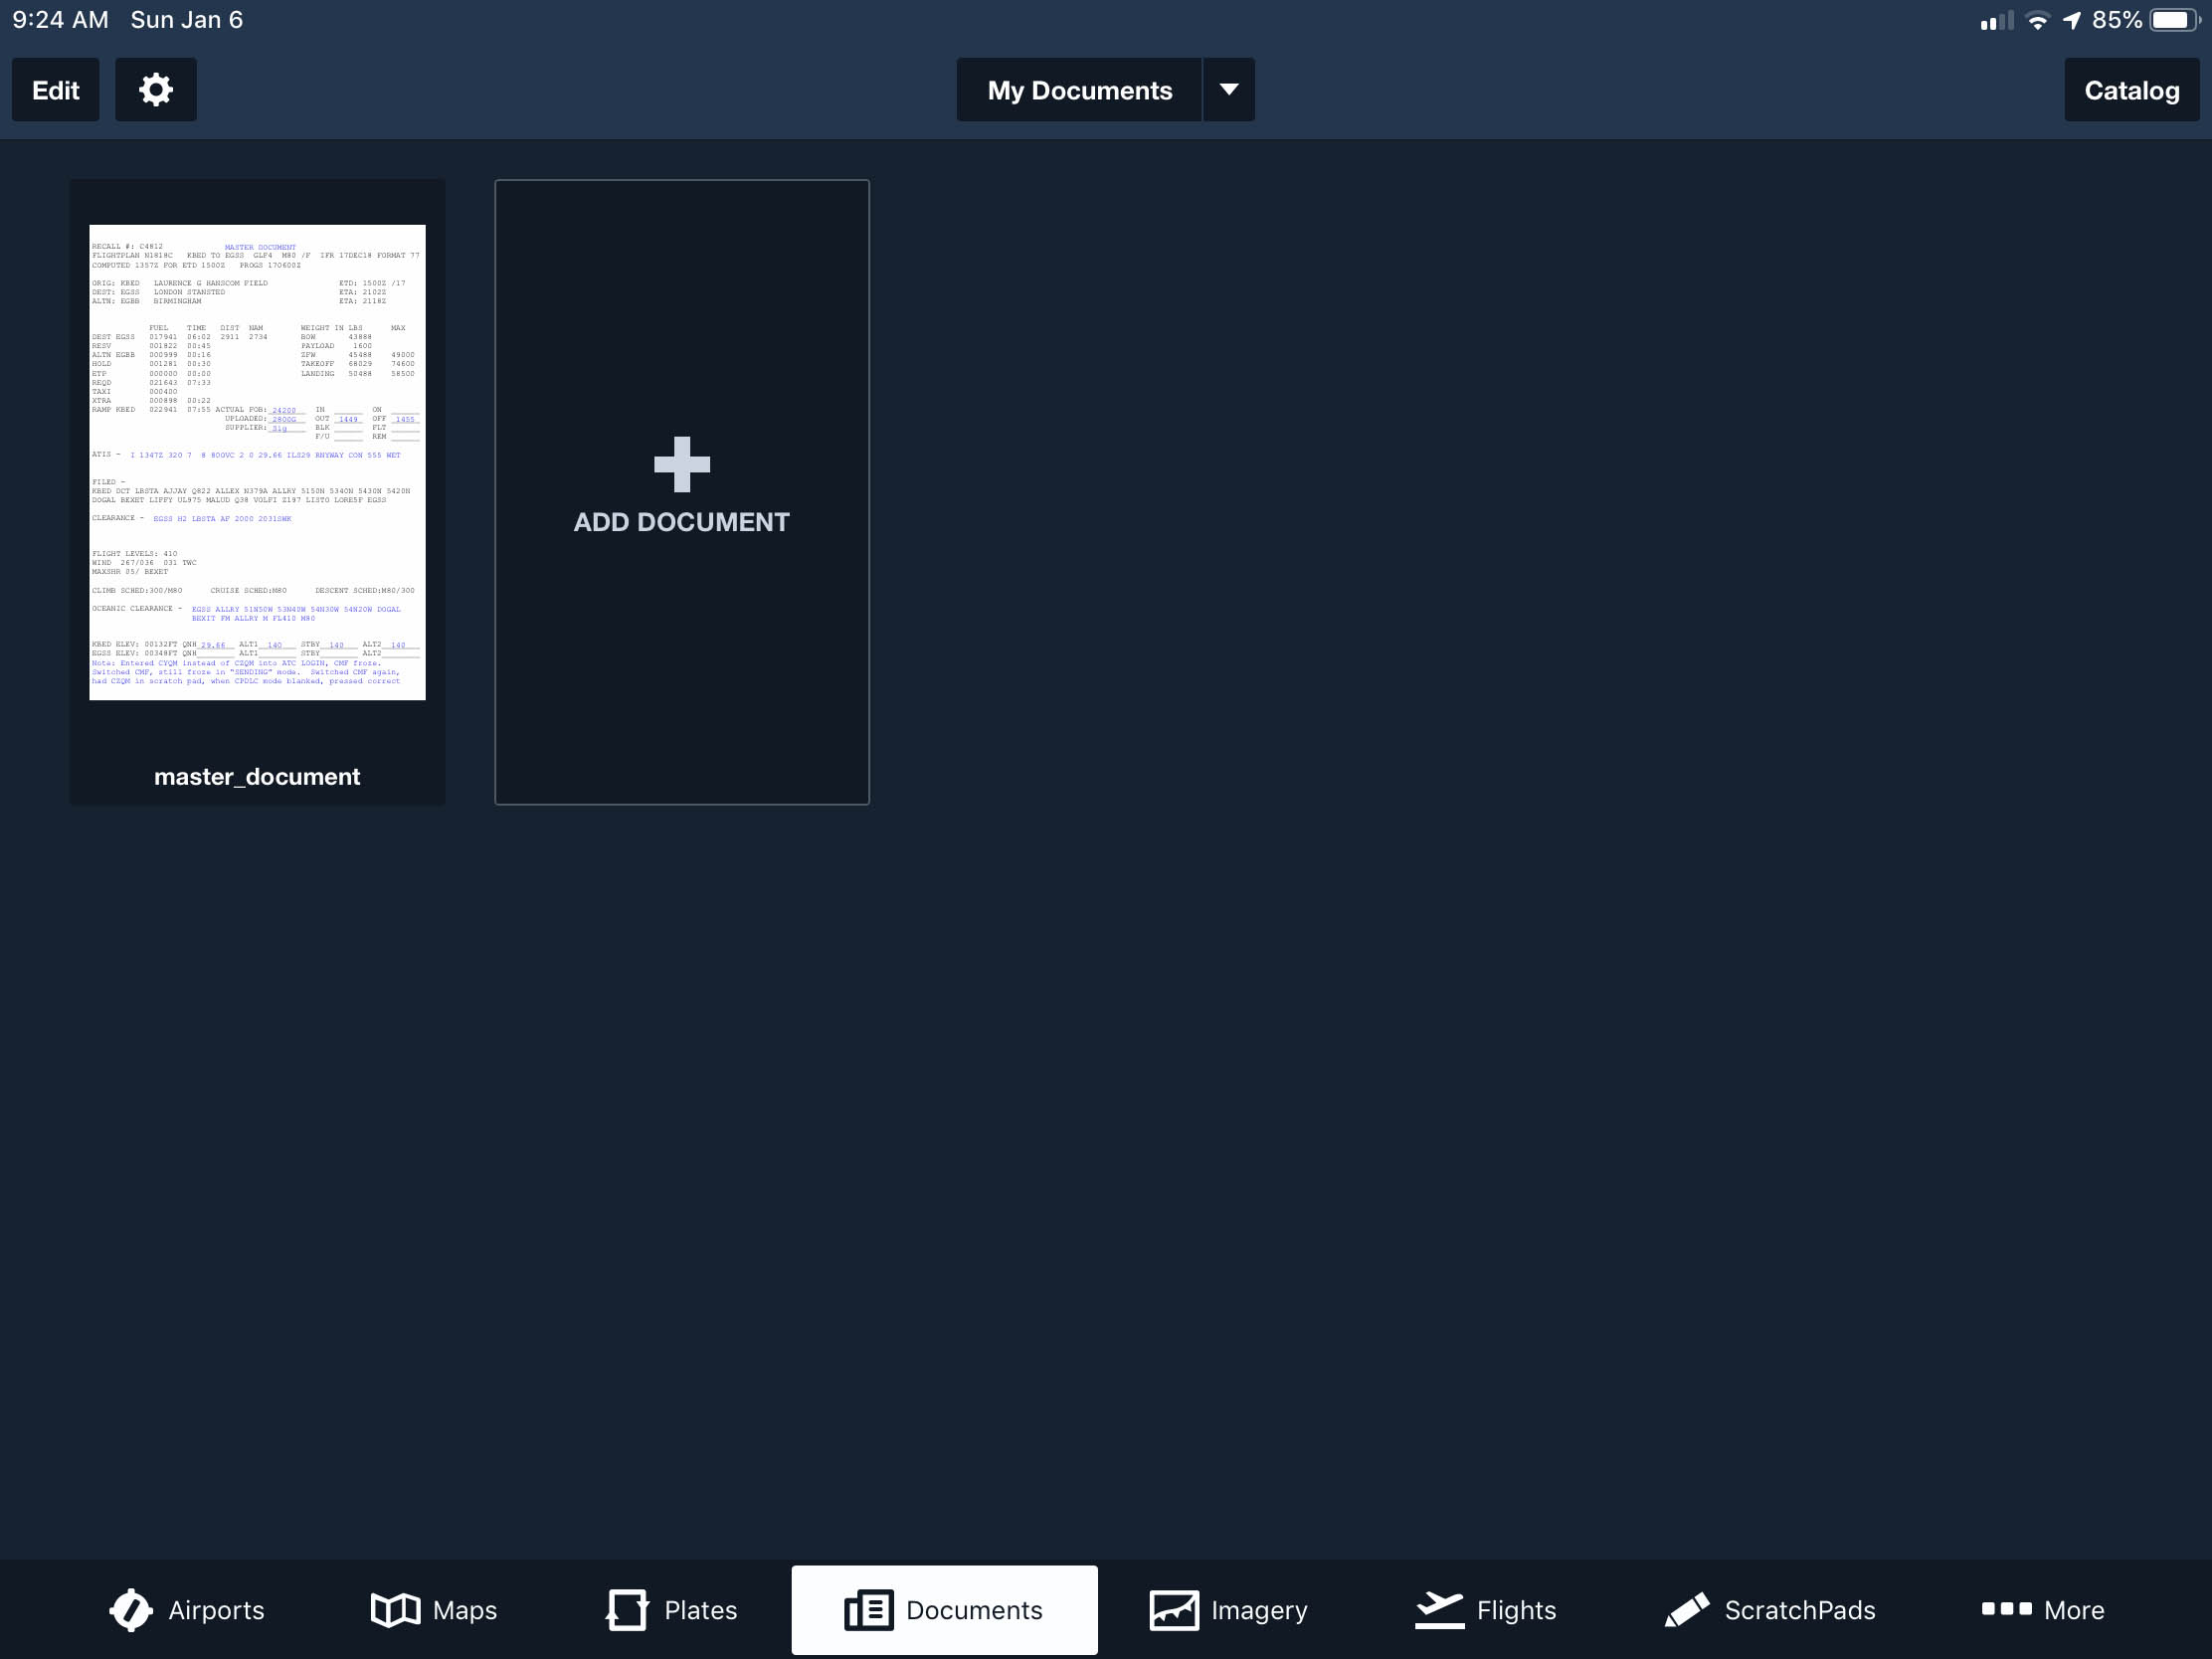
ForeFlight, the documents page
At this point you select and copy the route as shown above under "Using an interactive application" by pressing on a part of the route, extending the copy handles until the route is highlighted, and the select "Copy" from the pop up menu.
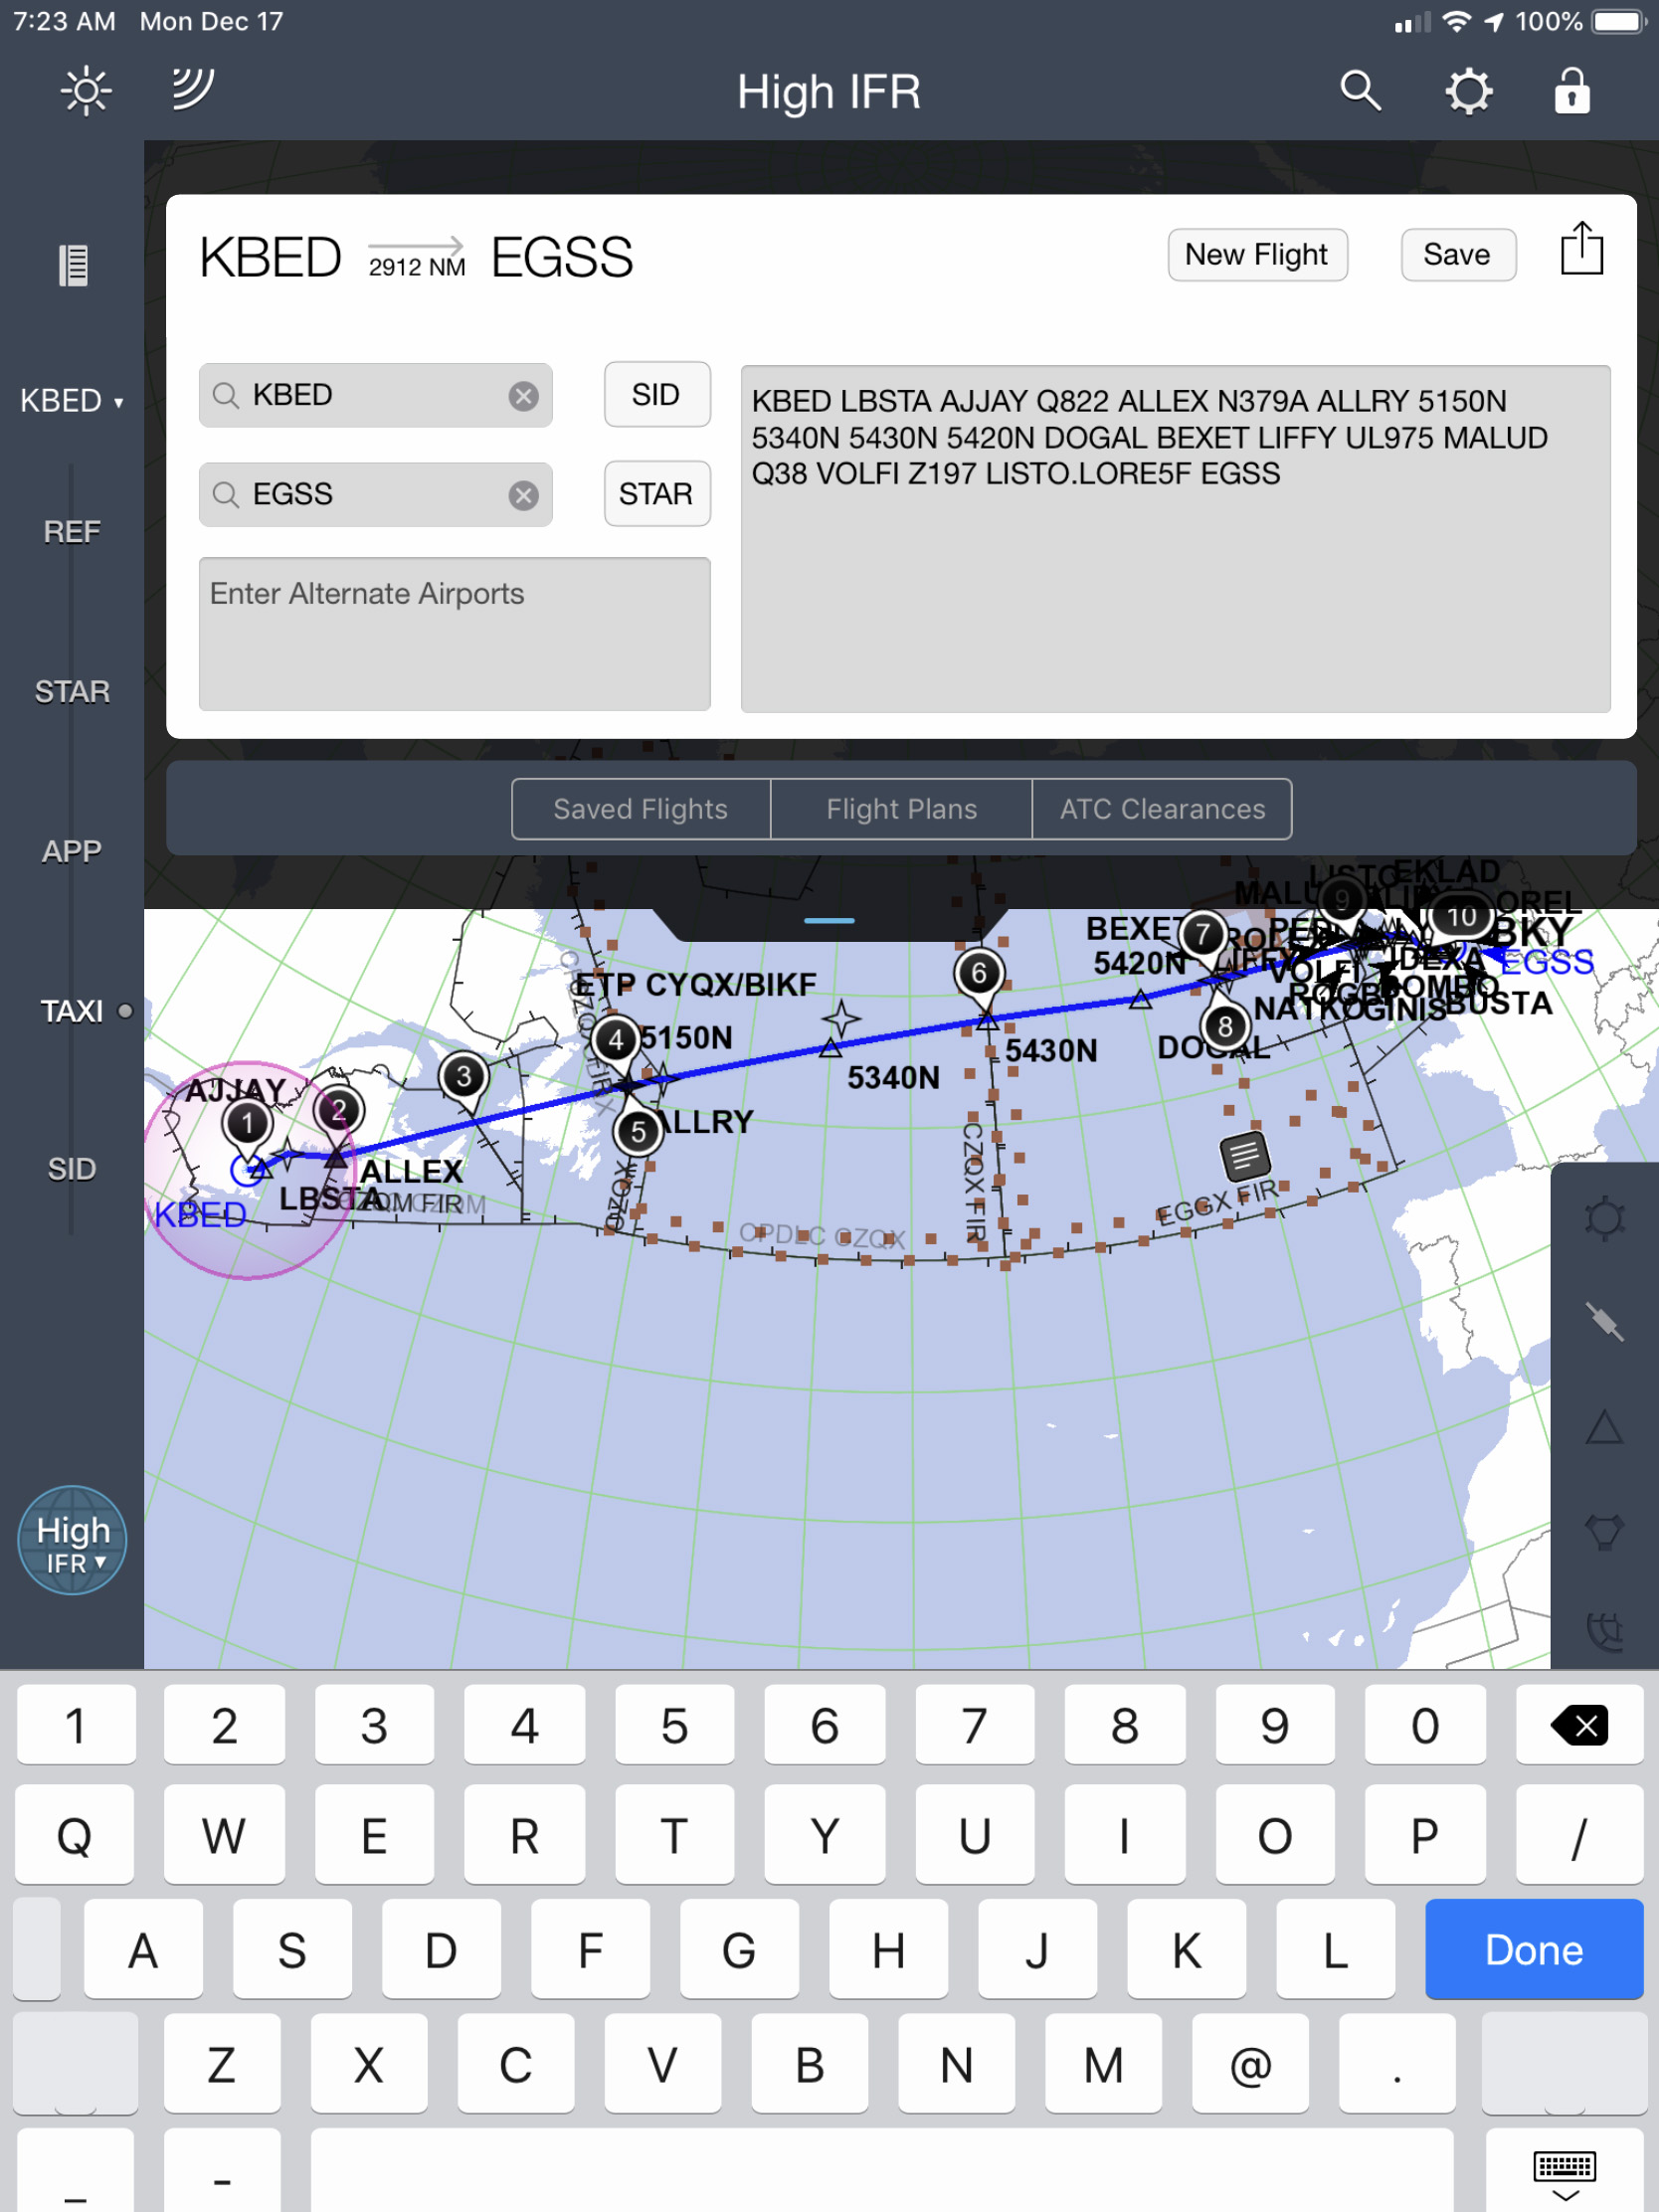
ForeFlight, entering the route
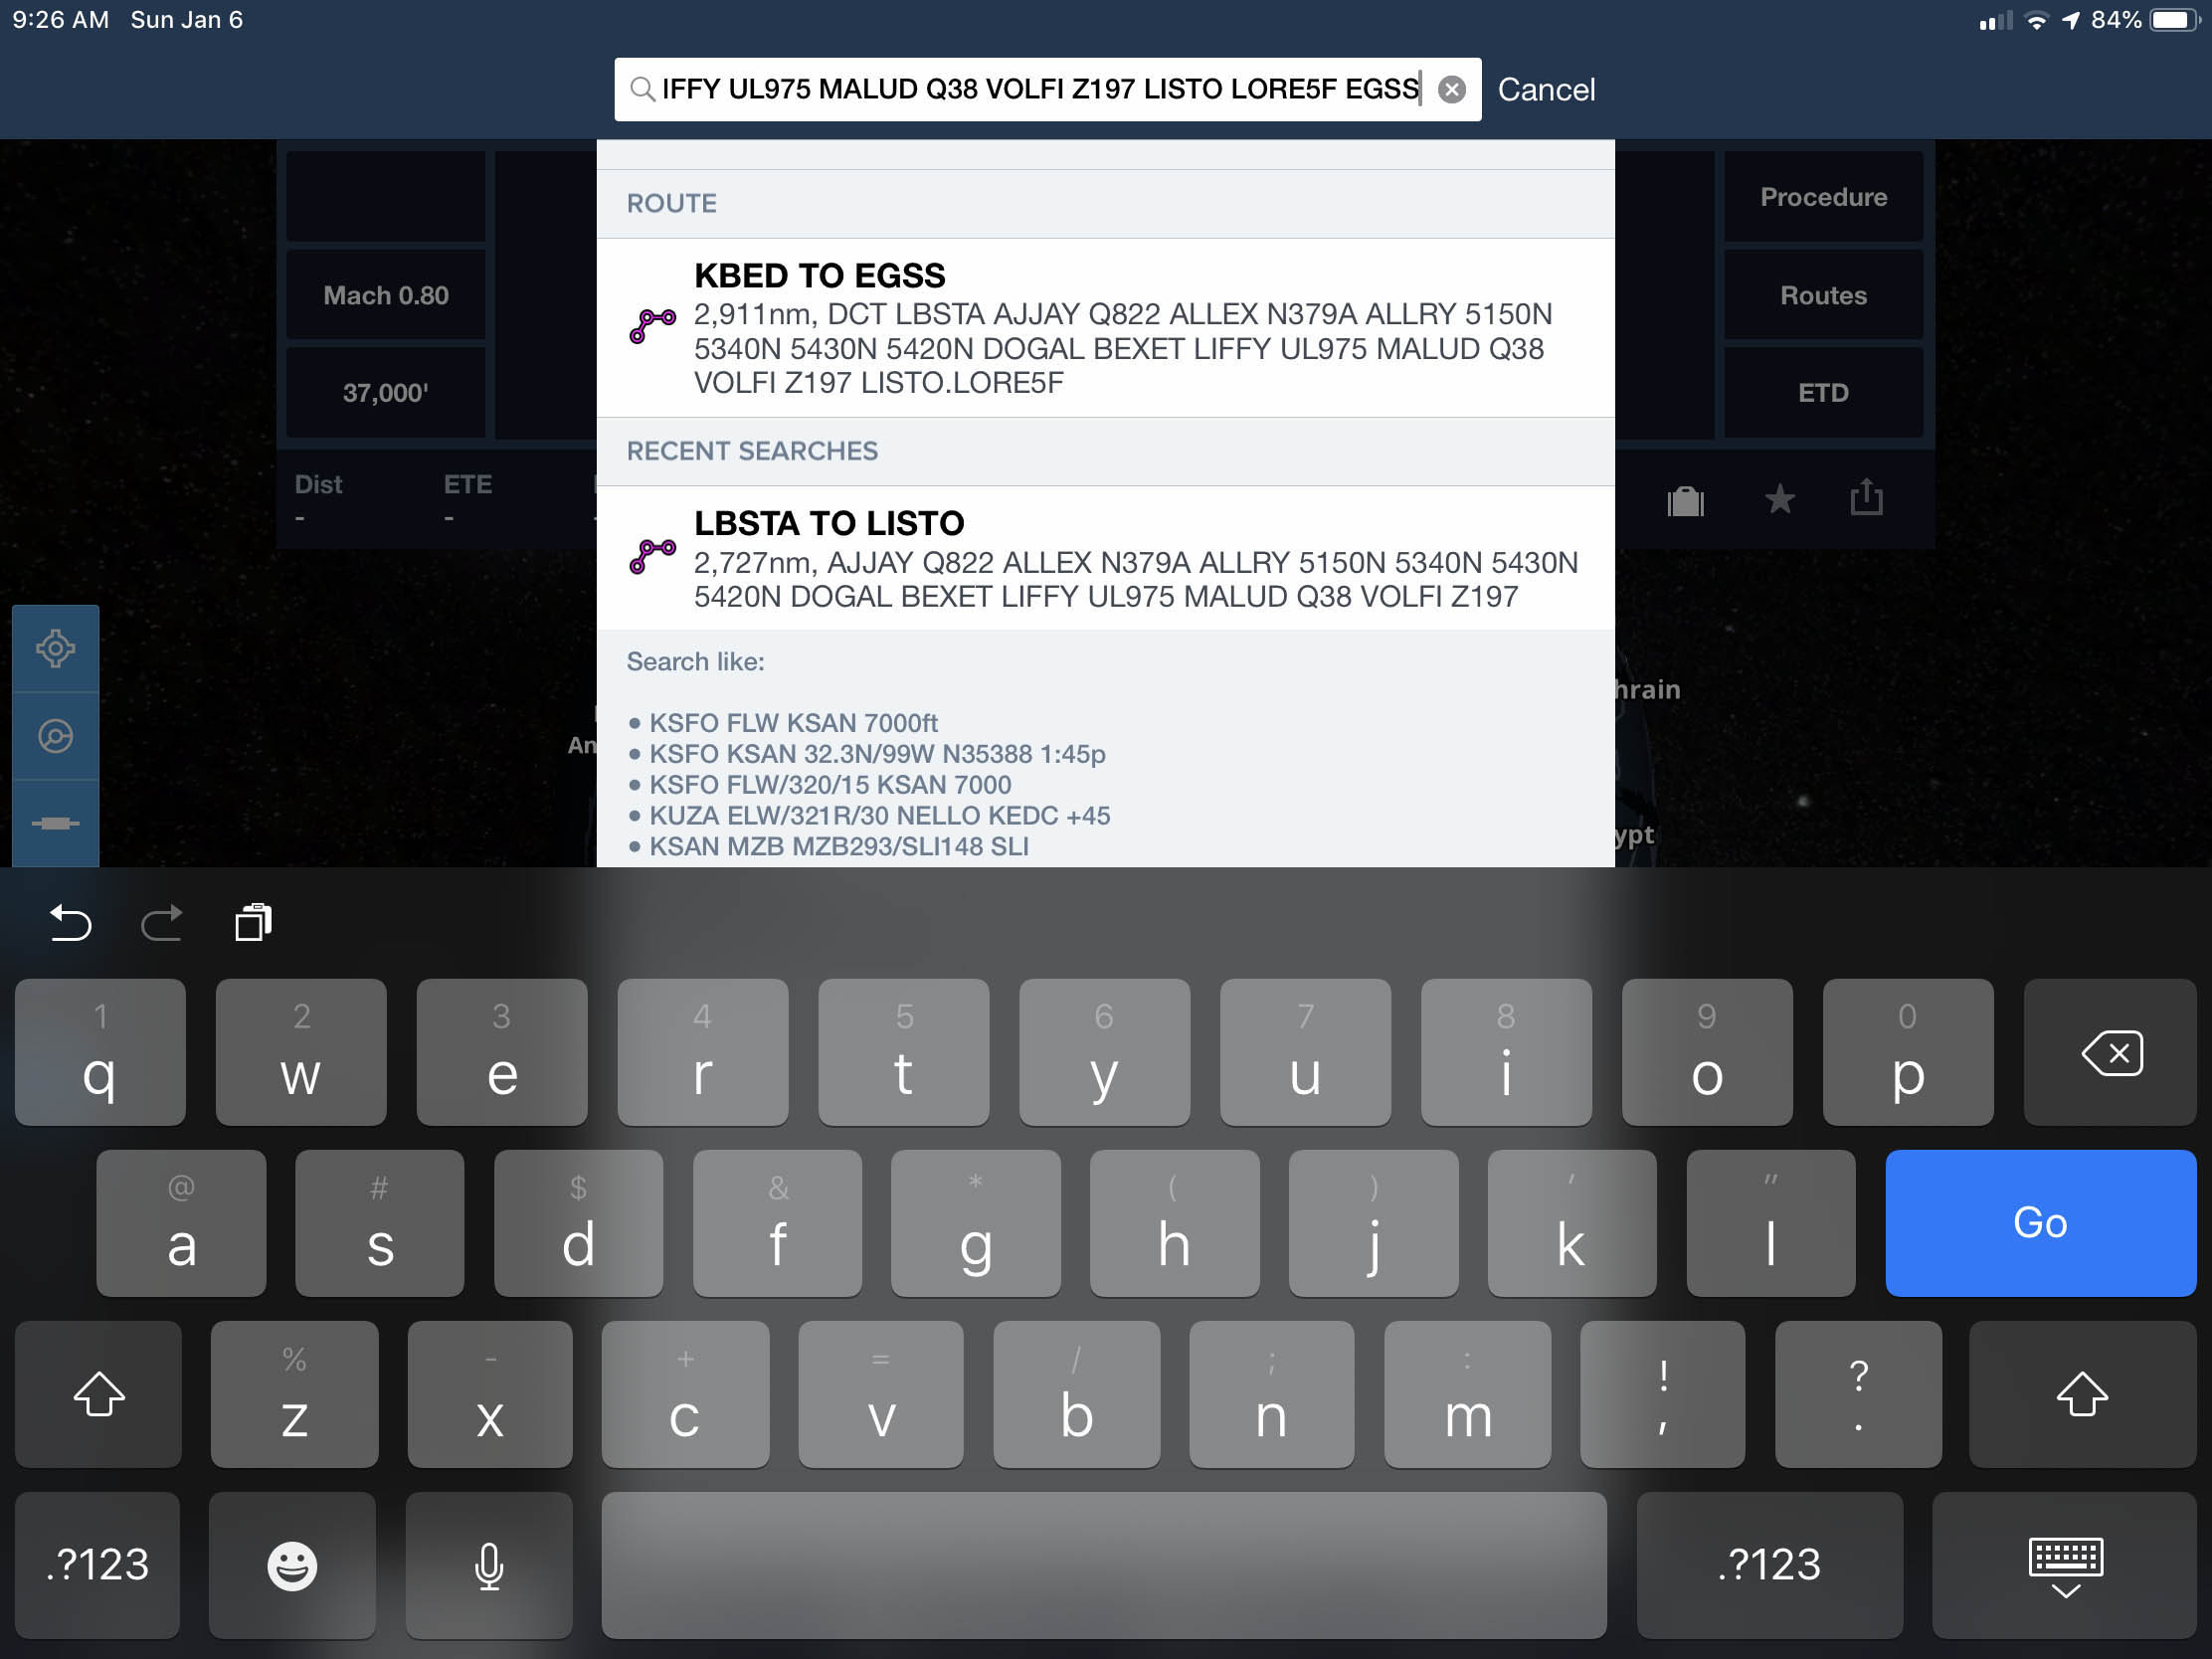
Now select "FPL" from the top menu, "Clear" the old route if necessary, and then press and hold the Search window on top. You should be presented with the text you just copied, press to select.
ForeFlight, entering the route
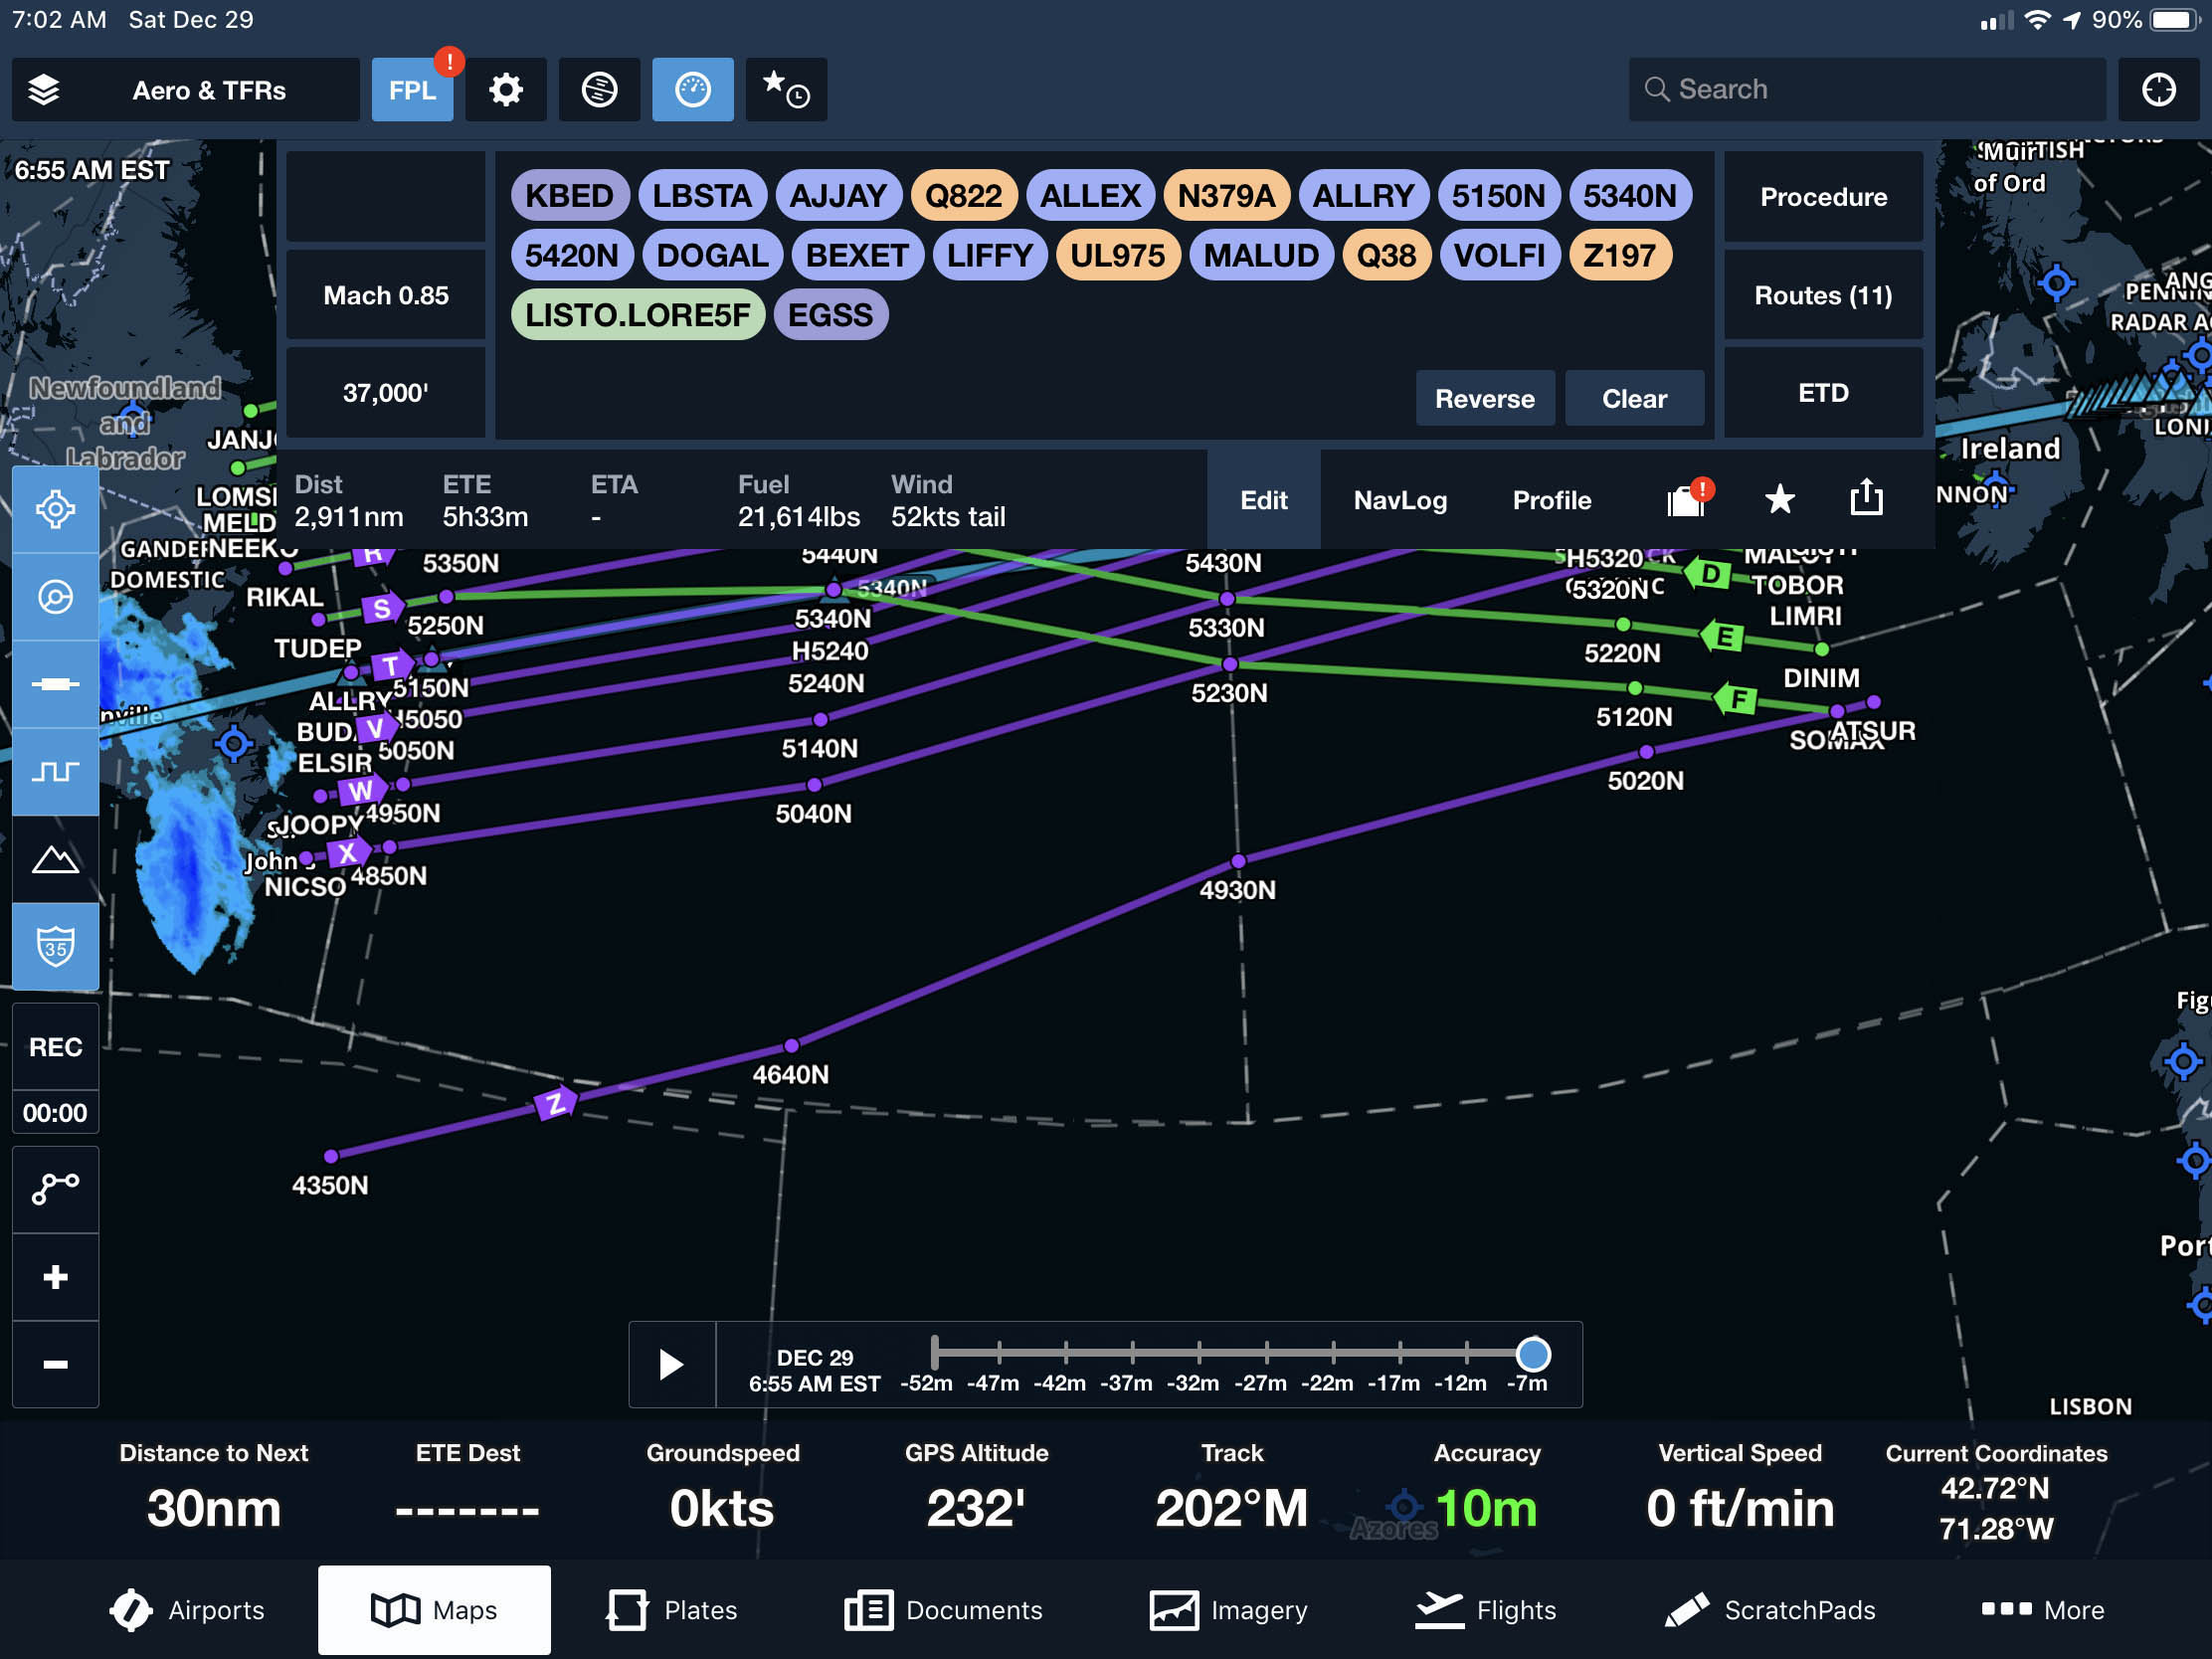
The result should be your copied route.
Checking courses and distances
Once you've entered the route, pressing the FPL button brings up the flight plan which includes headings and distances:
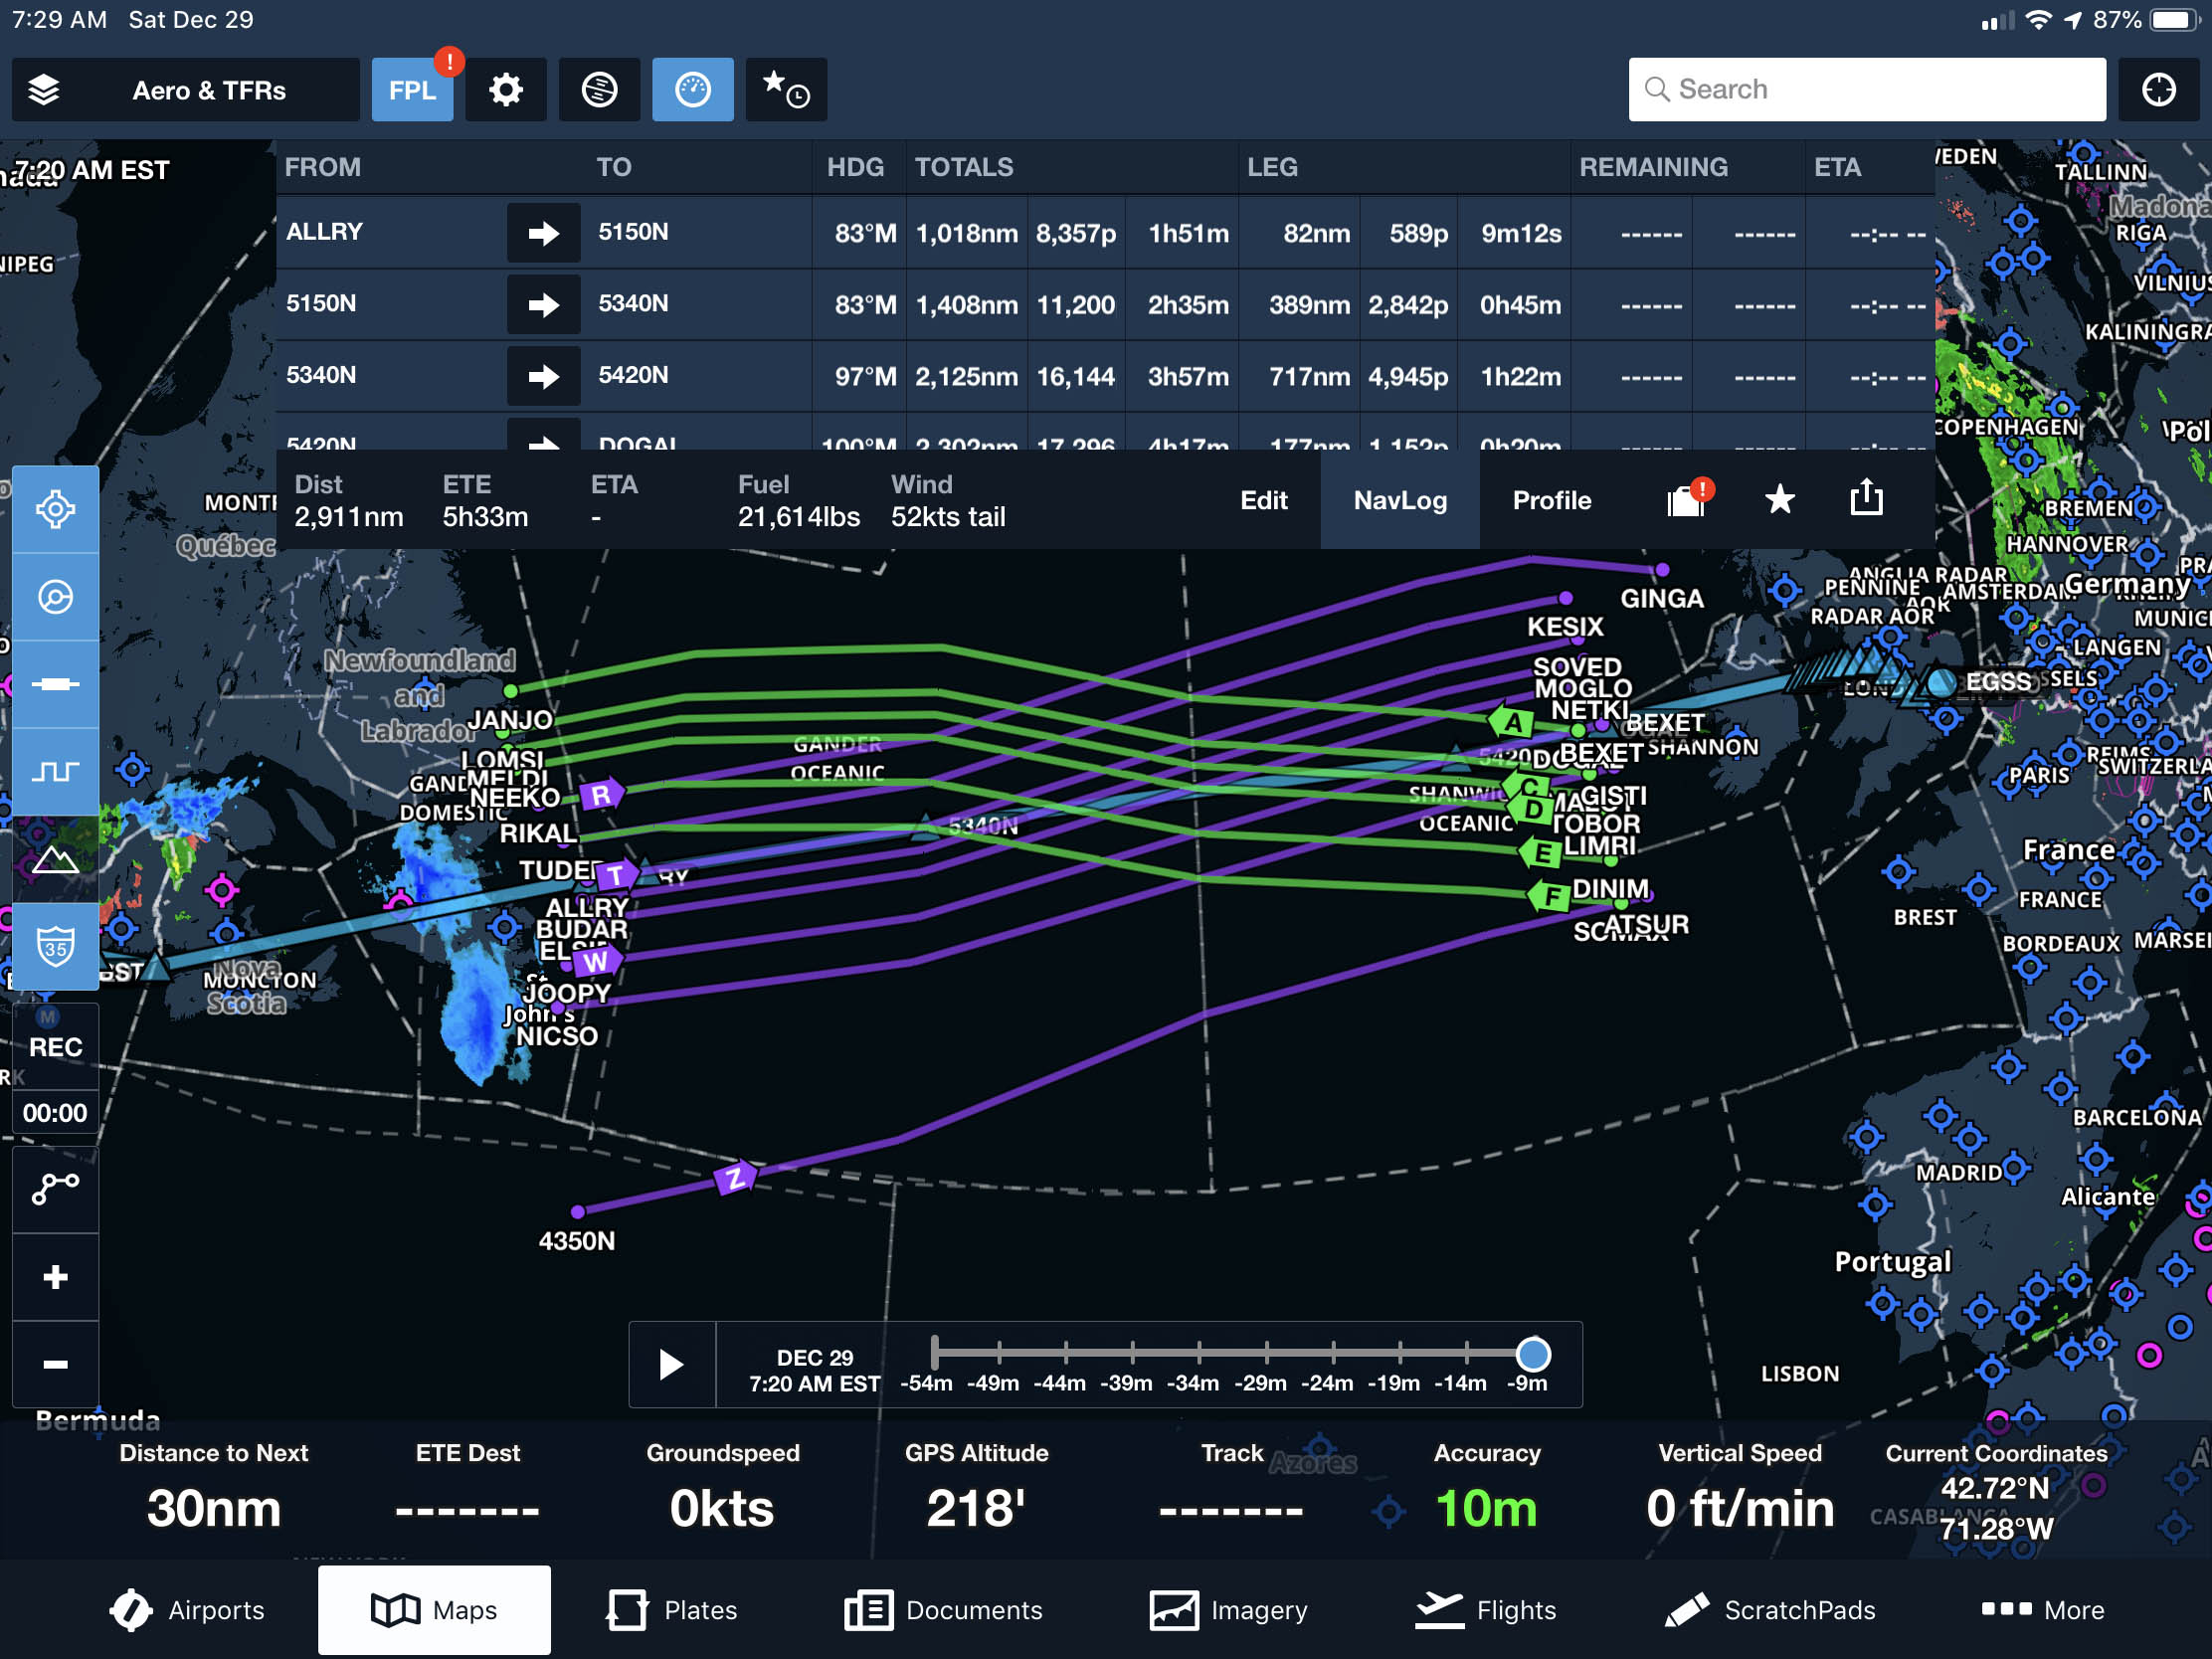
ForeFlight example flight plan page
Notice that this brings up headings not the courses. If ForeFlight has or has recently had access to the Internet, it will automatically download the winds and you will not be able to display courses. To get around this, tap the "Edit" button below the legs, then look for either "ETD" or a time which indicates the ETD. Tap the ETD and you will see a calendar. If you select a date at least 7 days away, the winds are zeroed and the NavLog will then display "CRS" which is the Magnetic Course:
ForeFlight example distance/heading check
This works, but remember it isn't the True course, it is Magnetic. That should not be a problem since your FMS will most likely be using Magnetic as well.
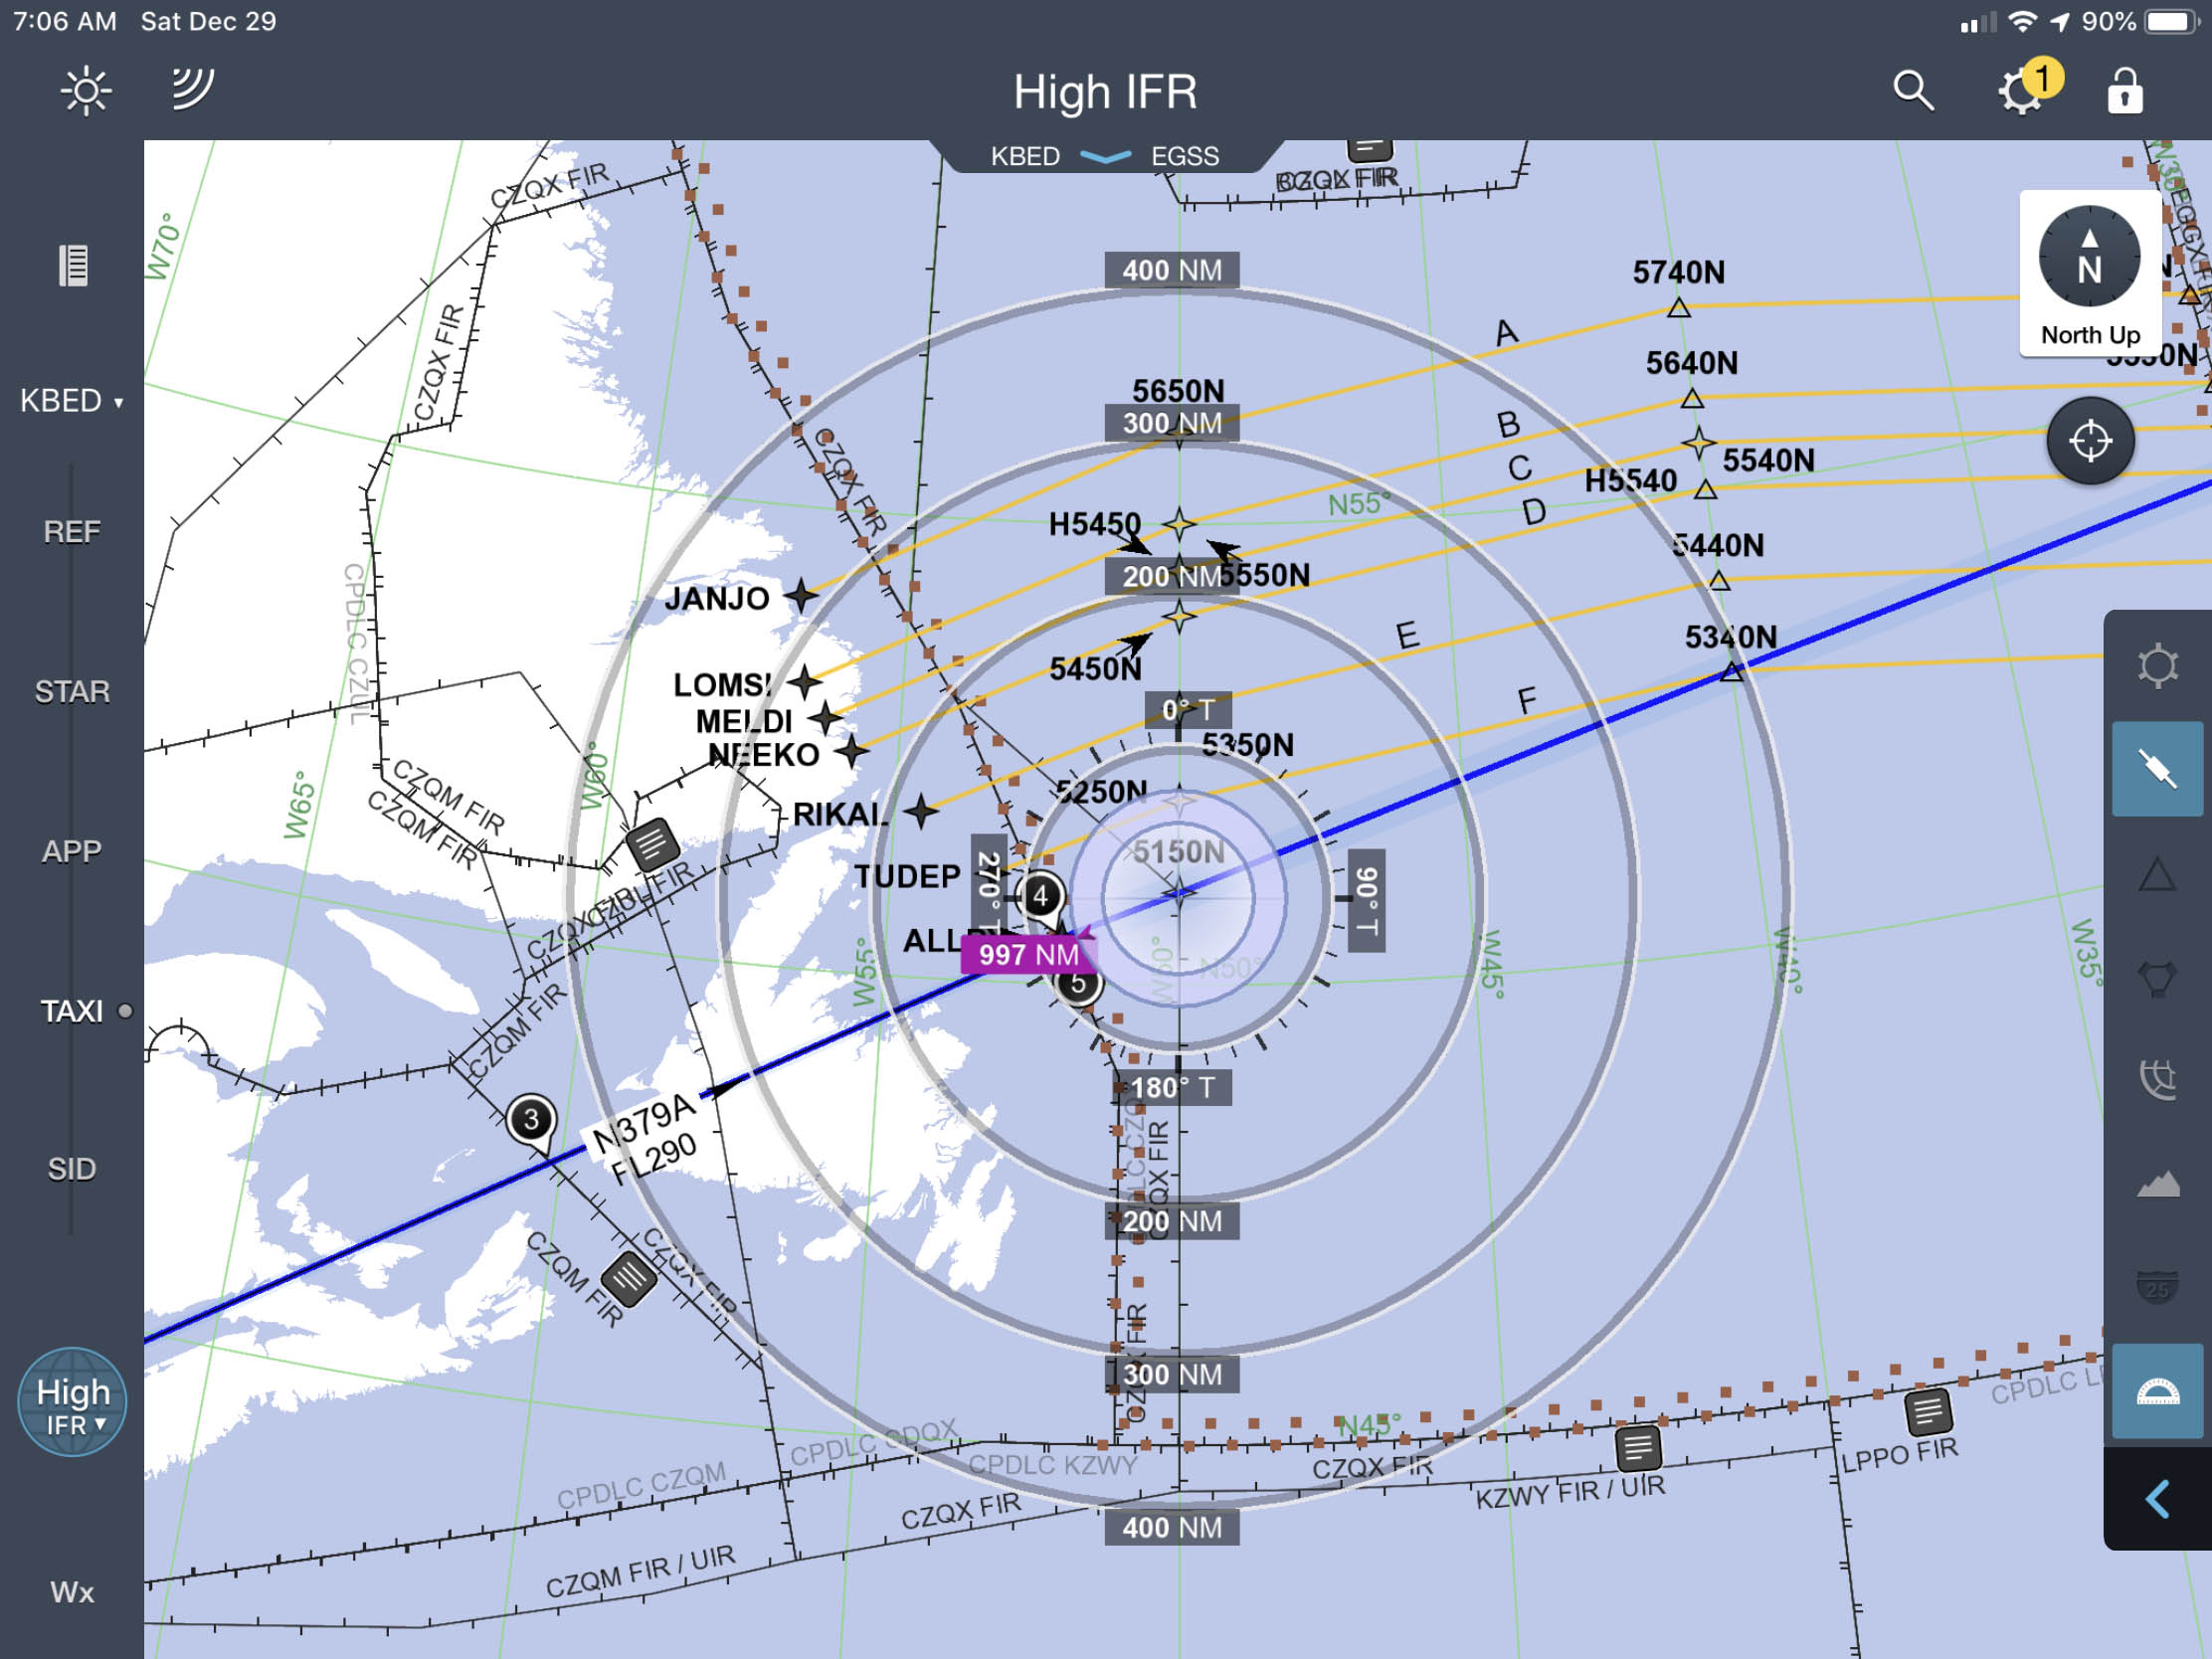
ETPs and PSRs
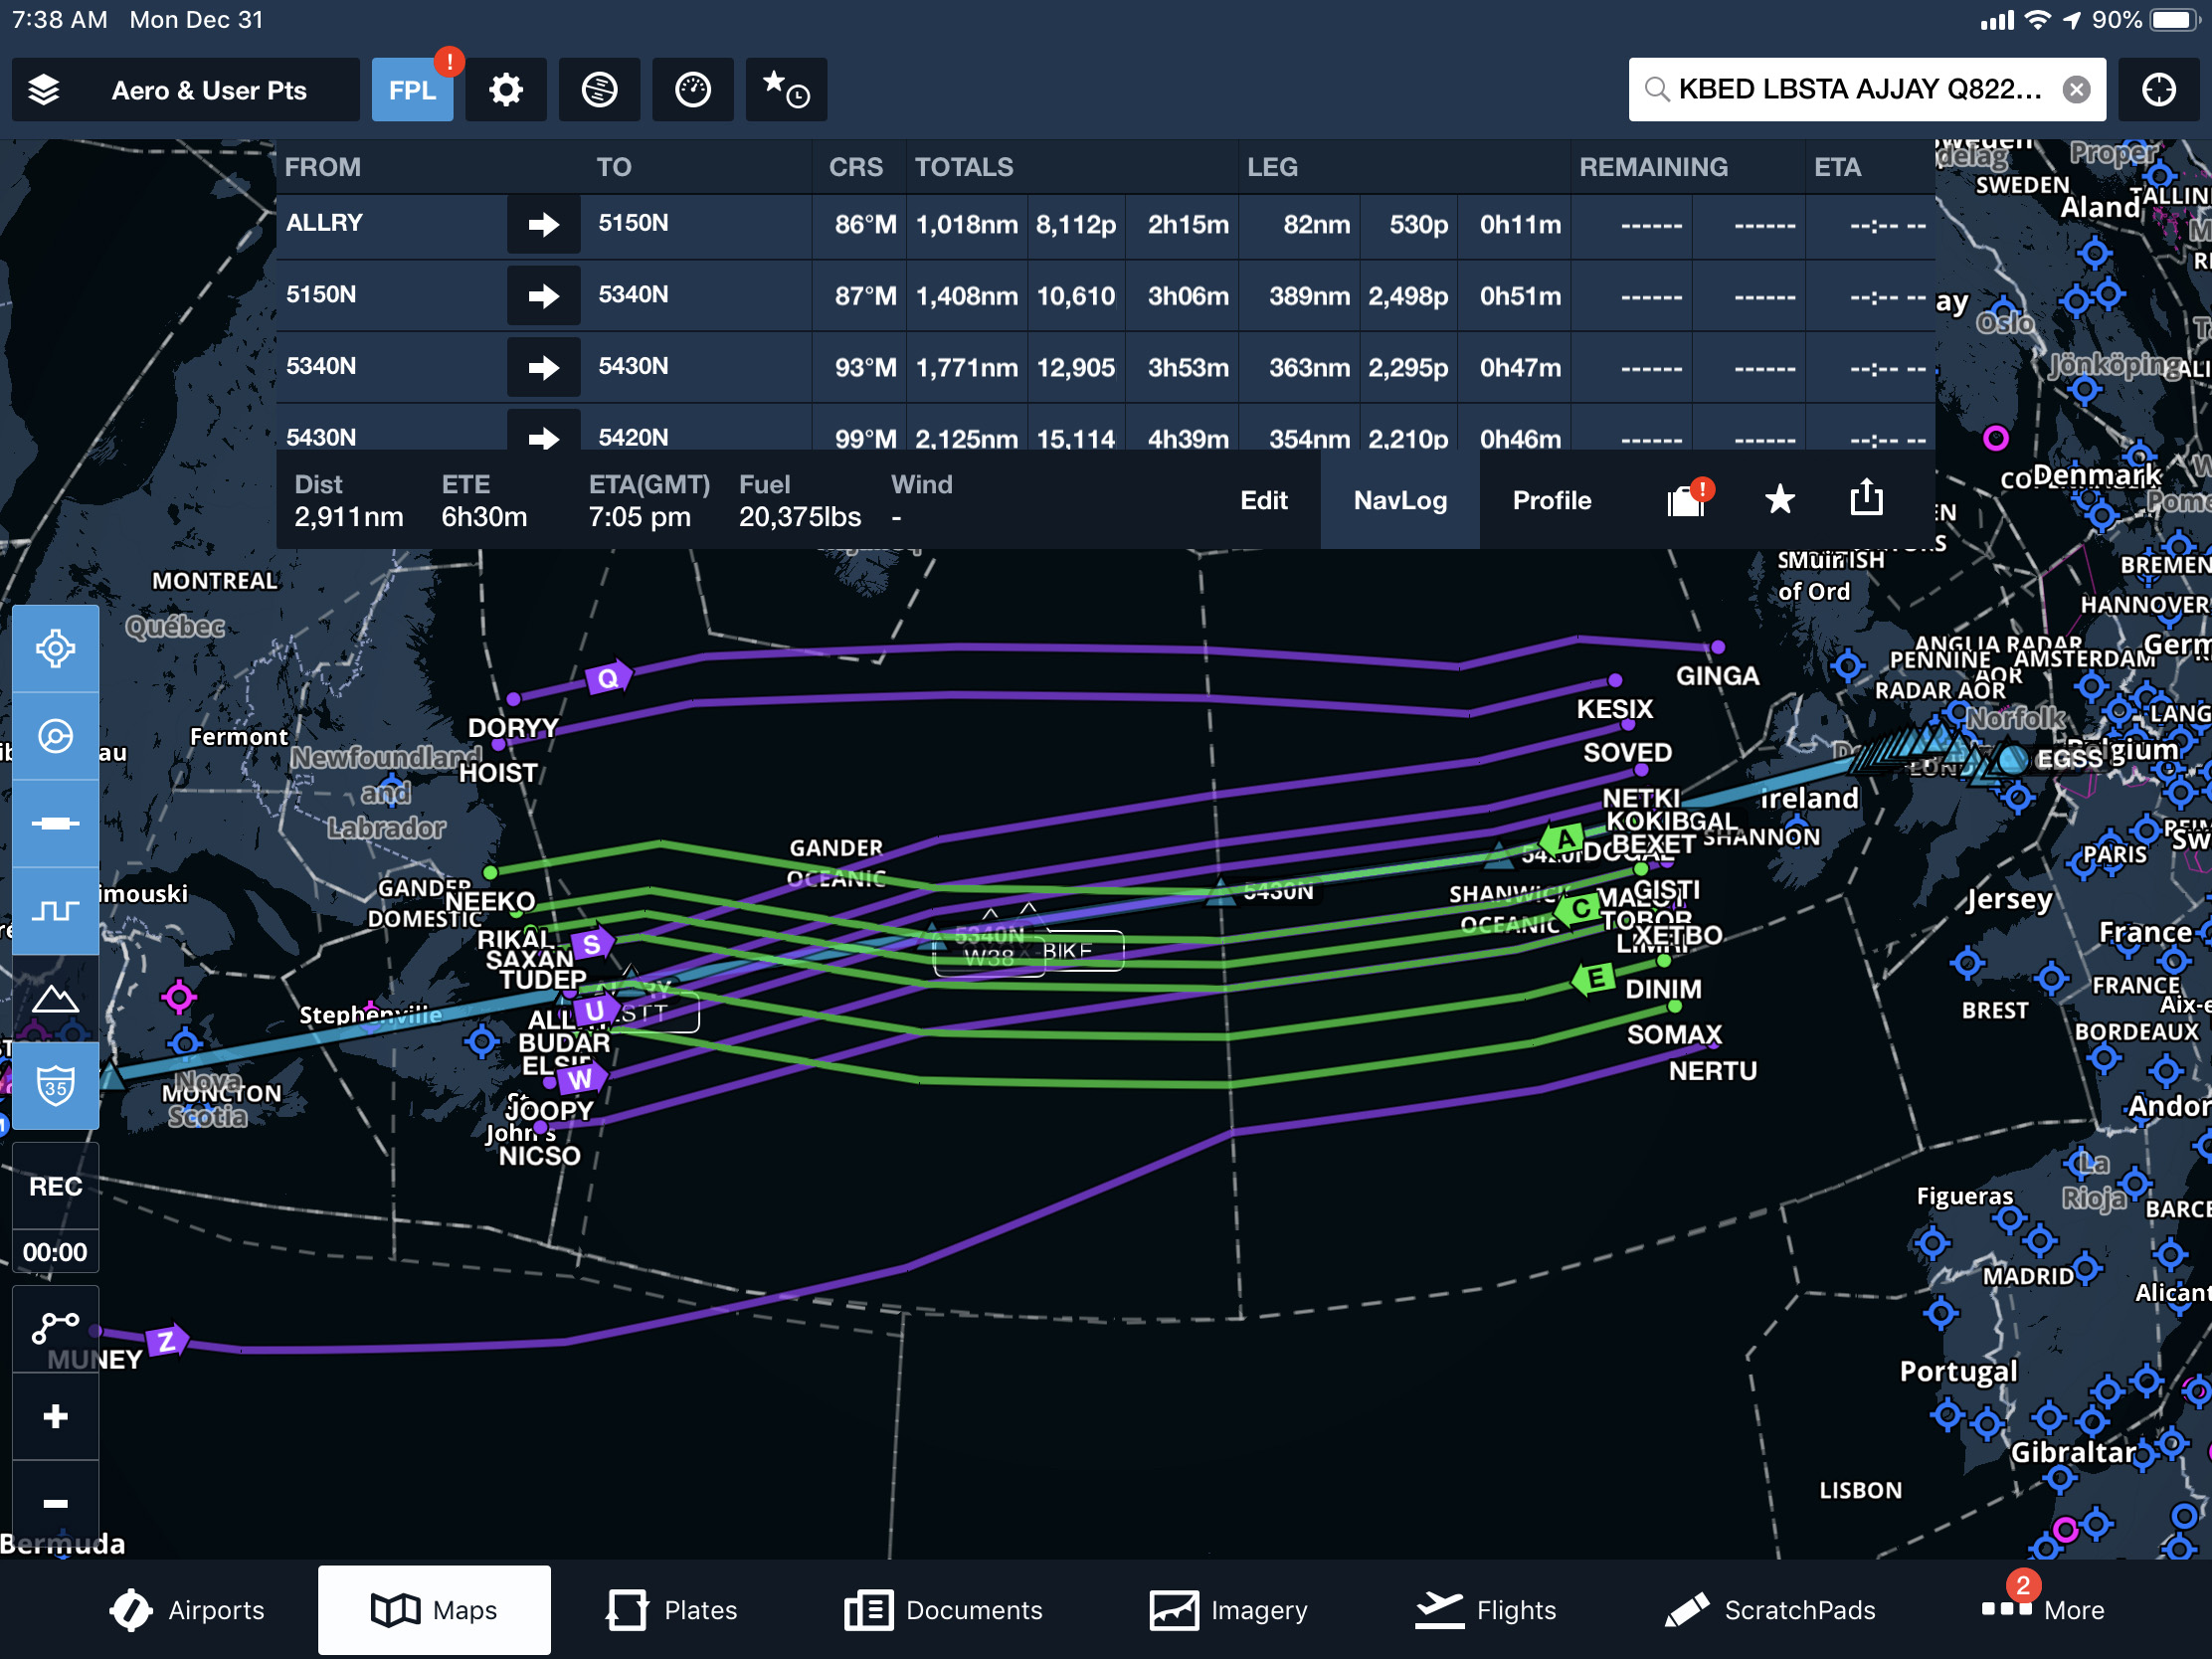
You will need to enter at least one Equal Time Point (ETP), possibly a Point of Safe Return (PSR), and you may want to enter other points onto the chart that should not appear as routing waypoints.
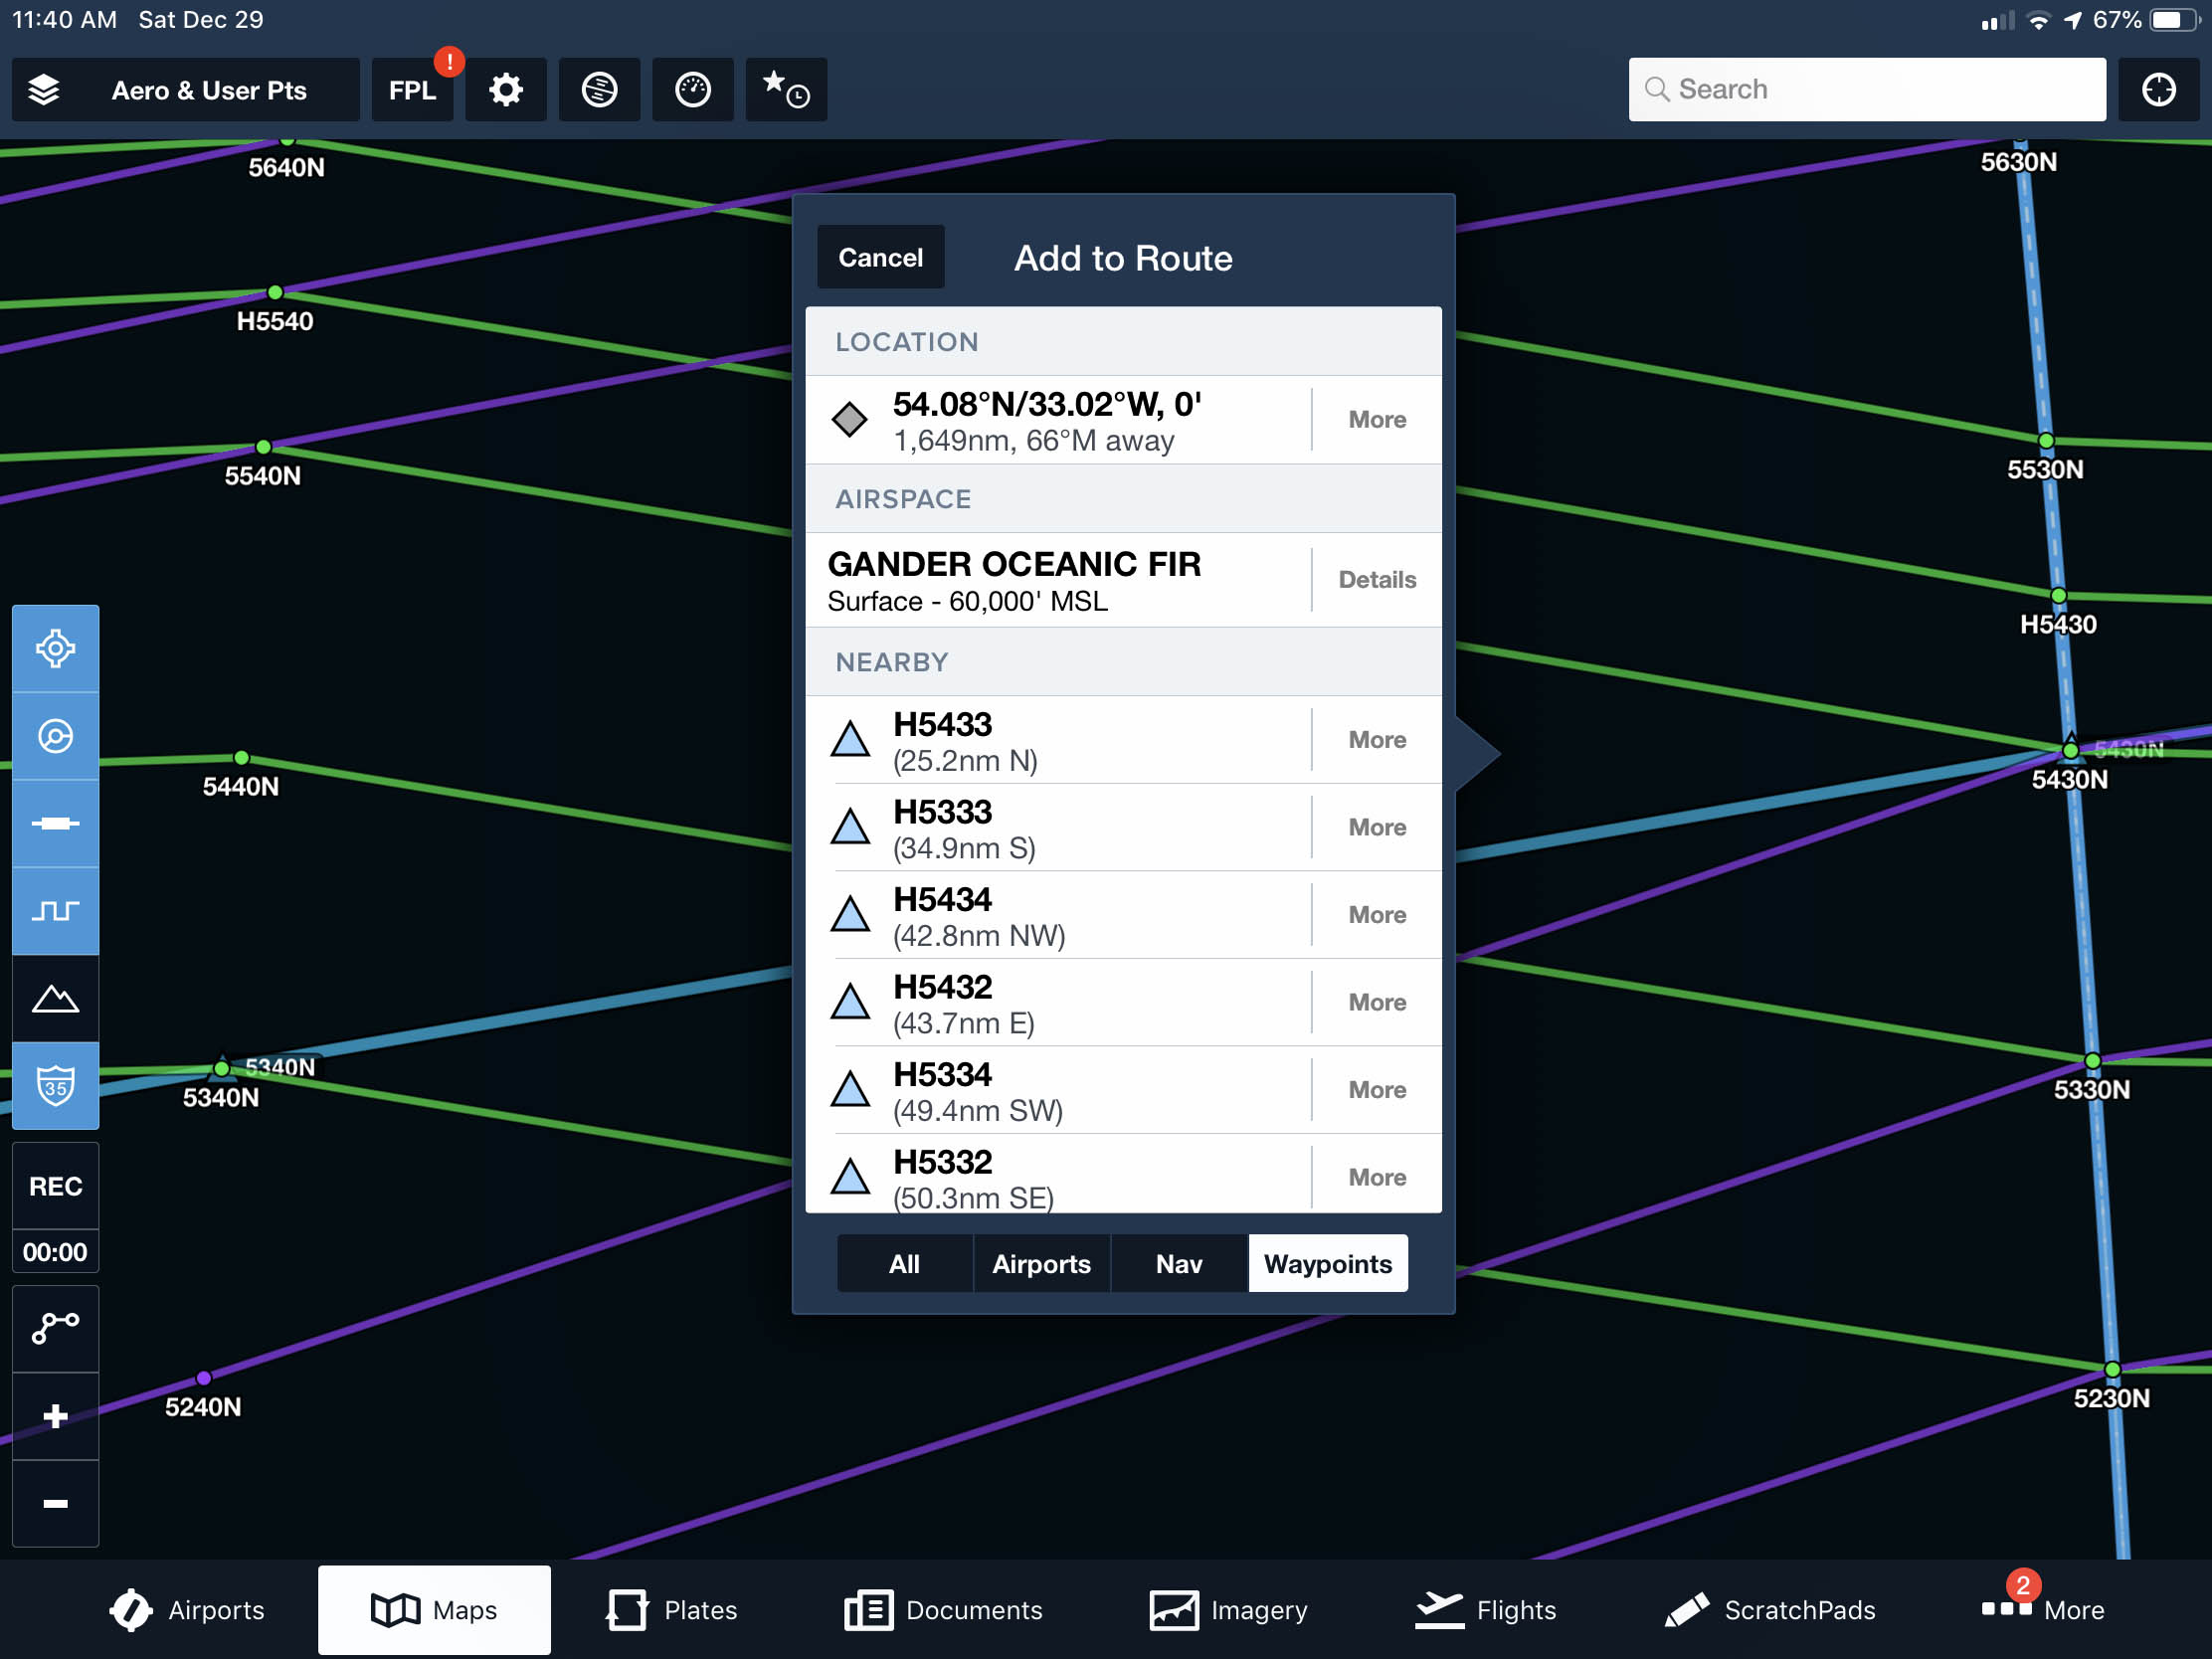
ForeFlight, plotting an ETP, step 1
Press and hold a point on the route near the desired point. Select "More" on the location line and then "Save."
ForeFlight, plotting an ETP, step 2
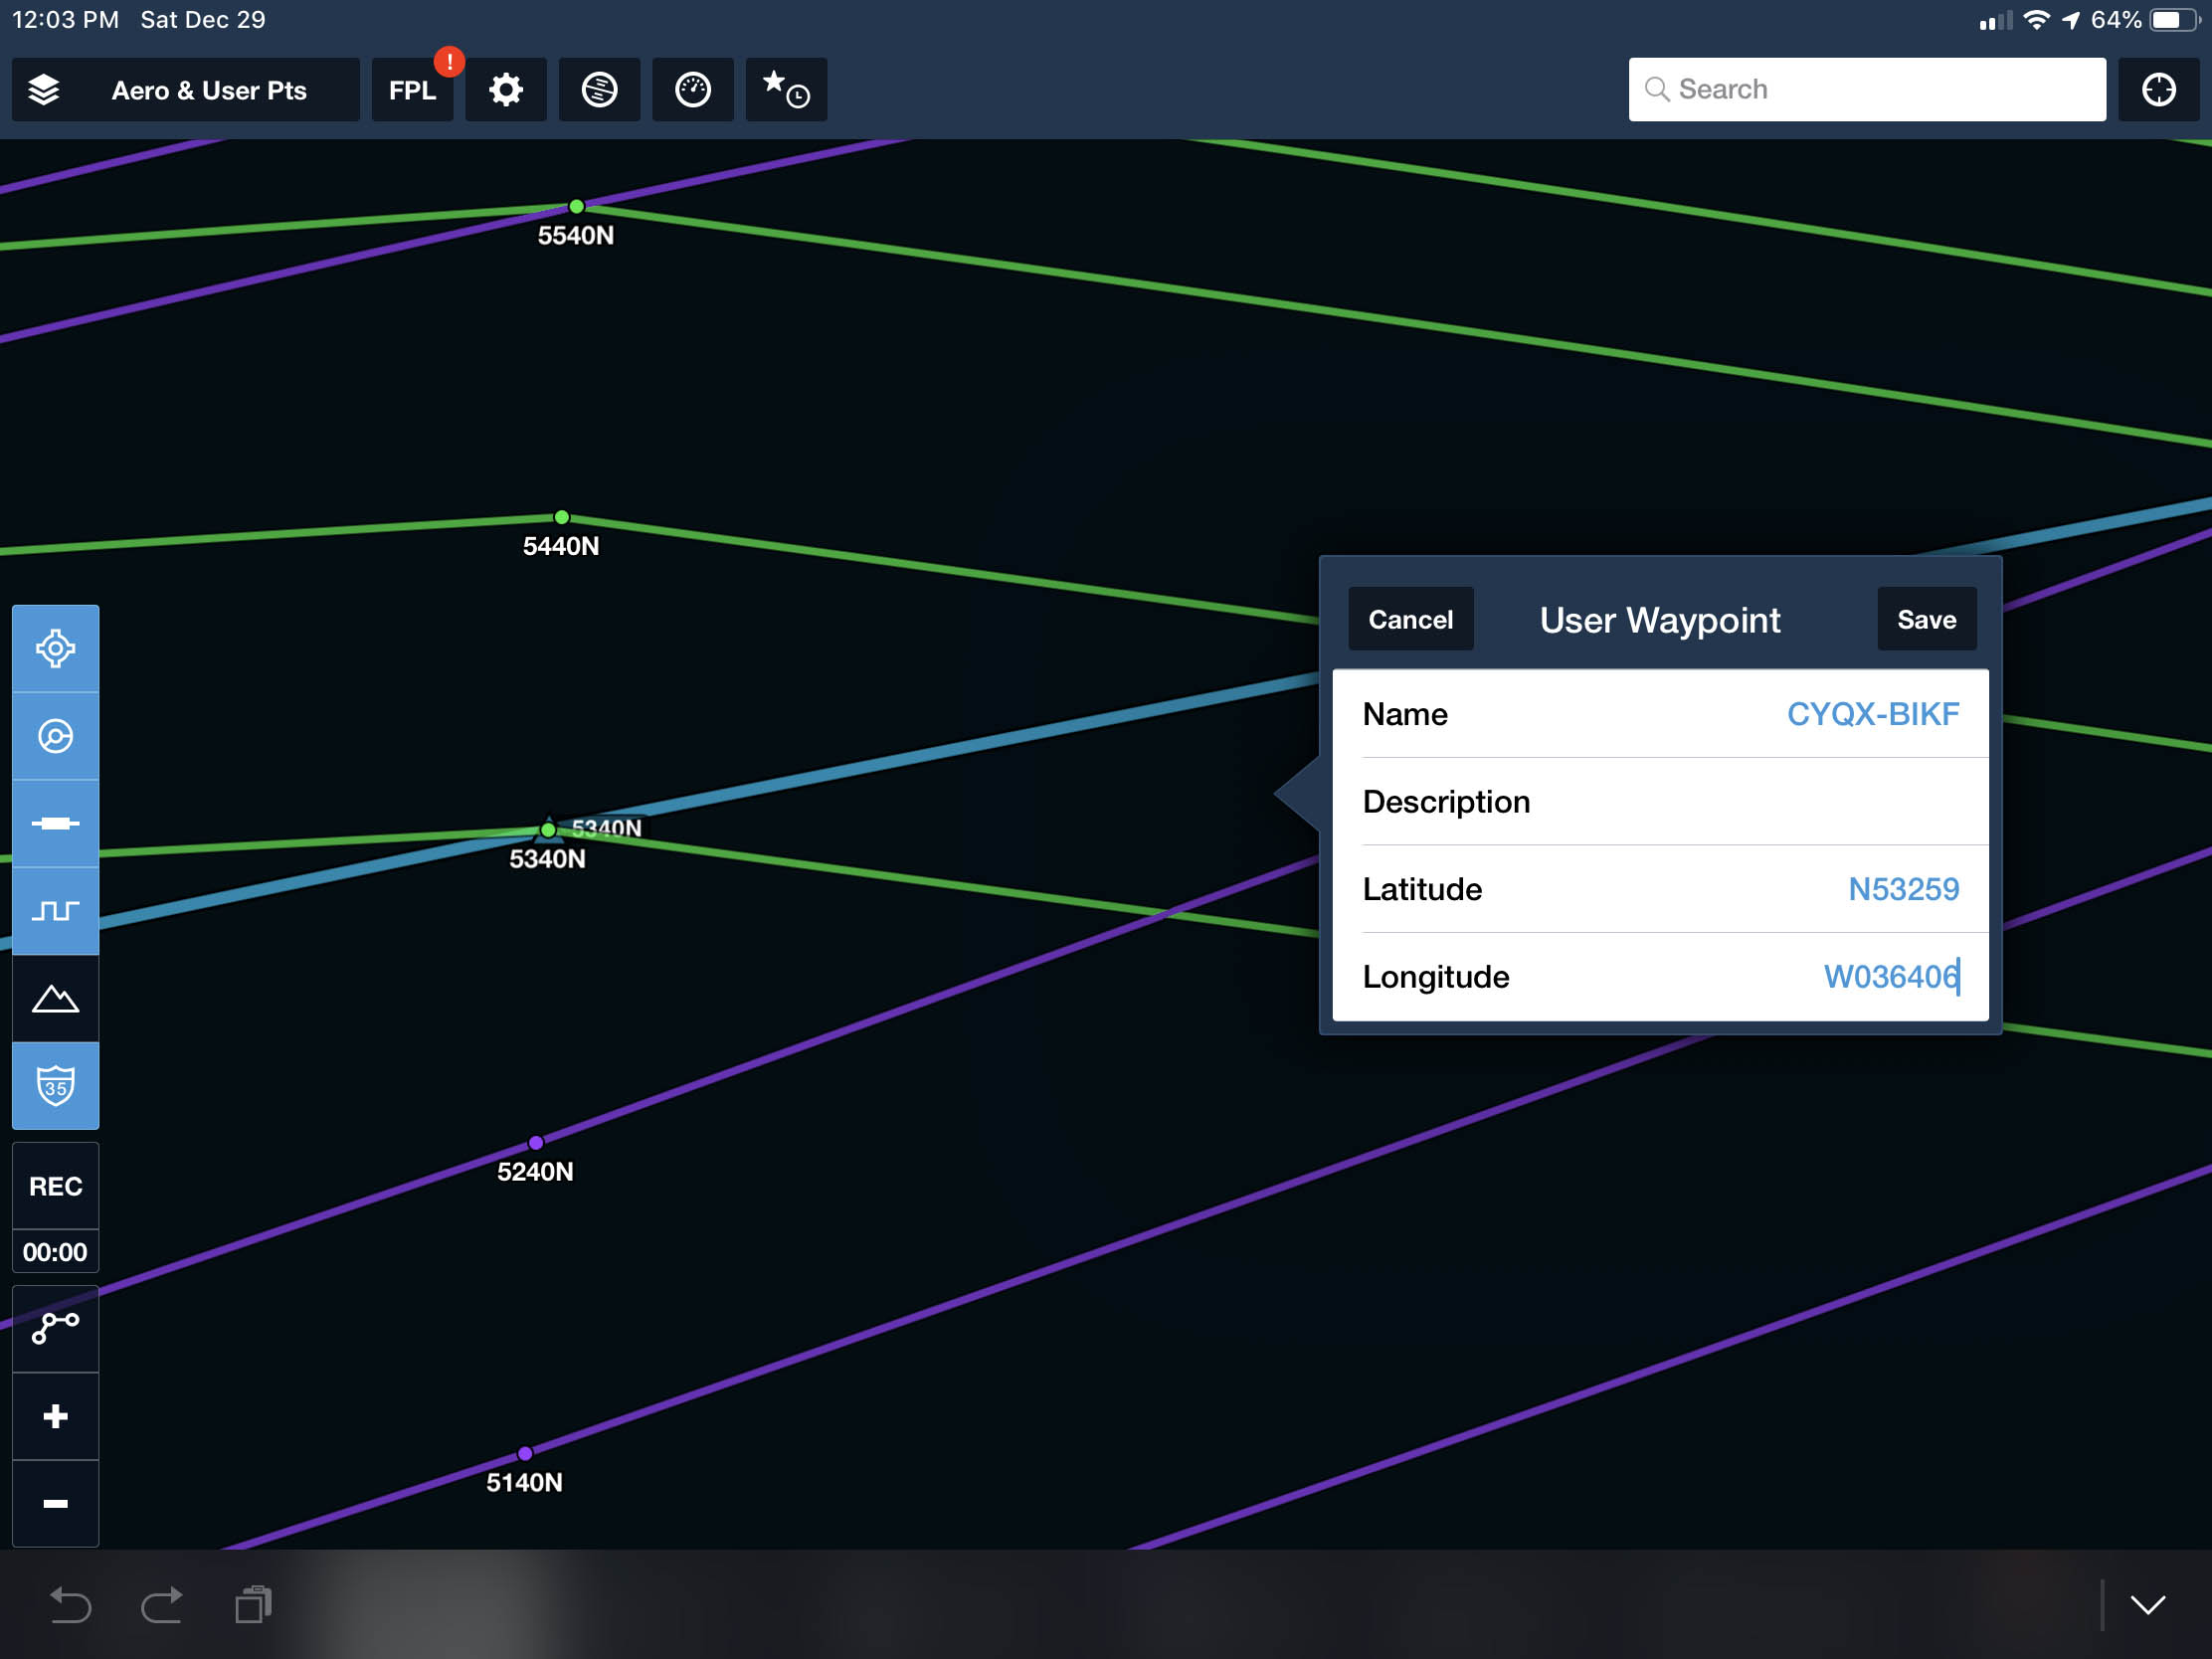
From the next menu give the ETP a suitable name, correct the latitude and longitude. The default format probably isn't what you want: degrees.decimal degrees. To automatically enter degrees, minutes, and decimal minutes, use the format HDDDMMS, i.e., N53259 or W036406. (Latitude degrees must be in two digits, longitude degrees must be three digits.) However you enter it, it will be converted to degrees and decimal degrees.
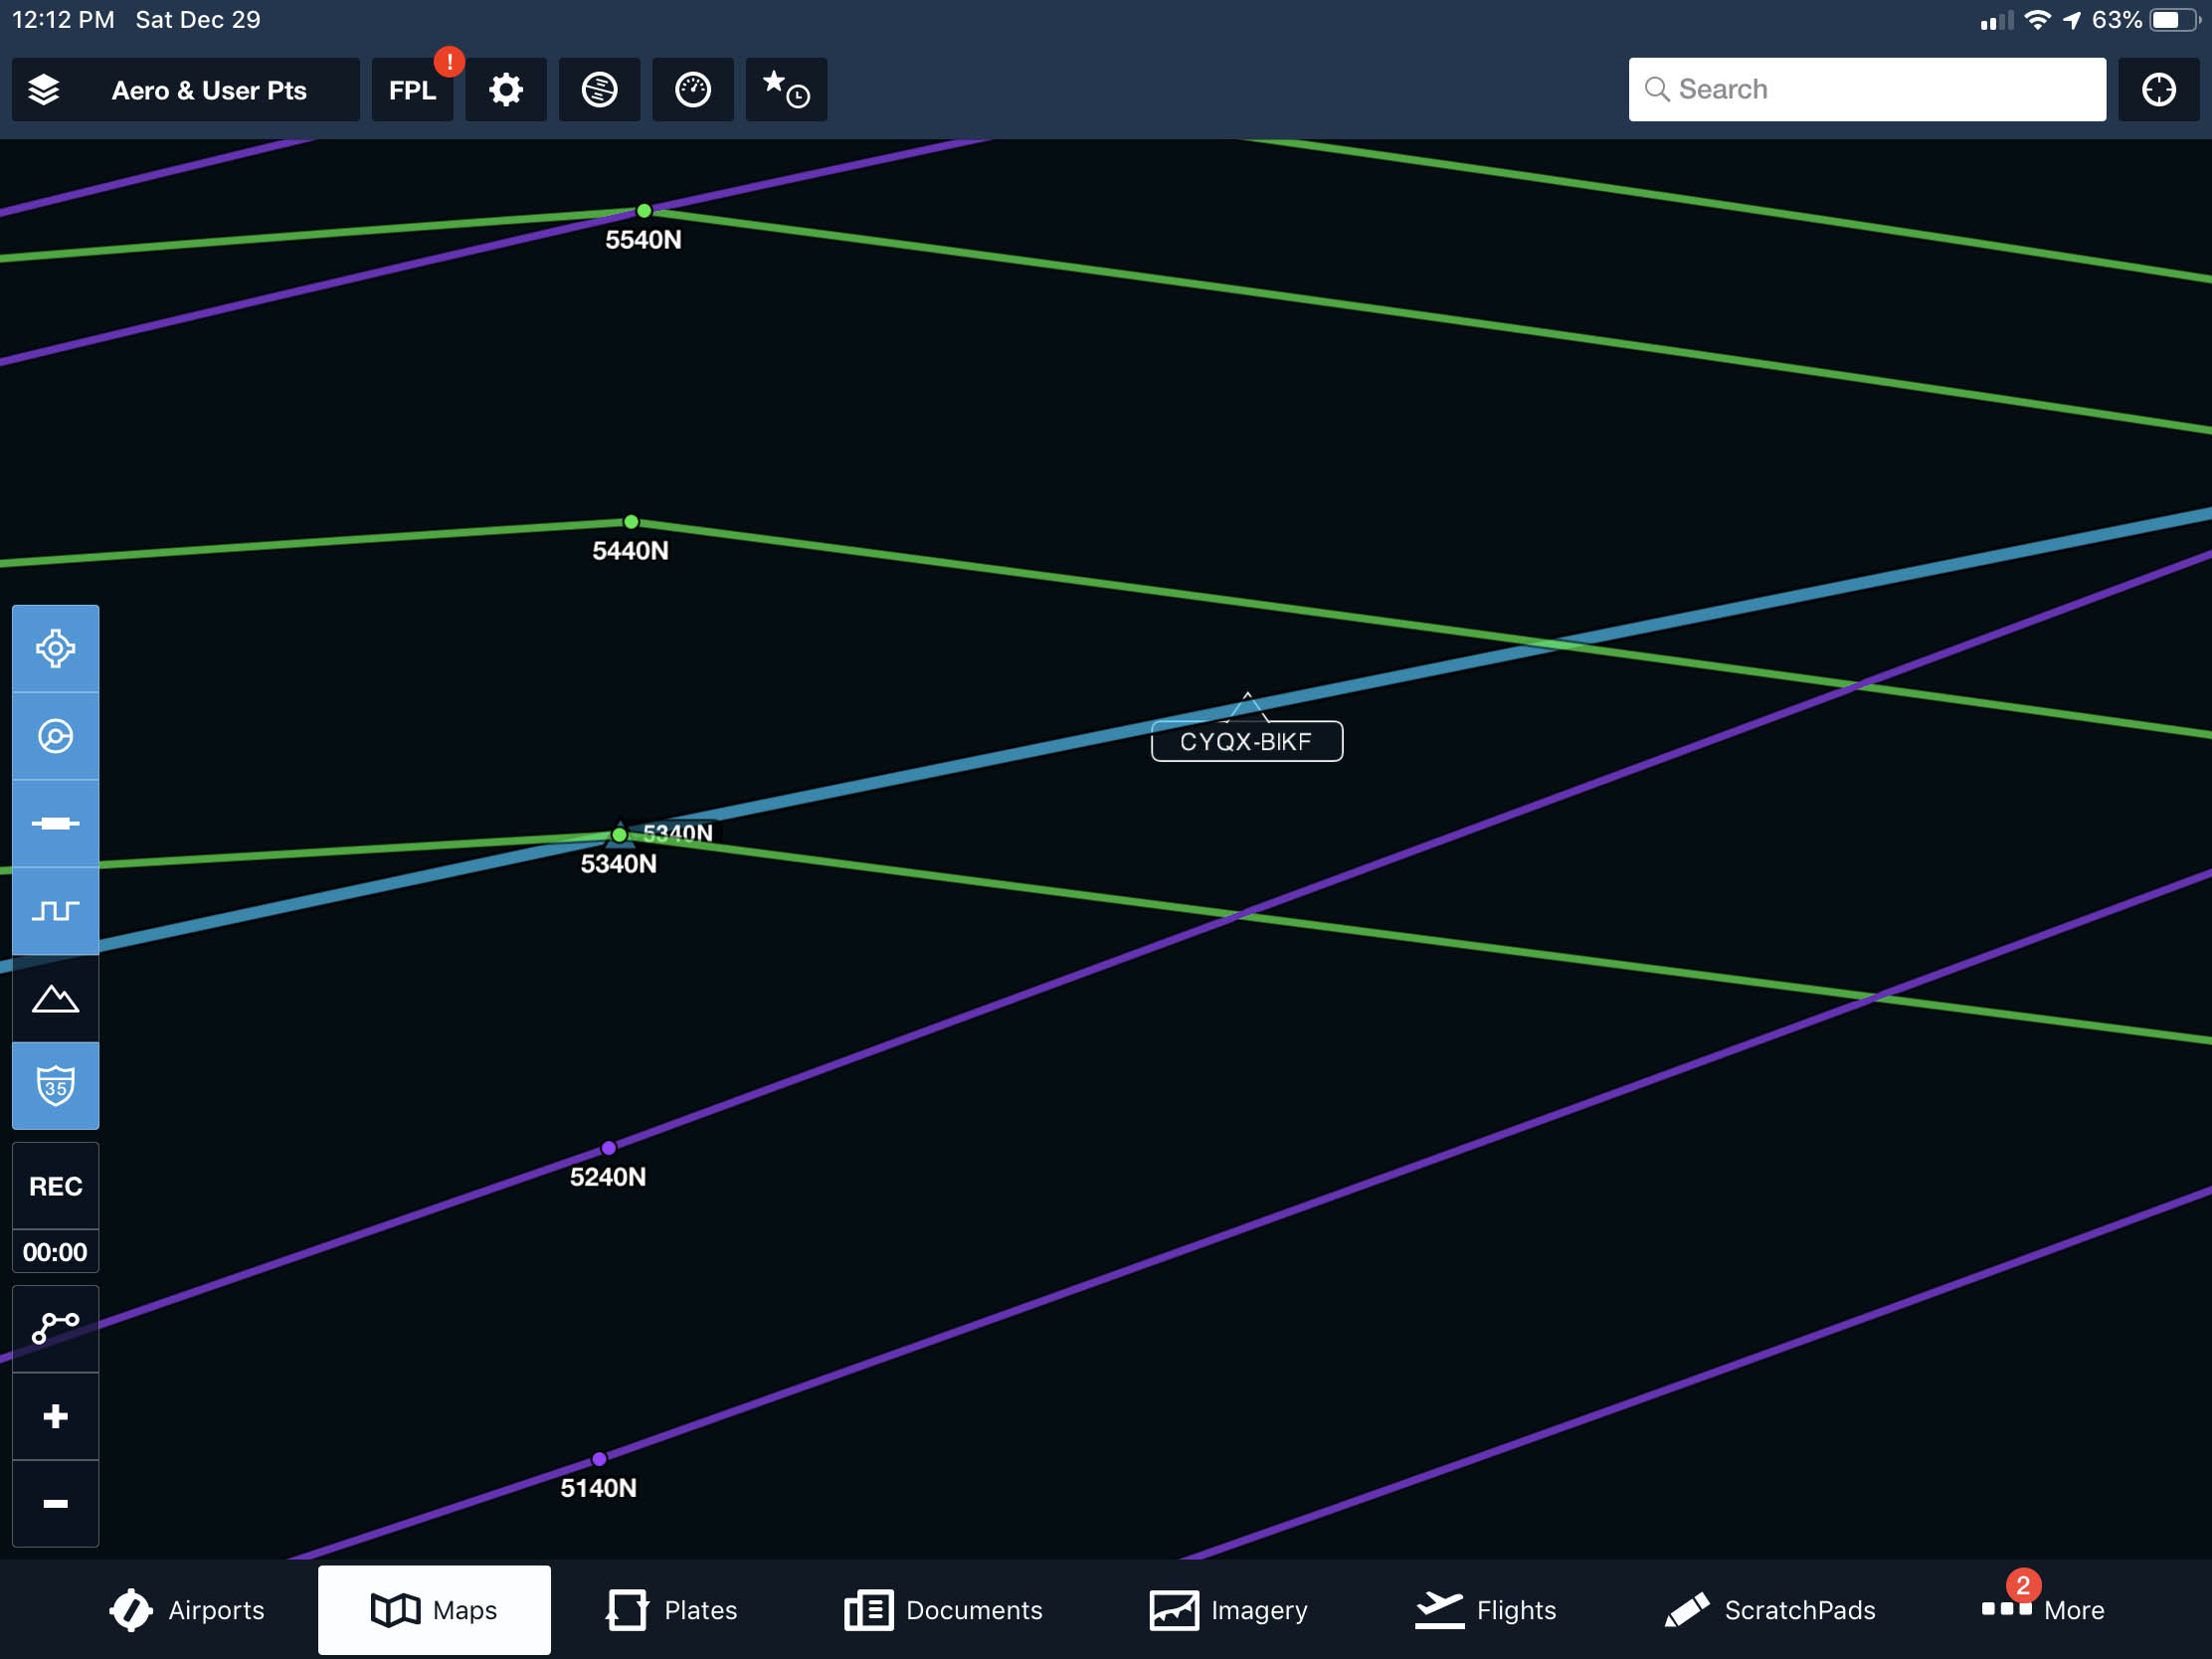
ForeFlight, plotting an ETP, step 3
The resulting point is given within a triangle above a flag.
Navigation Accuracy Check
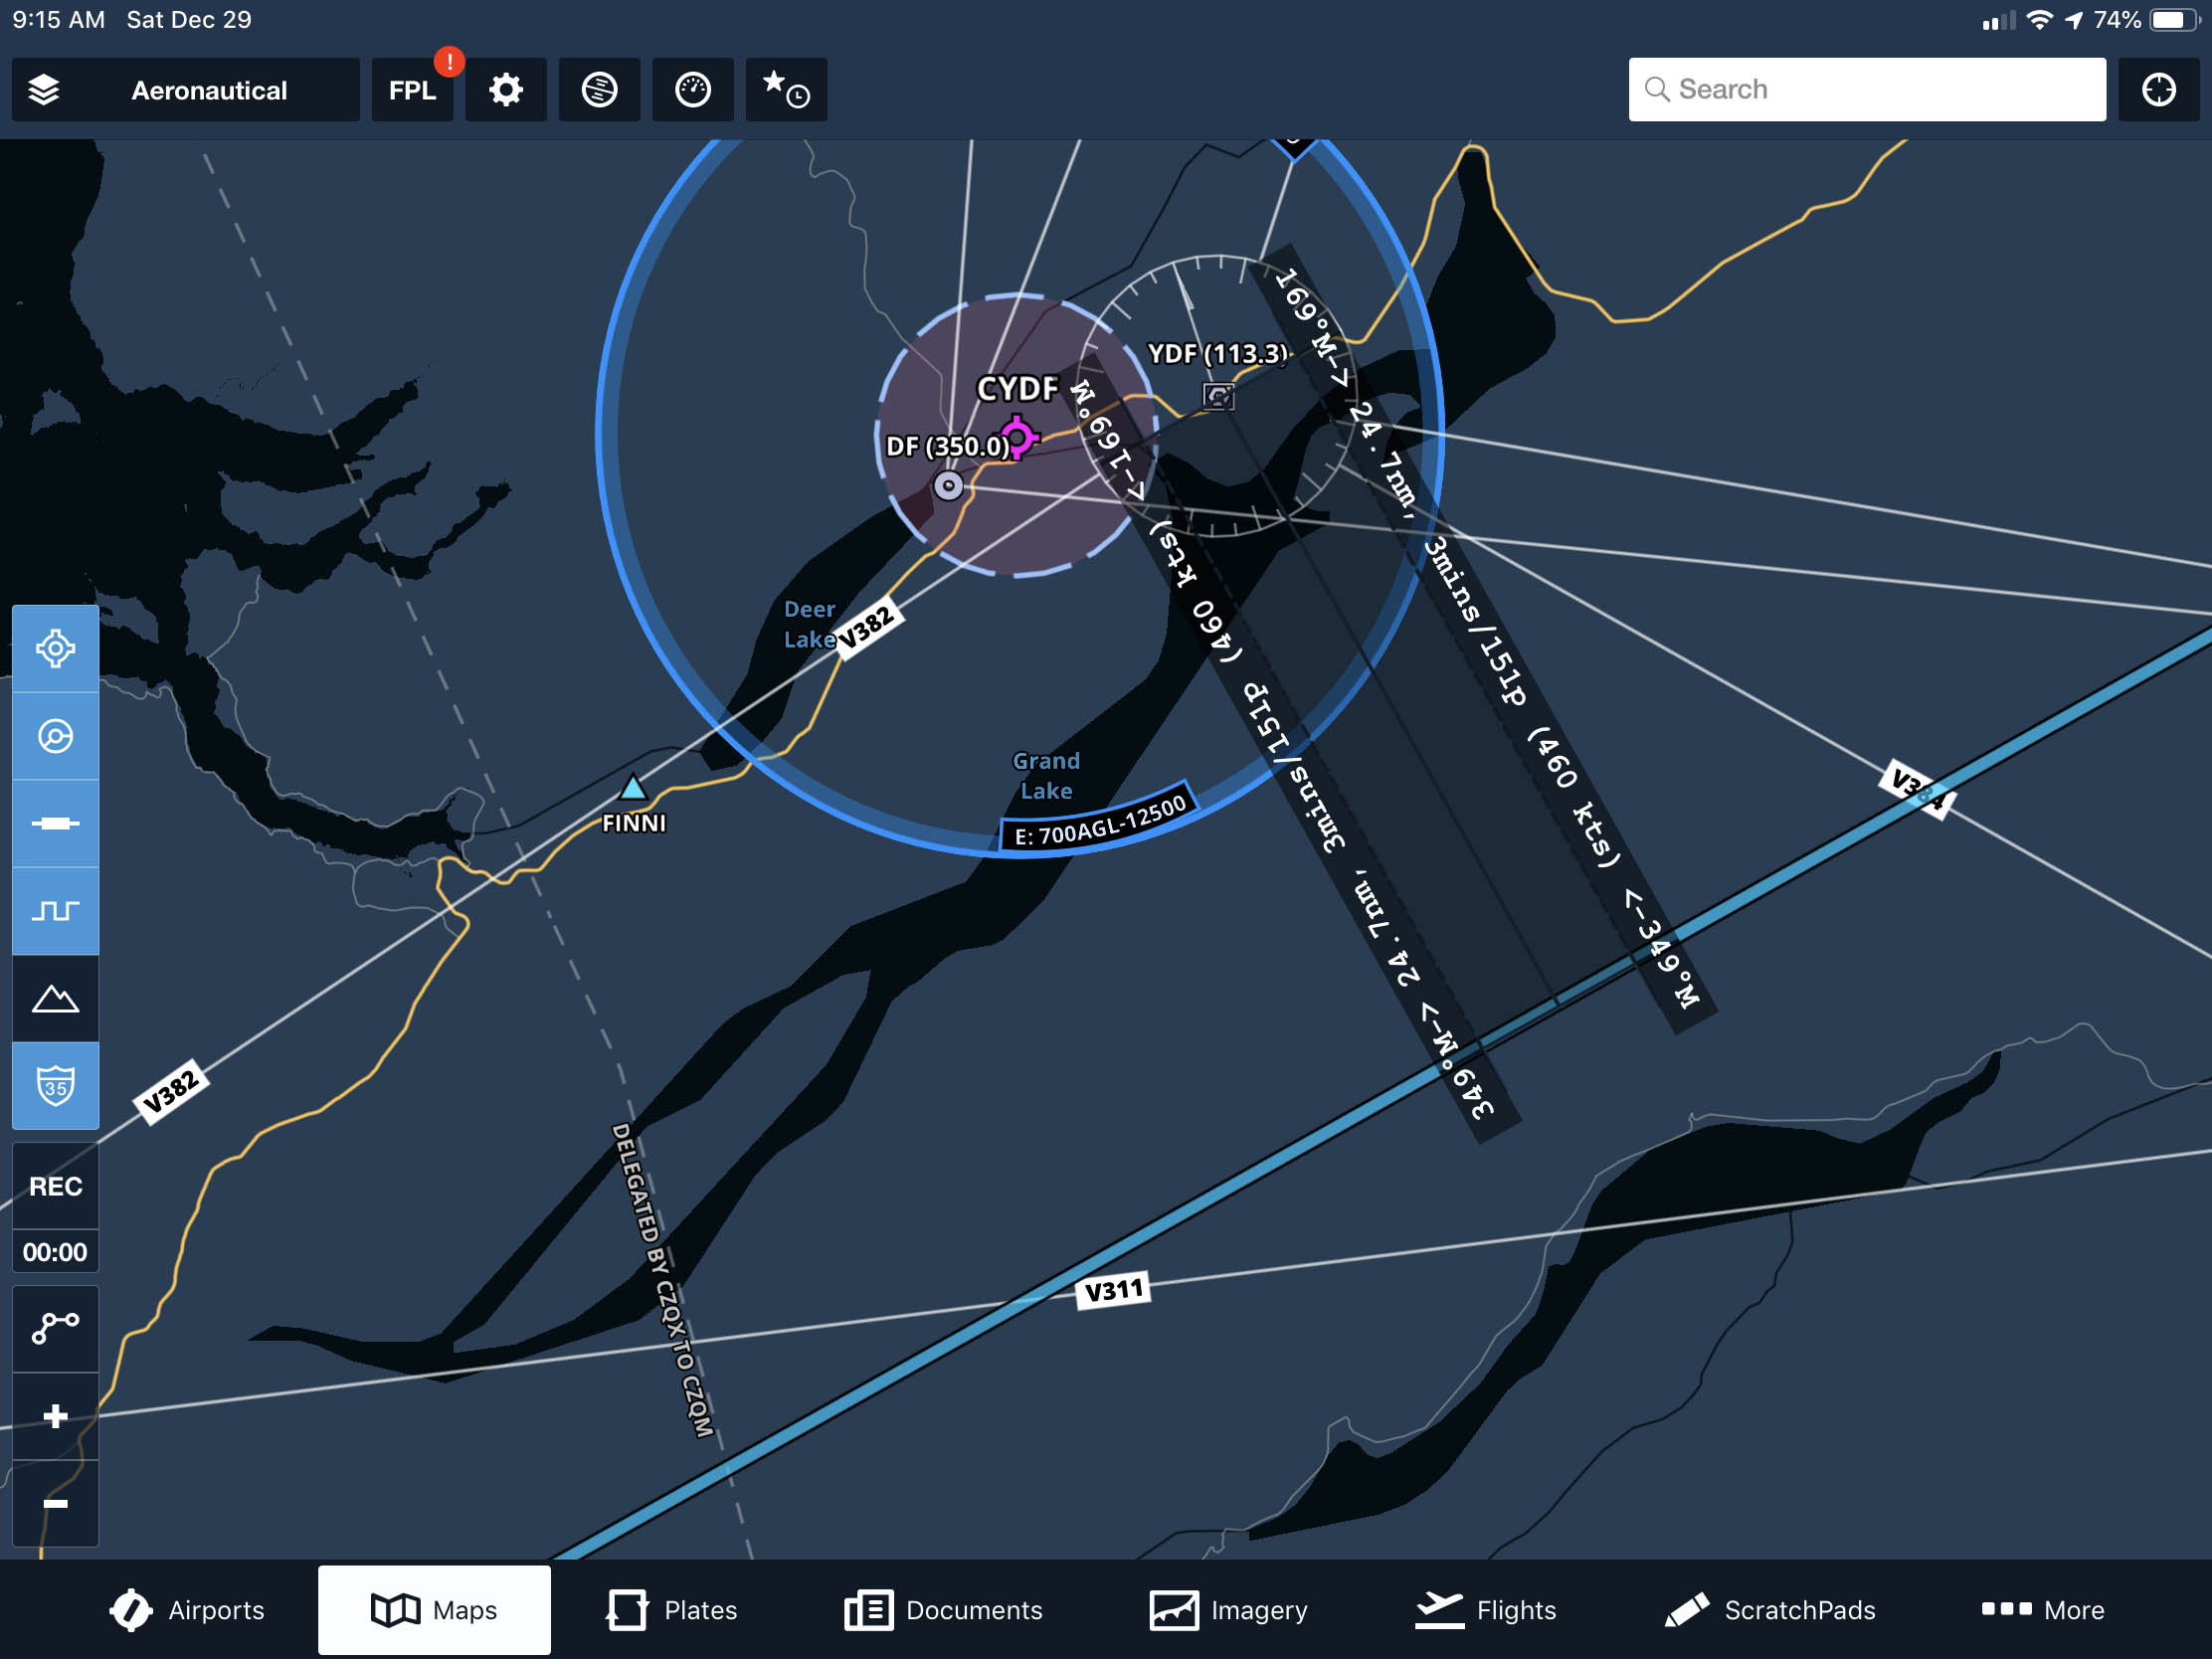
ForeFlight, Nav Accuracy Check
Using two fingers (using two hands makes this easier), simultaneously press the applicable VOR and the approximate aircraft position, fine tune the VOR position so it is exact, adjust the other until the radial and DME agree with your raw data, release both fingers. The resulting point should be right on the course line. This will not work, however, if you have been cleared direct off the projected course line. If you have a portable GPS linked to the iPad, you can work around this:
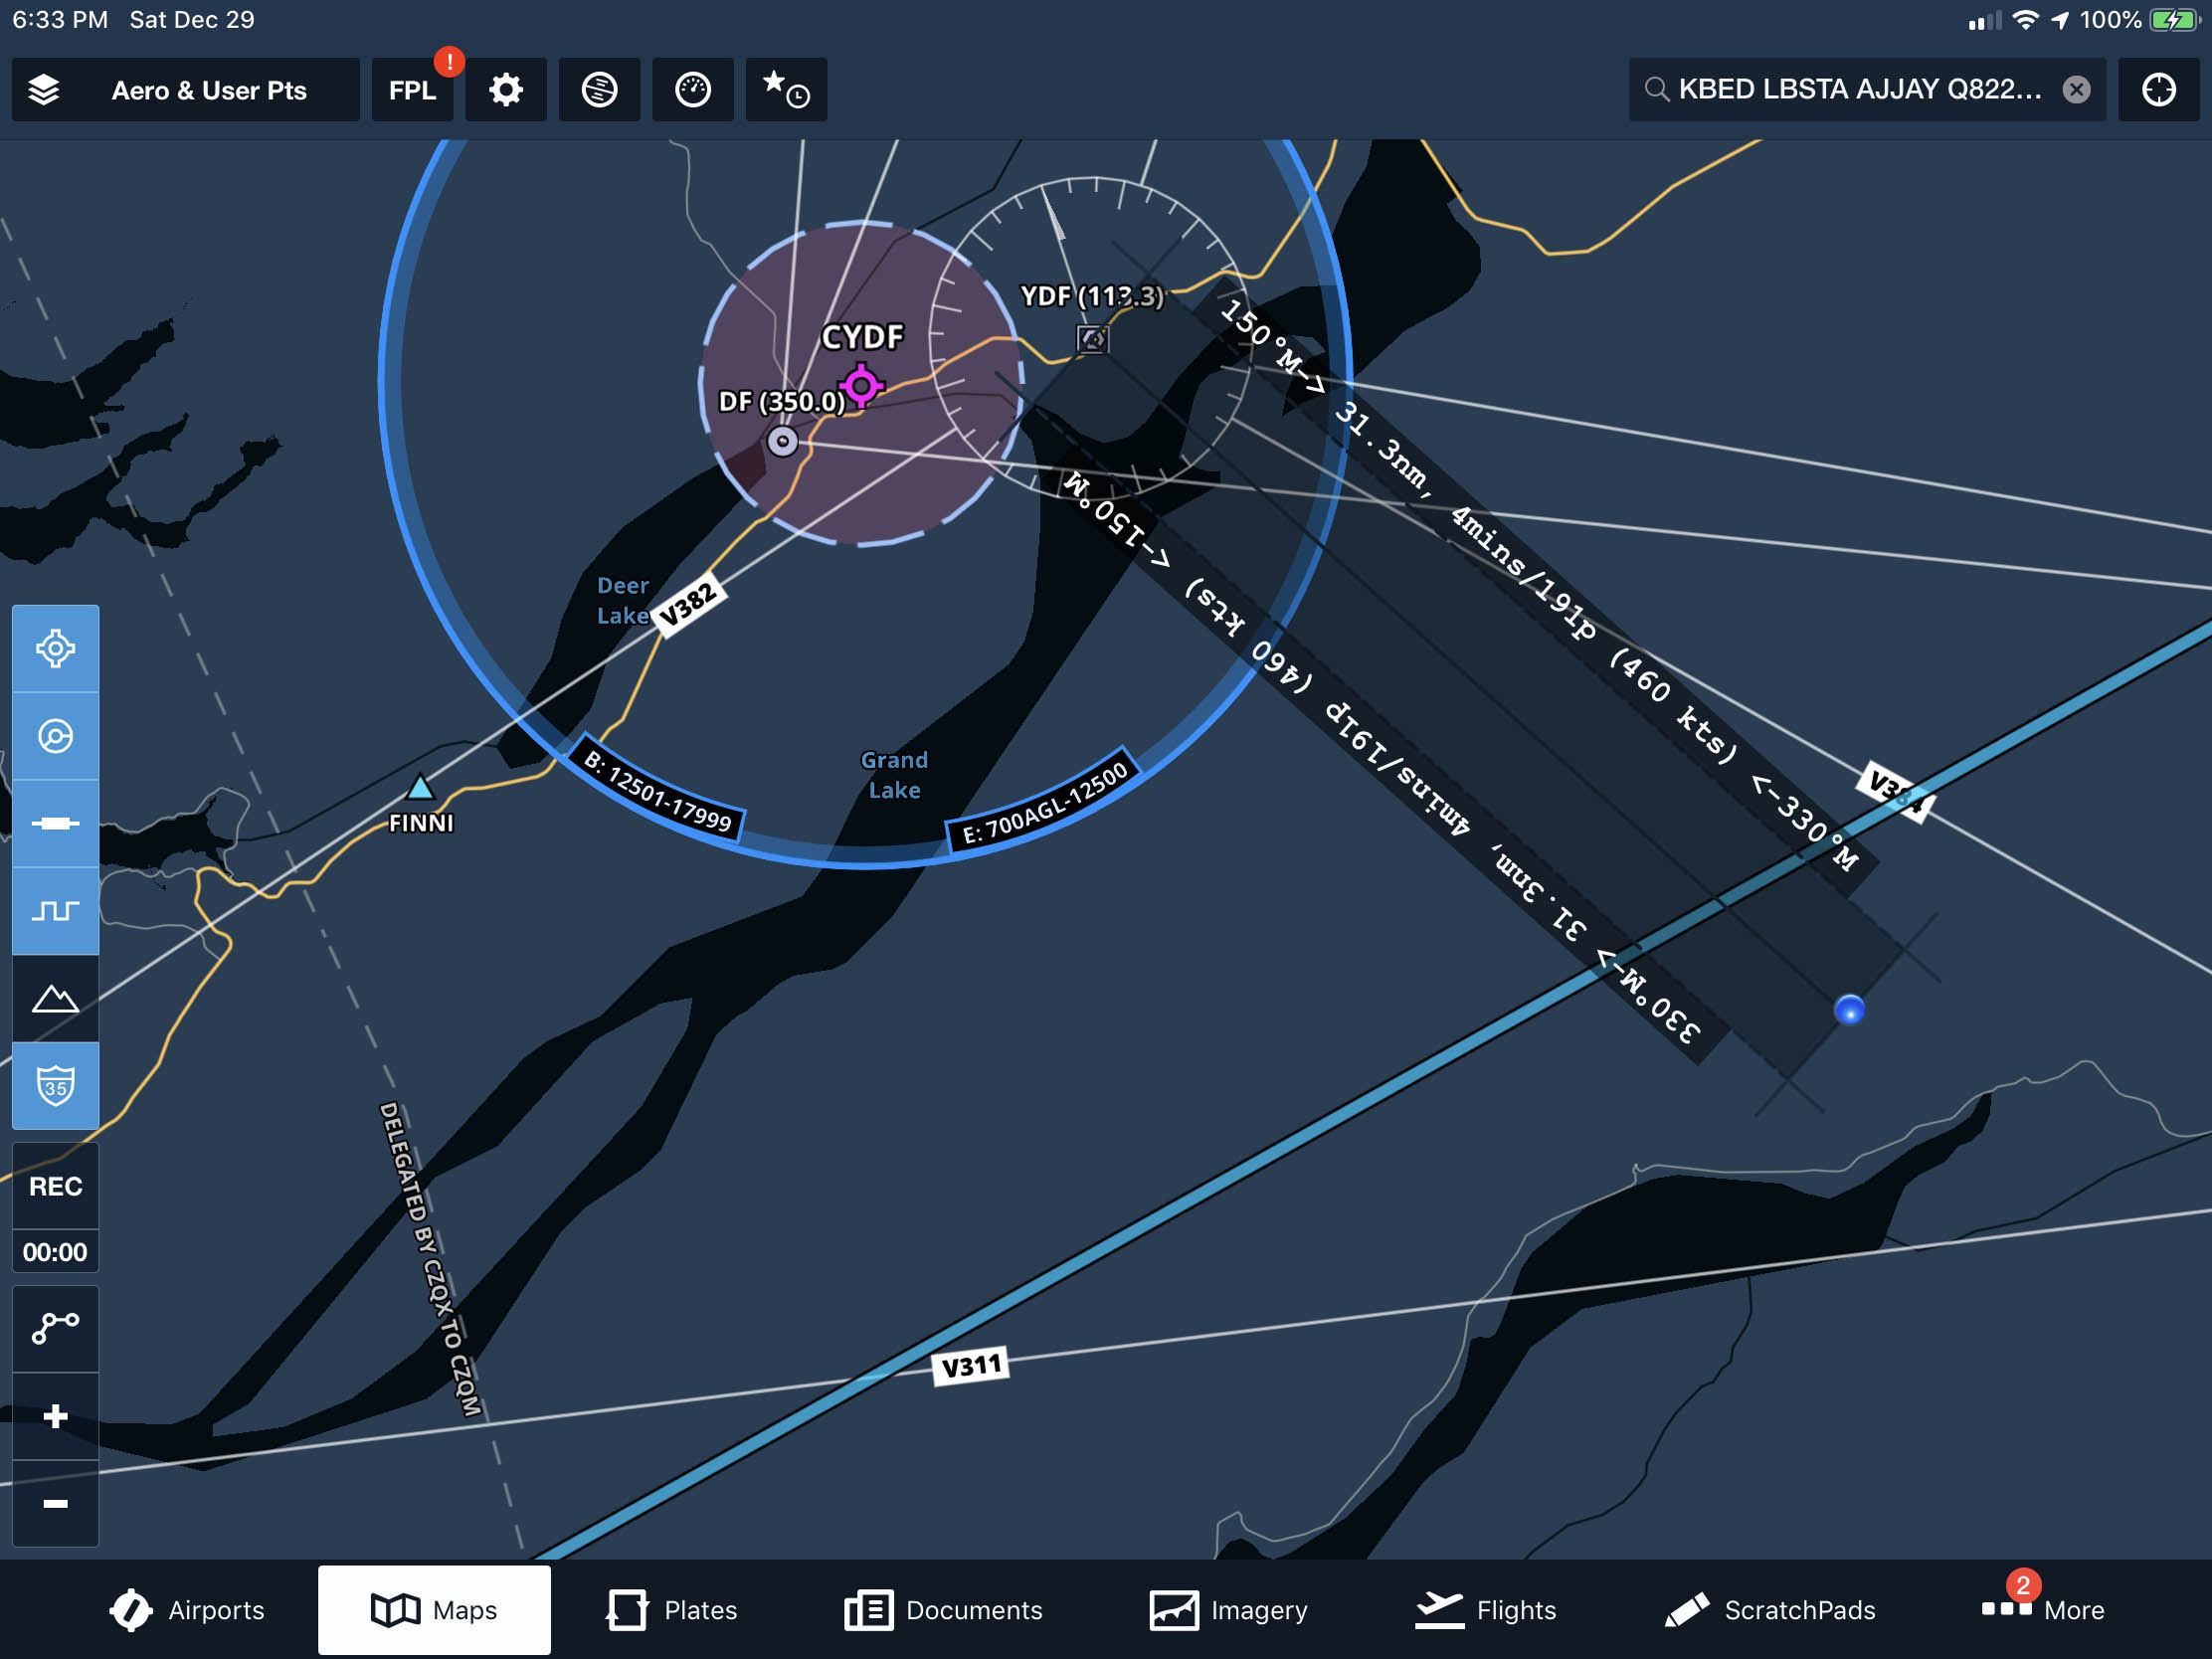
ForeFlight, Nav Accuracy Check, with a portable GPS unit
The blue orb is the aircraft position derived from the portable GPS unit. For more about how to use a portable GPS, see: Plotting, Fully Electronic Methods.
Post Position Plot
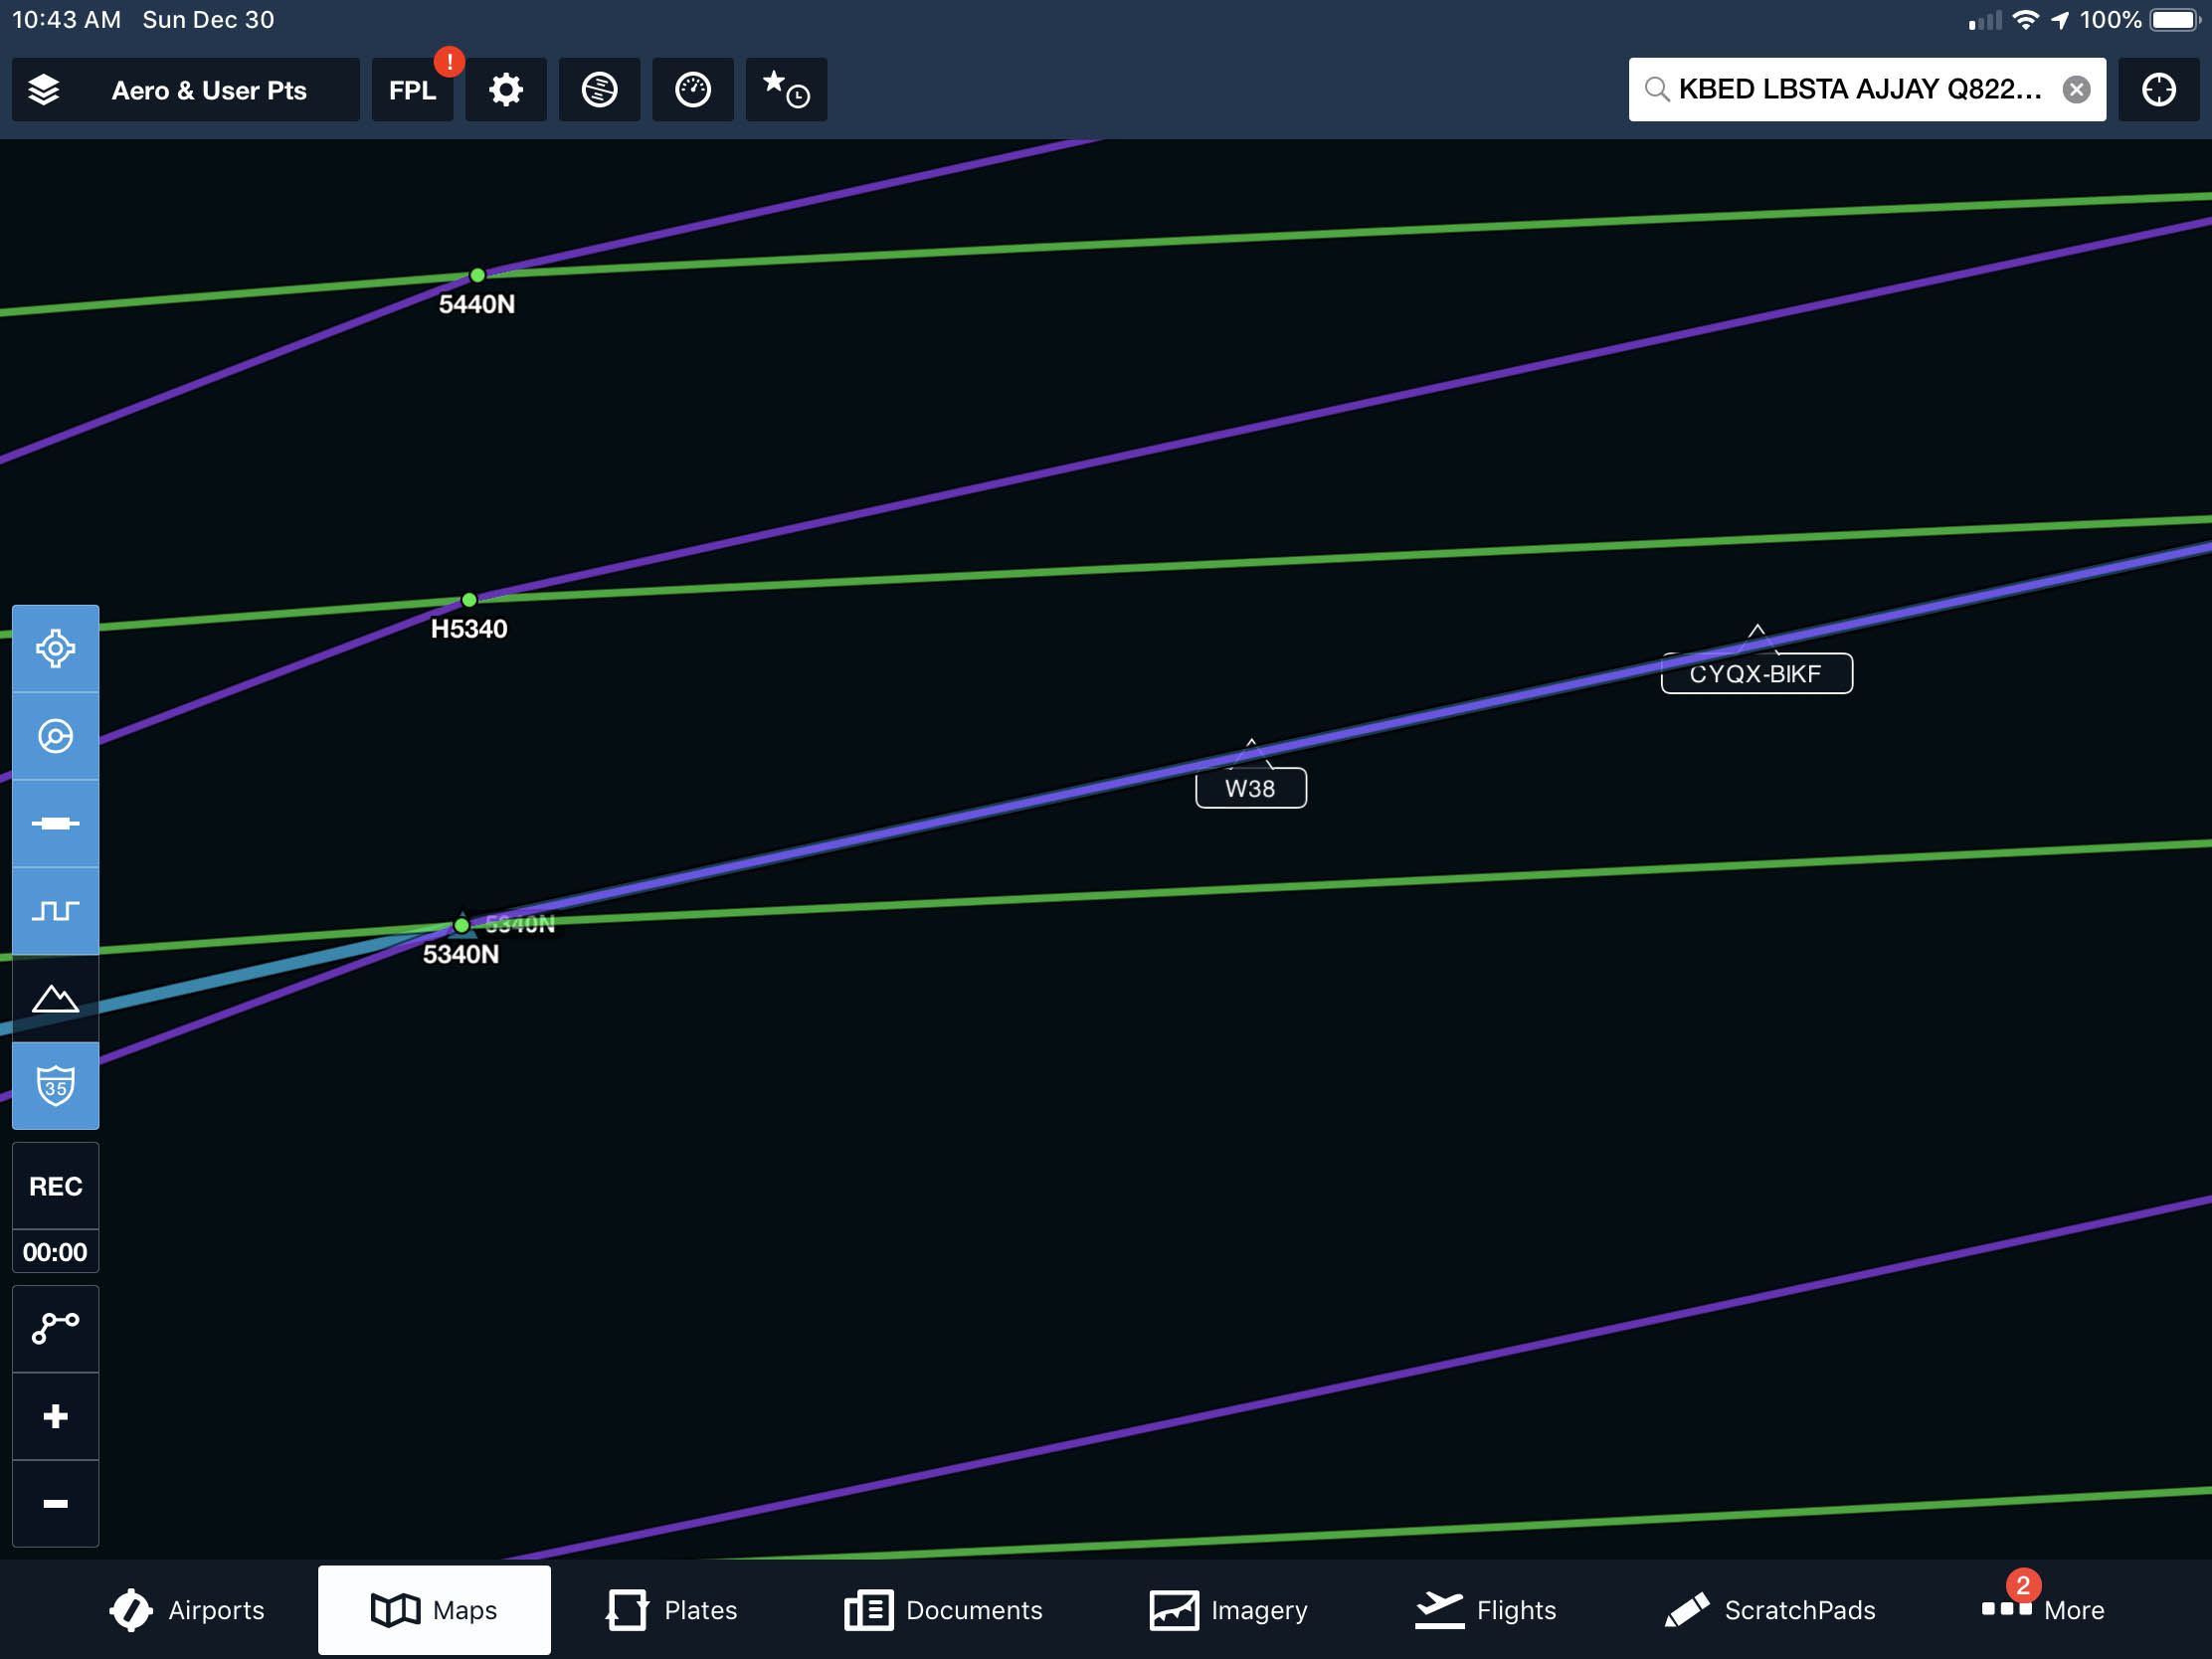
ForeFlight, post-position plot
Post-position plots in ForeFlight are entered just as you would any other user non-routing point with a suitable name, as shown earlier with ETPs or PSRs.
6
JeppFD example
Plotting your route
Copying the route
If you are using an interactive application to produce your plotting chart, you can cut and paste the route from either the application's master document or the PDF version of the master document. Press and hold any portion of the route until at least a portion of the route appears in inverse video. Then drag the start and end handles until the entire route is highlighted. Then select "Copy." You then go to the plotting application to the route entry appears, press and hold until you see a "paste" button.
Pasting the route into JeppFD, step 1
Pasting the route into JeppFD, step 2
You can paste the copied route into JeppFD by pulling down the Flight Plan bar, selecting "New," tapping the route window once, and then pressing and holding until the "paste" icon comes up.
Checking courses and distances
JeppFD, electronic plotter tool
The plotter icon in the tool bar shown on the right brings up an electronic plotter that you can position over a waypoint, resizing as necessary. With a steady hand, you should be able to get a course withing a few degrees accuracy. The distance, however, is hard to get within 20 nm.
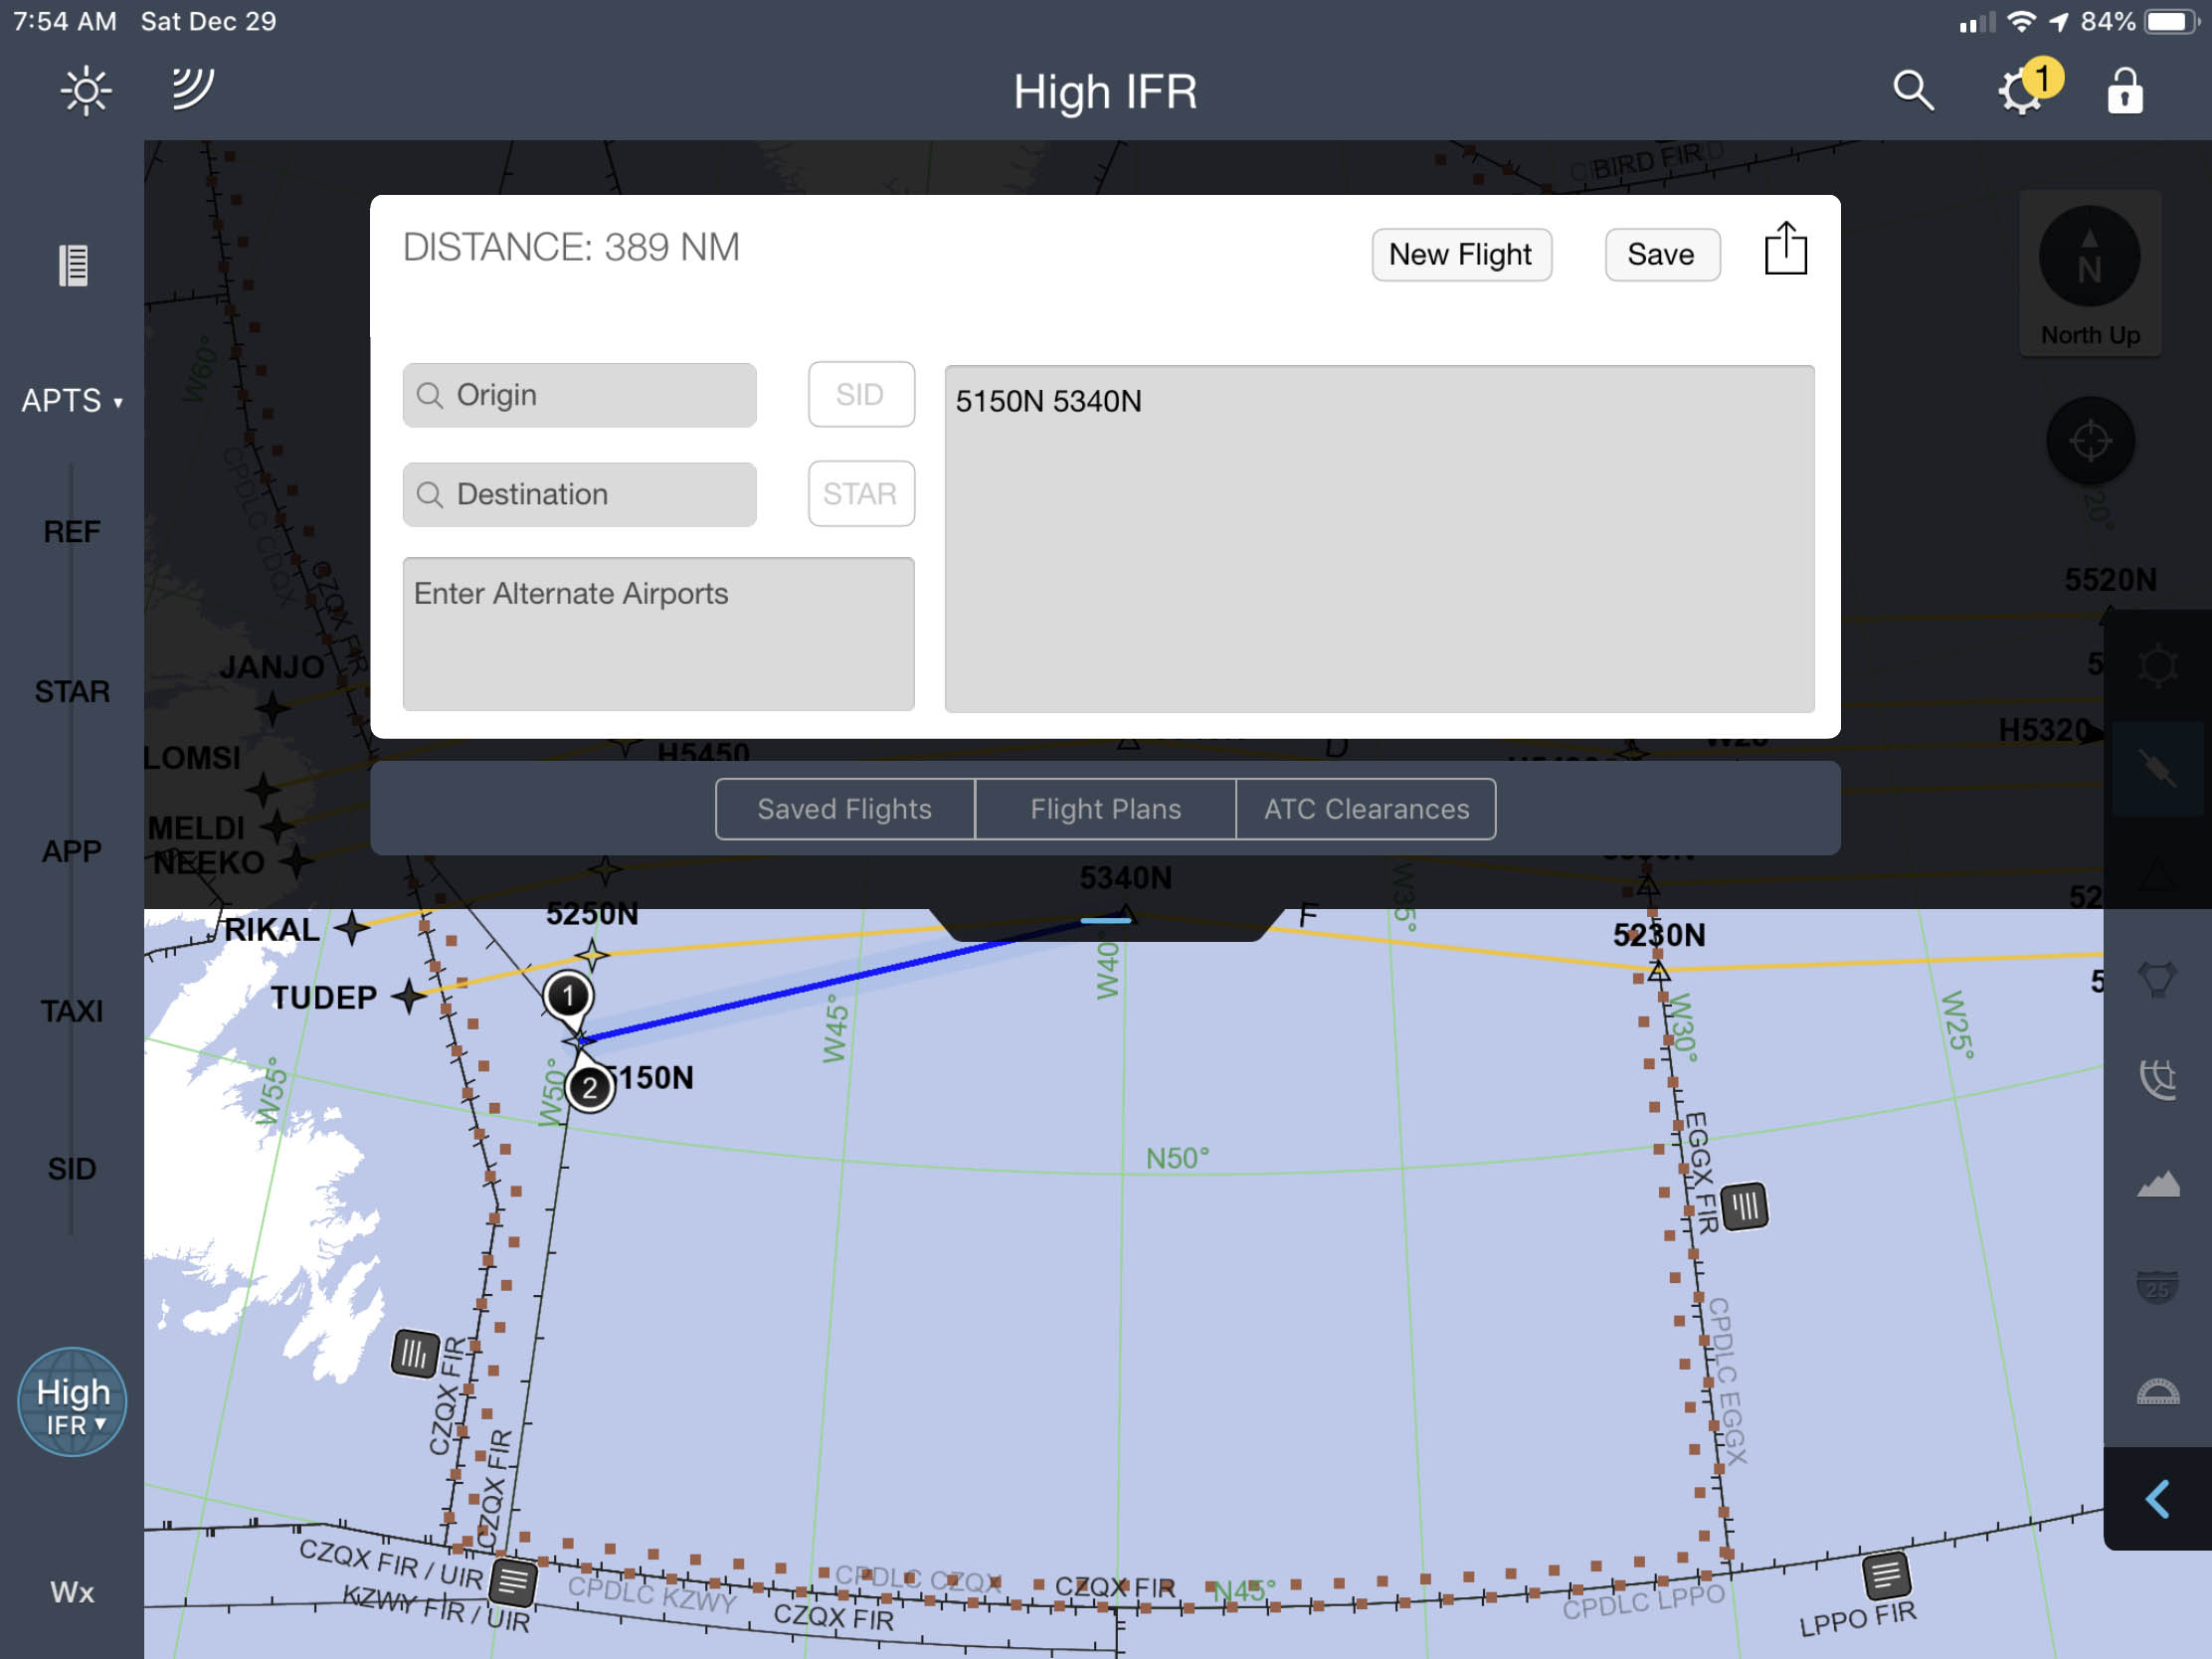
JeppFD, distance work around technique
You can work around this by inserting a new route from one waypoint to the next. Be sure you save your flight plan first, as doing this will erase it from the display. Step by step: select the flight plan menu, save the flight plan, select "new flight" and type in the two waypoints in the route window. The distance appears on the top left of that window.
An even better solution will cost you $7.99 but is an app well worth having: FlyBy E6B. Simply select "Navigation" and then "Track and Distance" to get the following:
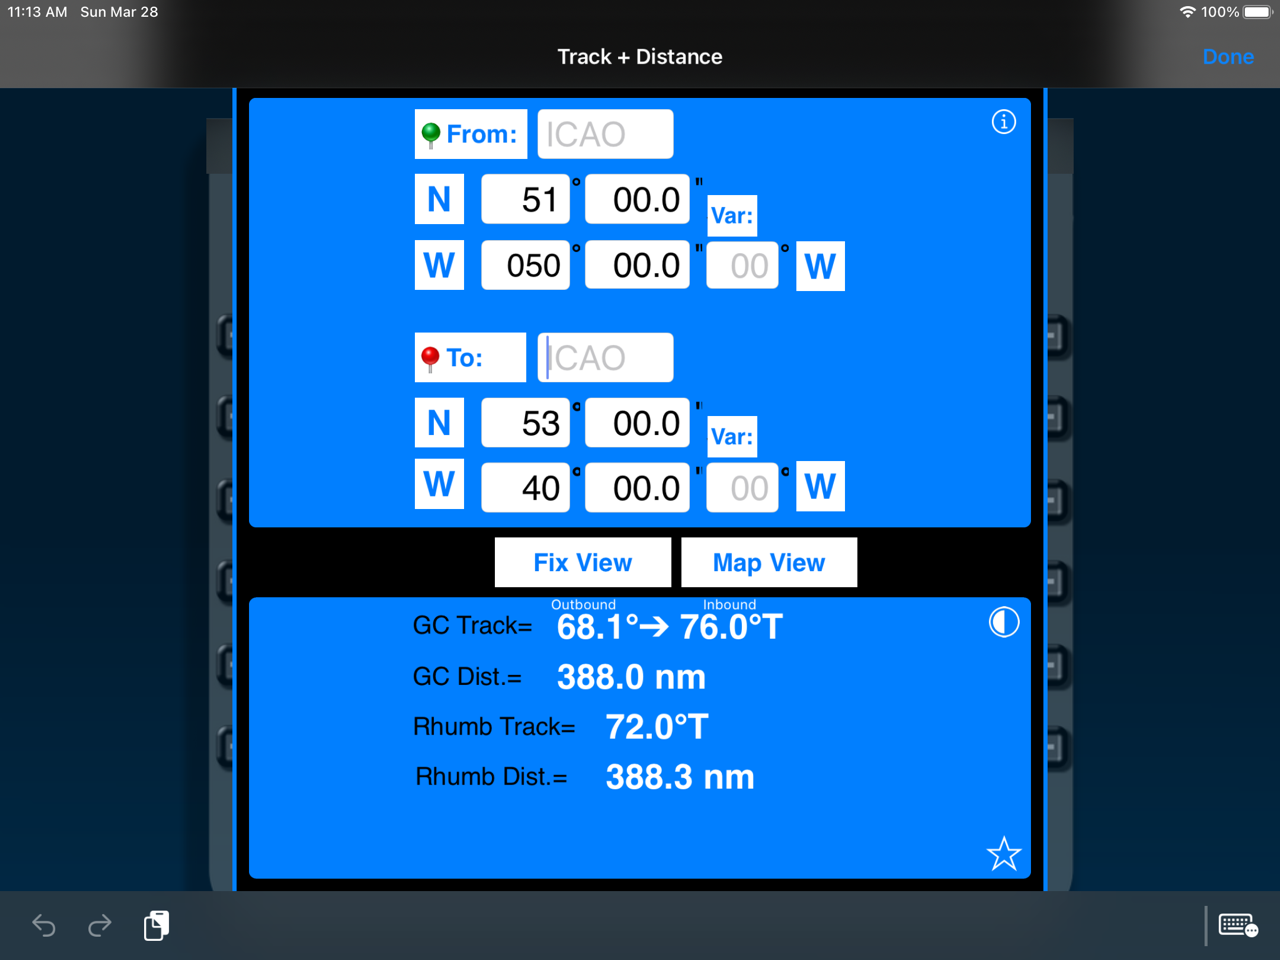
FlyByE6B, no deviation entered
Note that if you leave the "Var:" entry at zero, both numbers represent True courses and if you enter the magnetic variation both numbers are Magnetic courses:
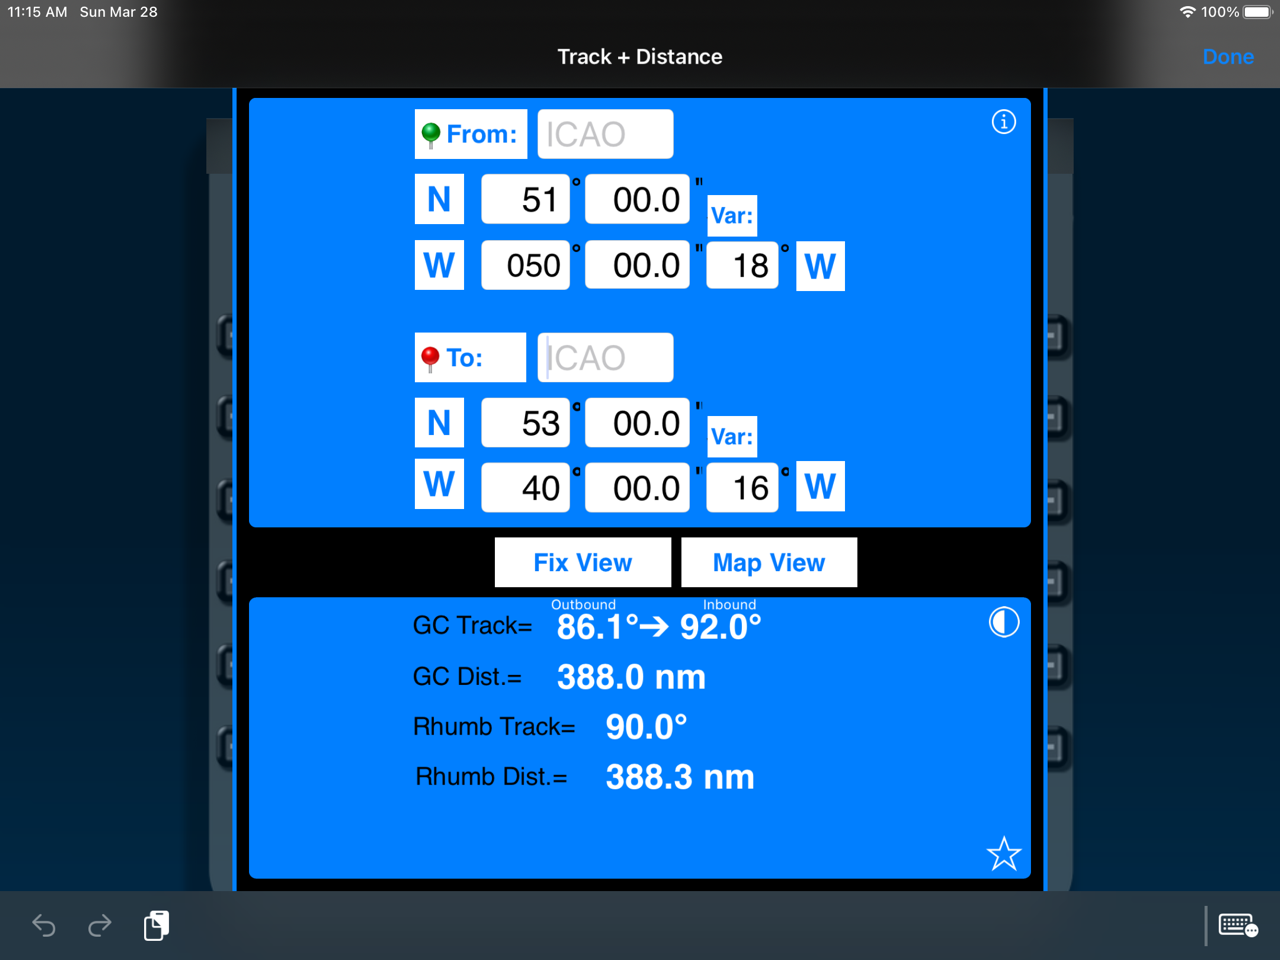
FlyByE6B, with a deviation entered
The newest version of the program will enter the variation for you if you simply press the "Var:" button after you've entered the latitude and longitude.
ETPs and PSRs
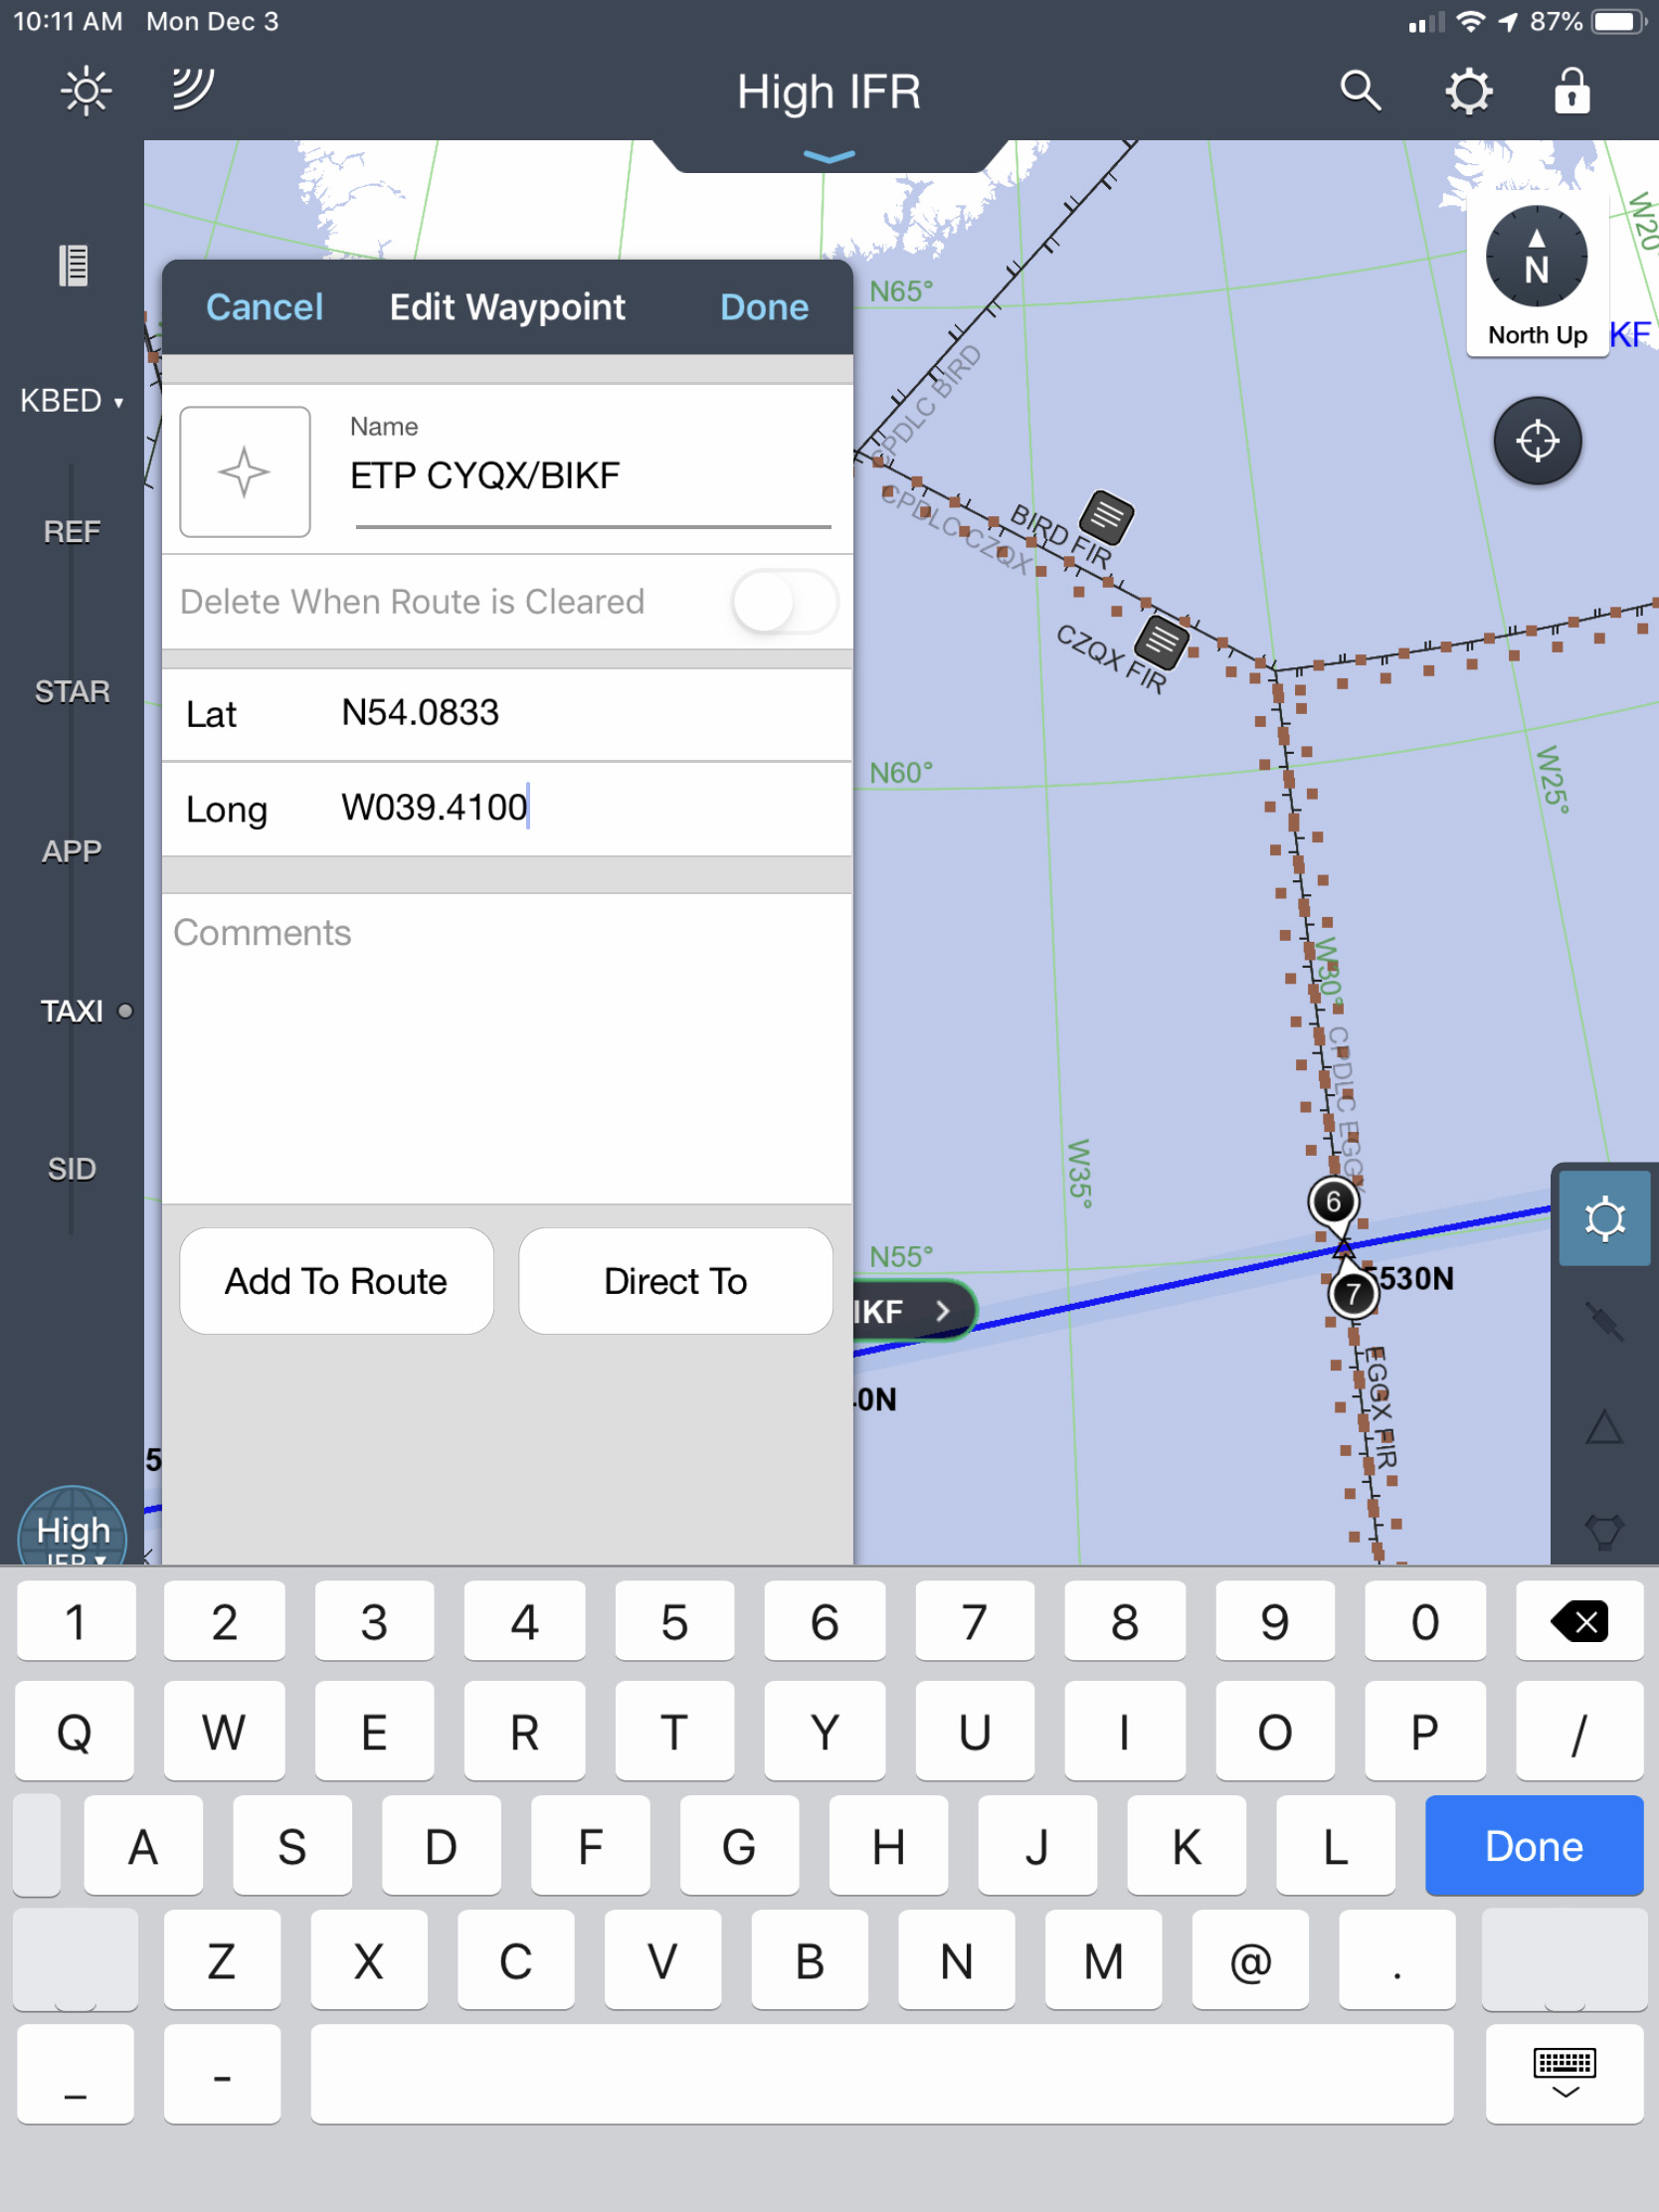
JeppFD, Entering an ETP
To enter a non-routing point in JeppFD, press a point in the approximate position, enter a suitable name, and then fine-tune the latitude and longitude. Do not press "Add To Route" or "Direct To" but do press "Done."
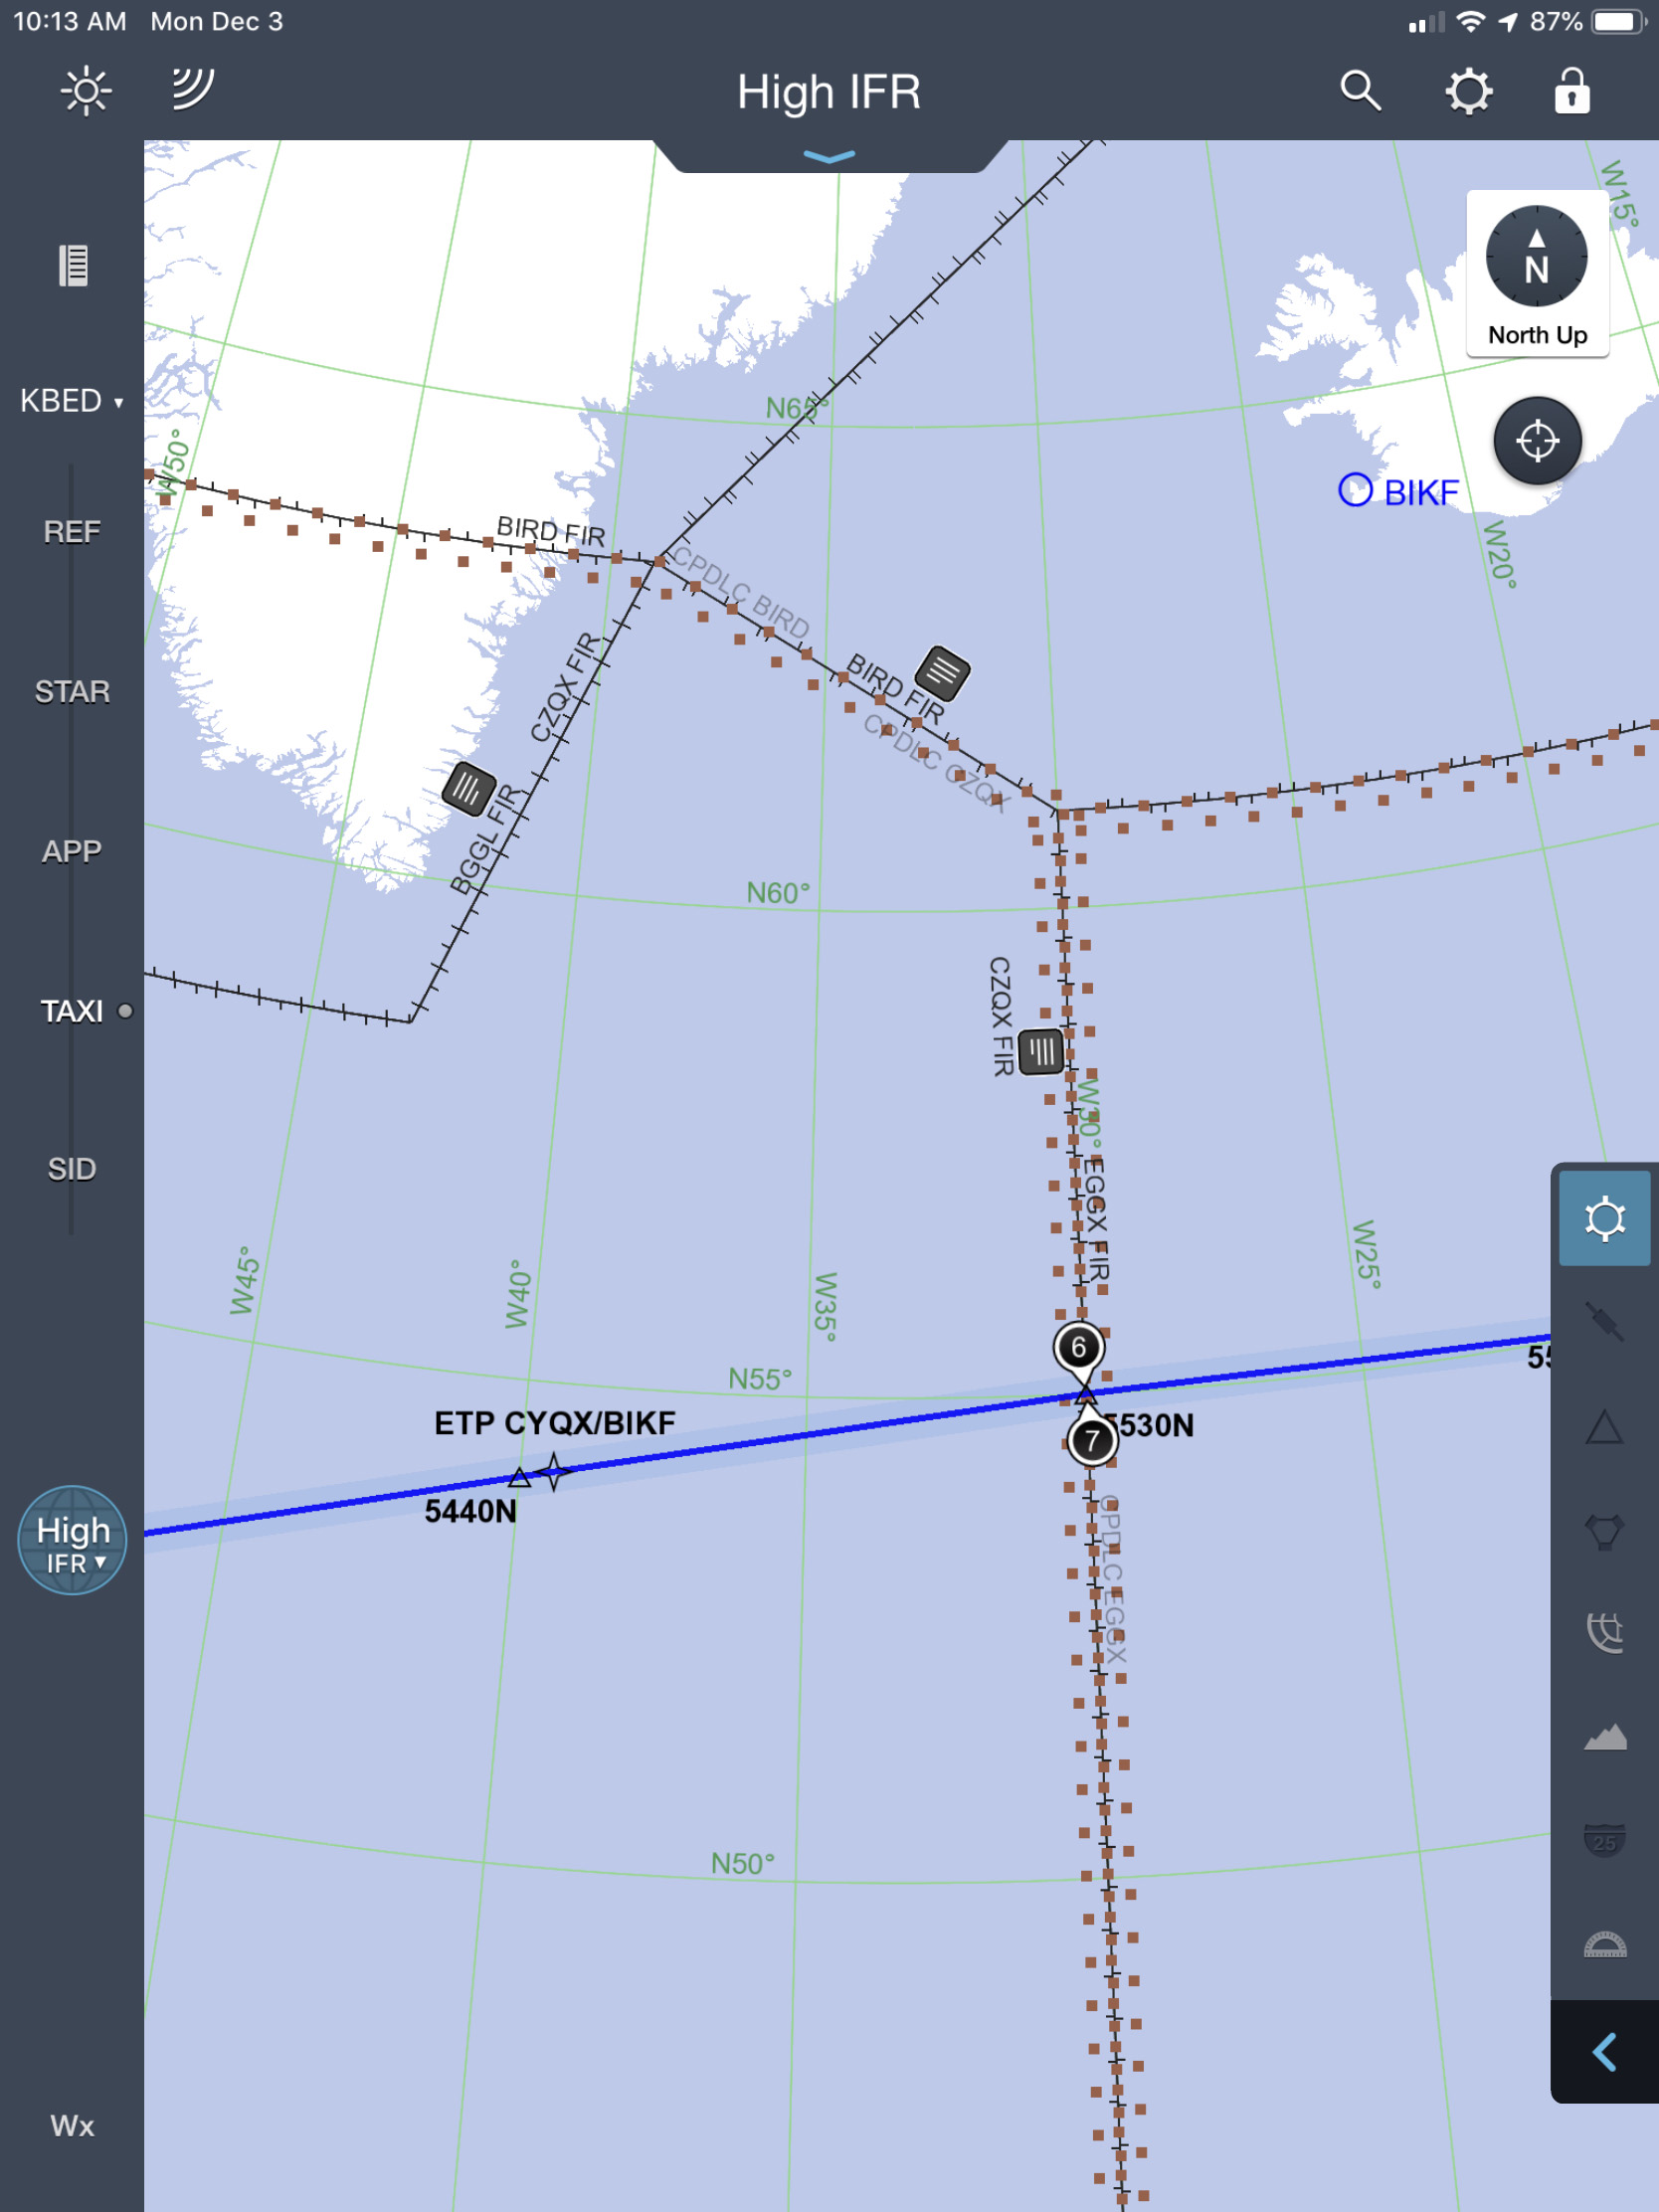
JeppFD, ETP
Navigation Accuracy Check
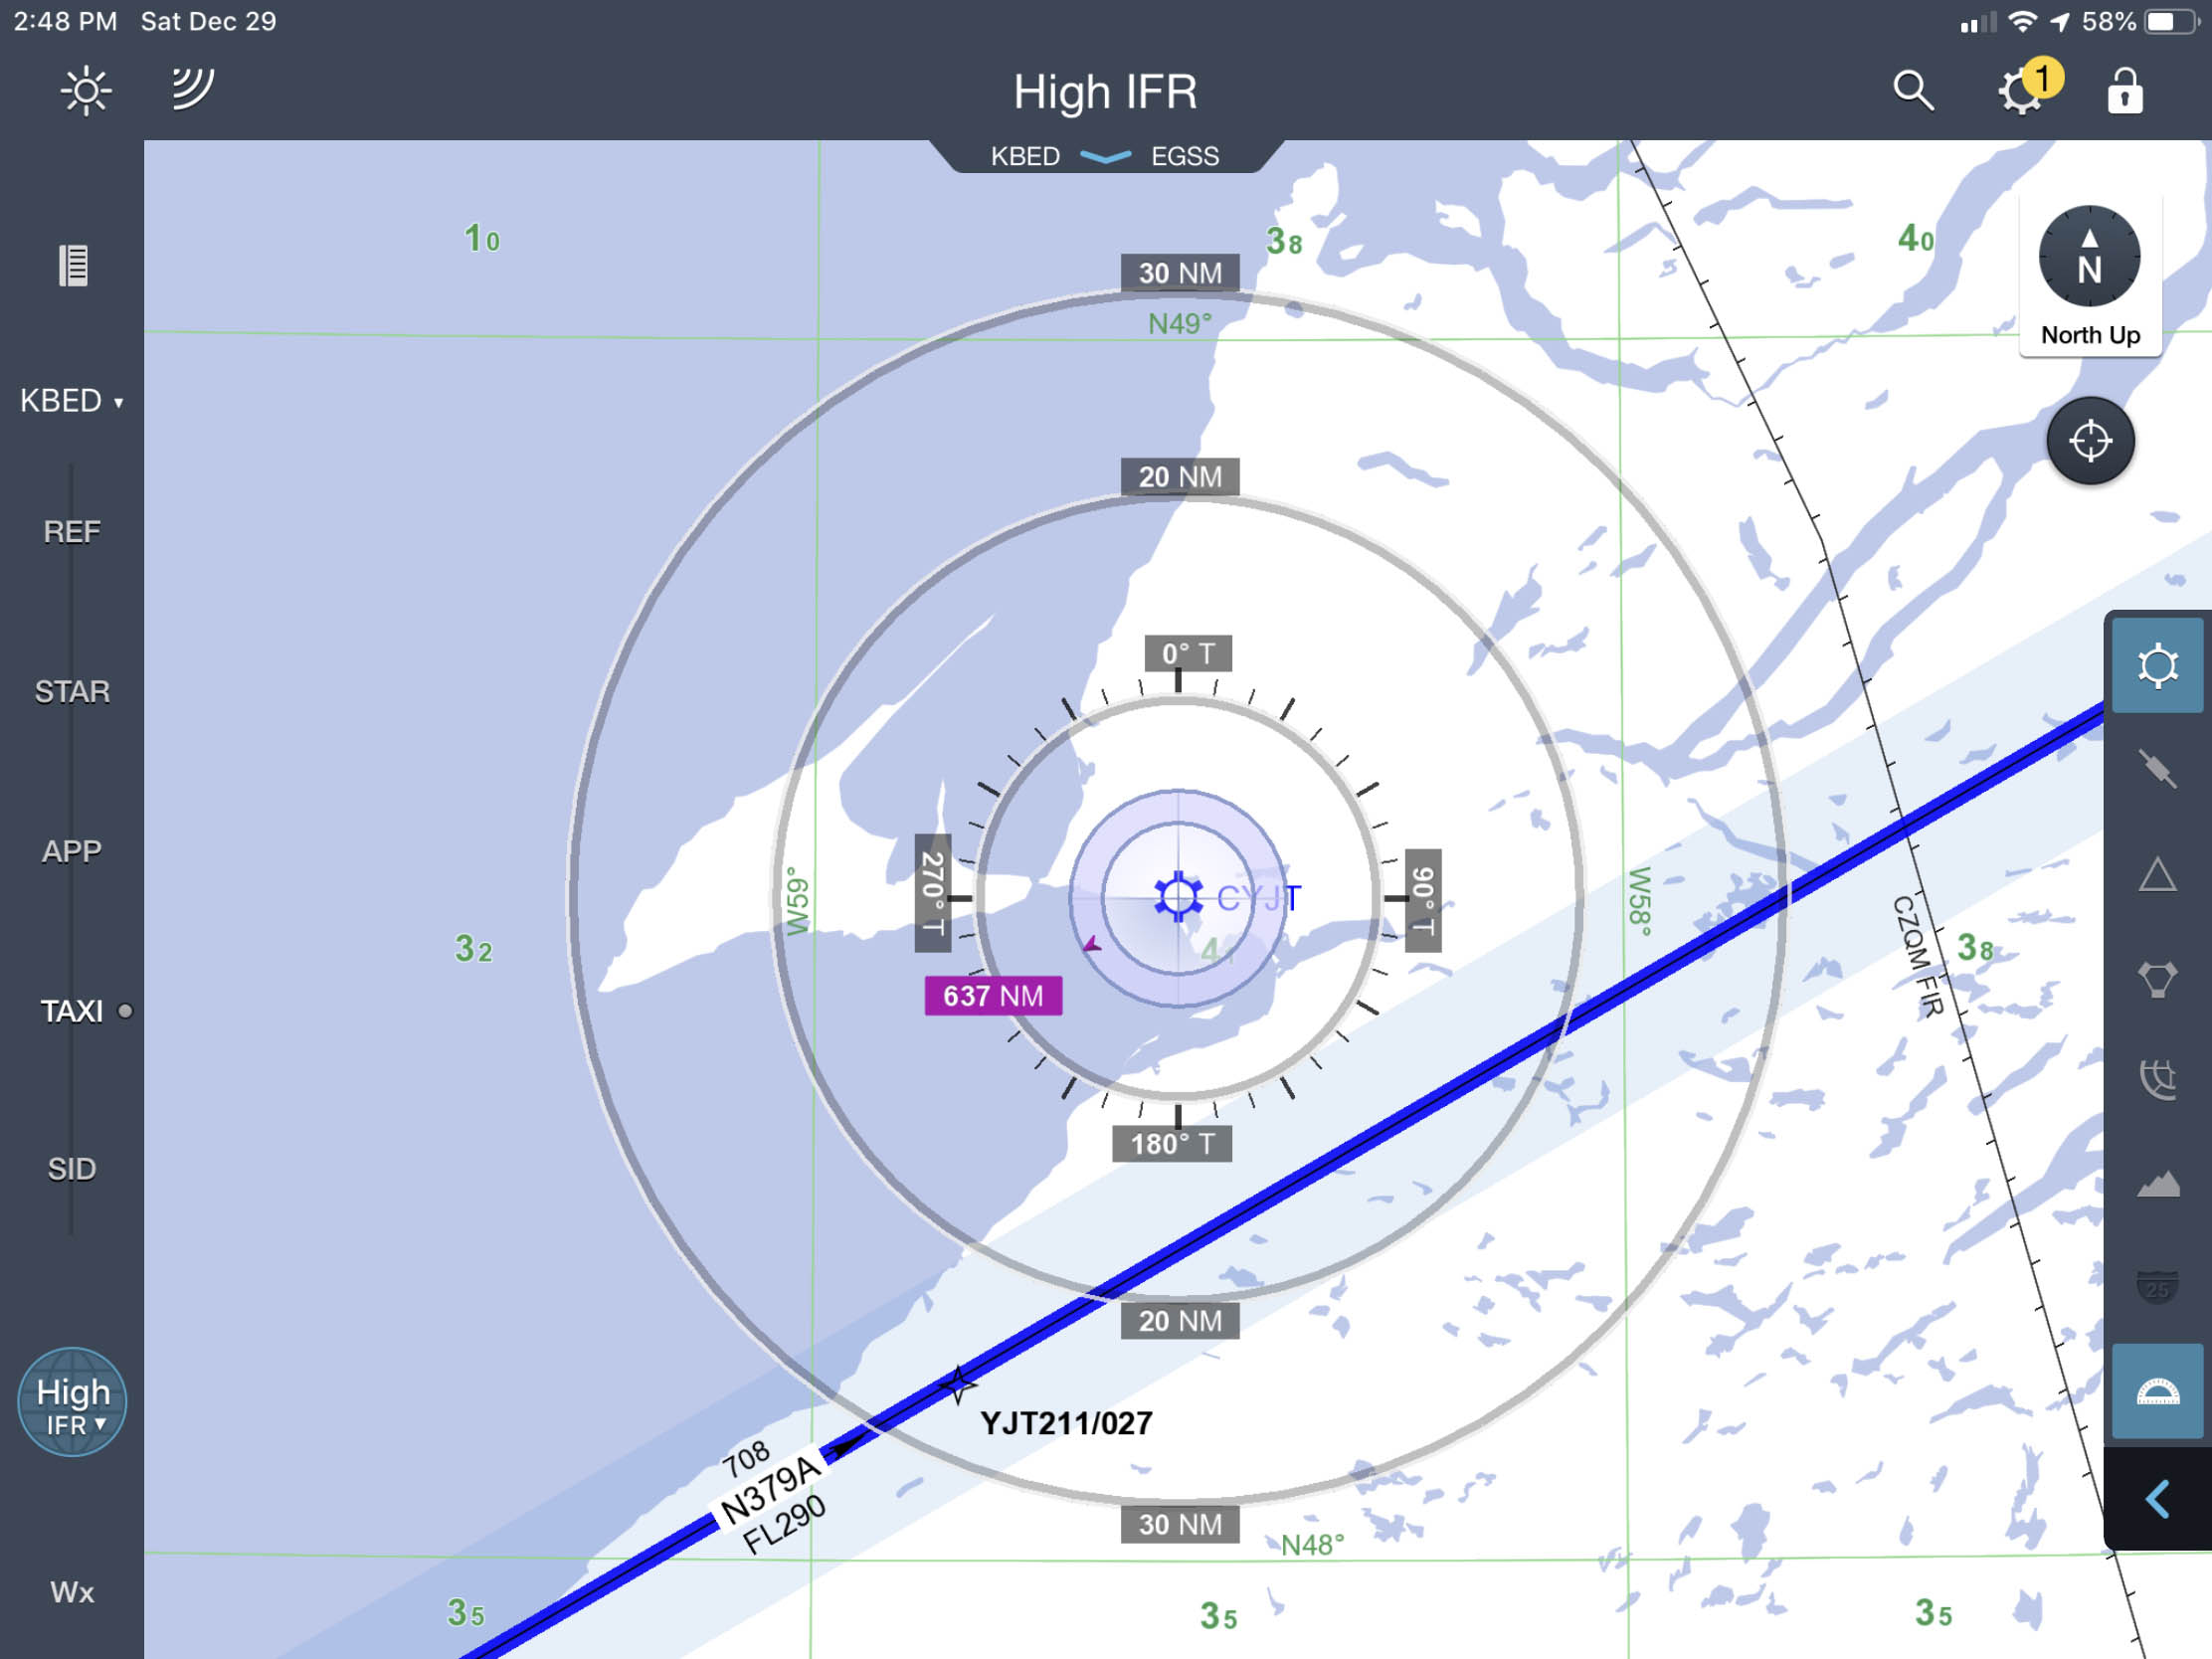
JeppFD, Nav Accuracy Check
Make note of your aircraft's position by recording the latitude and longitude from the FMS while simultaneously making note of the VOR radial/DME. Create a user waypoint using these coordinates. Press the electronic plotter icon in JeppFD and move the plotter so it is precisely above the VOR. The user waypoint should be on the recorded radial and DME.
Post Position Plot
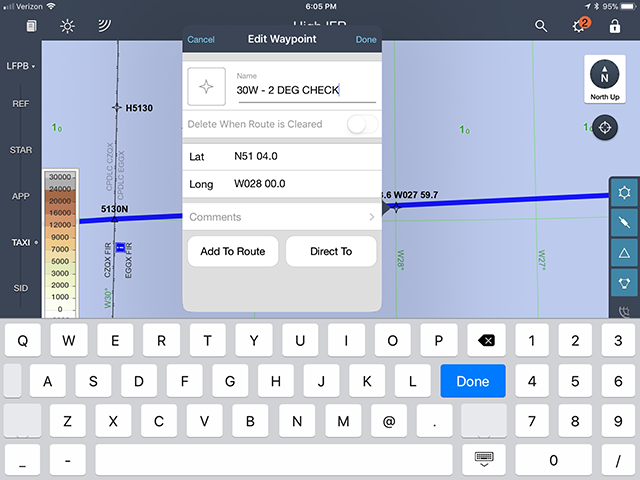
Two-degree check entered manually into JeppFD
Making a post-position plot using JeppFD with the iPad is quite easy. You derive the coordinates from your FMS and then press the course line in the approximate position. Then it is just a matter of correcting the approximate latitude and longitude with exact numbers and pressing "done."
References
(Source material)
A Report from the Portable Electronic Devices (PED) Aviation Rule Making Committee (ARC) to the Federal Aviation Administration (FAA), September 30, 2013
Advisory Circular 91.21-1D, Use of Portable Electronic Devices Aboard Aircraft, 10/27/17, Department of Transportation
*Advisory Circular 91-70A, Oceanic and International Operations, 8/12/10, U.S. Department of Transportation
* This version of AC 91-70 has been superseded but it retained because it contains older guidance that helps place current guidance into perspective.
Advisory Circular 91-70B, Oceanic and International Operations, 10/4/16, U.S. Department of Transportation
Advisory Circular 120-76D, Authorization for use of Electronic Flight Bags, 10/27/17, Department of Transportation
Information for Operators (InFO) 13010, Expanding Use of Passenger Portable Electronic Devices (PED), 10/31/13, U.S. Department of Transportation
Information for Operators (InFO) Supplement 13010, FAA Aid to Operators for the Expanded Use of Passenger PEDs, June 9, 2014, Department of Transportation